A bella and some coloring

>> Tuesday, December 30, 2008

I desperately need to clean up my craft room (not to mention the rest of my house!) but i've been promising this coloring tutorial for DAYS and this bella card i created for Christi's color challenge nearly 2 weeks ago! Sheesh! Time to get on the ball i suppose since i no longer have holidays, family or traveling for excuses! :)

First... my card...

Christi's color challenge was to use one of my favorite color combinations, turquoise, chocolate and white. These colors ALWAYS look great together, and i think it's hard to find anyone who disagrees so this is a great color combo to use when doing something for someone else as well! I used my fairly new content-to-be-a-bella from Stamping bella. Isnt she just so cute! I also used Jen's sketch for you to try from a couple of weeks back. and i opted to not include a sentiment so i can stamp whatever i need at the time on the inside.
Other deets
patterned paper - cloud 9
cardstock - hobby lobby
flower punches - fiskars
other accessories - cuddlebug folder tiny mosaic, bling from studio g
coloring medium - copic markers

And now onto my mini coloring tutorial! I've been asked by quite a few people "how i color". Well, i do like to play with a few different techniques depending on the end result i'm wanting, but here is my most common way of coloring.
1. I prefer copic markers. I just like the end result the best and they blend so well. If there is interest i'll do some coloring tutorials on how i color using water based markers and other mediums.

2. When using copics i generally always color in a rounded motion (either circles or something like figure 8's. This keeps the edges wet and helps aid in blending.

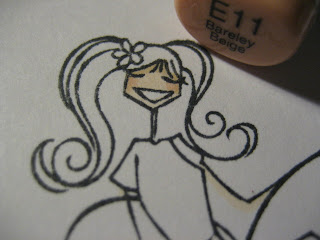
3. I dont know why, but i generally always start with the face. For people i color a quick layer all over with e00 (skin white).

4. Then i outline the face usually using e31. Most people i know use e11, but i find it too pink for my personal tastes. I like the fairly greyed out tone of it without being just grey. I concentrate the most of the outline where you would see the most shadow. For the face, this is just under the hair line.

5. Then, just the same as i'm an advocate of blush in real life... i gotta add some blush to my image! Which color marker i use is dependent on how much pink i want the cheeks. For bellas i often choose E11 because the space is small and too pink just stands out to much on her small face. Larger images, or baby/child images i often go with R20.

6. I'm not sure if i didnt take a picture of this step, or if it's actually the above picture, but i go over the entire face again with E00 or maybe E000 to blend everything together. Again, i use circular motions. on a larger face i still concentrate the most color towards the outside and almost leave the forehead with the just first layer of color.

6. Next i go to the hair. In this case i actually used y23. i often use y21 for blonde hair. they are extremely close in color. I take a darker color and go along the outer lines as well as any internal lines. I concentrate a little more color at the hair "part". With blonde hair i use either E31 for more ashy blonde hair or E33 for warmer blonde hair with my shading. if you want even more defintition, i take my colorless blender and lightly "erase" a little spot to show where the light hits. Then i go over everything again to blend with my original color.

7. Now i go one everything else, usually clothing next. However i follow the same method. Lay down 1 layer of the lightest color. Then follow the outer edges with a darker color. Then color over the whole thing again to blend. To show you the difference, i took a step by step approach to 3 of the flower petals Miss Bella is sitting on...
The first petal is colored just once over. The 2nd petal i colored over a bit with a darker color along the edges (in a circular motion. The quicker you add your shadow color, the better it will blend. This is because the ink is still much wetter. The 3rd petal is when i went all over the whole petal again to really blend everything together.

This is the flipside of the same image just so you can see how much color has been laid down. (the random space in the 3rd darkest flower is from her uncolored leg :) )

Ok, and here is the whole image colored in...

For her shirt i used a light color and i actually didnt have a very good shading color. they were all too dark. So i used a technique (that i used to do alot, but not as much anymore) called Tip-to-tip coloring. Just use the tip of the lightest color and swip it on the tip of the darker color and shade along your edges that way. it takes a little longer, but it's a great way to use your markers if you dont have a bunch yet. You can make almost any color blend together this way. This is why i used to use it all the time, i had fewer markers! Now that my marker collection has grown, i dont need to do the tip to tip as much. :)

Along the entire outer edge of the image i use a neutral gray (or sometimes a very very light blue like b000) to outline outside the lines. it really makes the image stand out.

And that is pretty much how i color. :)

Read more...

Makeup Monday

>> Monday, December 29, 2008

Well today was certainly a much longer day that i thought it would be! I woke up this morning to a phone call from a bride who wanted to meet me TODAY! I'm actually doing her wedding later this month but she lives about an 3.5 hours from here (she's from my city which is why she's getting married here) but was visiting family. So i got up, showered, and cleaned my house because it had been pent up for a week and i didnt exactly make it sparkly clean before i left it! After that was done baby gabe just did NOT want to be put down today. The rest of th day was just looooooong. So i never did get pictures taken but i still know the little trick i wanted to teach you for this week. Next week when holiday life is over i'll have a video tutorial.

I got my hair cut on saturday and overall i'm pretty pleased with it. I still desperately want to color it! Then i'll be much happier i'm sure. My hubby LOVES it so thats good. But the tricky thing with new hair cuts is that your hair still remembers how it used to lay, which makes styling a little difficult at home for a bit. Did you know you can train your hair? Because you can. Just the same as your hair seems to remember it's normal "part". Now i have bangs and i'd like for them to sidesweep but right now they want to part more towards the middle and fall in my face. The easiest way to train them is to 1, create the part you want with your new hair cut when your hair is wet and just out of the shower, and 2 pin it in the direction you want to go before you go to sleep. I'm doing a bit of a double whammy tonight in that i just took another shower (2 in 1 day, holy crap!) and i'll pin my bangs to the side i want before i hit the hay. If you pin you hair before bed a few nights in a row, it'll start to remember it on it's own. :)

*sigh* the baby is crying again, so off i go! I'll post my coloring tutorial tomorrow! :)

Read more...

home again!!!

>> Sunday, December 28, 2008

Phew! I'm home after a long 10.5 hour drive today! Let me just say my boys and dog are TROOPERS! It could have been a day of you know what but instead it was quit pleasant (other than the fact that it's a long drive from indiana to south carolina)

I have so much stuff to post to catch up on!!!! A coloring tutorial (which i'm entirely too tired to type out right now), some gifts i wasnt able to post before the holidays, some cards, a scrapbook layout and i'm sure much more. I have to go thru everything to see what hasnt been posted!

Tomorrow is makeup monday and i know 1 thing i want to talk about (which is actually in relation to hair not makeup, but thats ok). I'm too tired to take pictures now (plus i'm really not lookin' so hot) but hopefully i'll get to it in the morning so it's not too late of a post!

For right now, i'm going to post a scrapbook layout i put together quickly before i left for vacation. It was for the UNITY scrapbook design team call. I didnt make the team but i really wasnt expecting to. But a few of the ladies i was expecting to make it did! So go over to the unity blog and leave them some love!

Here's my simple layout...


I used a background of kraft cardstock. The set is beautiful life by unity. LOVE this set! After i stamped directly onto the kraft cardstock and matted the frames, there really wasnt room for much else! I did want to the the program from my wedding so i did put that on there. I also used a glitter pen to accent everything (it caught the light in the photo but just reflected it so it looks a little odd but it's pretty and sparkly in real life) and also some bling and flowers. I Love these pictures from my wedding. The lower picture is special to me because i was out on the dancefloor when someone snapped it and you might notice i'm holding my belly (i was pregnant at my wedding). It was just such a wonderful day all together. :) Now if only i could get the rest of my wedding scrapbook done! :)

Read more...

EtsyInspired Challenge #17

>> Saturday, December 27, 2008

Welcome back to another EtsyInspired saturday! This week's shop is Kiddlebug creations for kids and oh my word, i'm in love with the stuff from her shop! It's all so stinkin' cute! You just HAVE to check it out! BONUS - she is offering a onesie of choice to one lucky winner who enter's this challenge! What's to lose? You'll get a adorable card made (or other crafty item) and be entered for a chance to win! :)

I used this onesie (that i fell in love with the second i saw it.... i love whales!) Isnt it so sweet?! You can get it in a variety of sizes and it's a super soft wool patch that is bonded and side stitched onto a preshrunk tagless onesie. I'm already picturing Gabe in it. :)

And i created this card with my inspiration!

I used a whale image from a Stampin Up set that i dont even own, i just asked someone to stamp me out a plethera of the whales because i just love whales! I opted to NOT put a sentiment on the front of my card (*GASP*) which is actually something i've done quite a bit lately. Rather, i made a little inside scalloped oval with matte like the whale and put it inside so i can add the sentiment when i need to use the card (like "Get Whale Soon" or Birthday Fishes, etc. I like having the various options. :)

Now dont forget the rest of the fabulouso design team for this week's challenge!
Ashley Newell
Joy Stagg
Lee Murphy
Lindsay Spencer
Ryann Salamon
Tanis Giesbrecht
Tiffany Johnson

and if you make a card creation yourself, link it back to the Original EtsyInspired #17 post on Ashley's Blog (hearthugsdesigns.blogspot.com)

Read more...

the best of intentions...

>> Thursday, December 25, 2008

I had the best of intentions to post all kinds of things this week. I even had some stuff that i was going to post last week but i was so busy making the gifts that i didnt have enough time to blog!! So I thought, well at least i'll have some stuff to post even while i'm out of town. But that hasnt happened either! Woops! It's been a full full week thats for sure with lots of family time and stuff with the kiddos which is always nice.

Now it's christmas day and i'm enjoyed a little break since EVERYONE is on overload and has retreated to their own corners to either look at some goodies they got for christmas, or do a little baking, or feed the baby (thats me), or check their bank statements, etc. So that also means i have a little bit of time to hop on here and wish everyone a wonderful christmas! Dont forget what it's really all about today! here soon i think i'm going to have a slice of birthday cake (a tradition i started with my kids to keep the reminder of who's birthday it is).

Most of the photos i need to post are still trapped inside my camera. But i do that this little holiday treat that i actually made a week ago. And it was only for the mail lady so it isnt like i couldnt post it! But it's still a quick treat you can make for something if you arent seeing them until later today, tomorrow, or even over the weekend. Sorry the photo is not so good, i quickly took the picture while the mail lady was driving down the road on her way to my house!


First let me say i got this idea from Lauren Meader. I get a great amount of my gift ideas from her! Her blog is amazing. If you dont read it, i highly suggest it. Here's the link to how to make this template for this project...
Take any disposable coffee cup. Mine are from dixie and i bought a pack. You could also try to swipe an extra from a gas station i suppose. Or kindly ask when you get your next latte at starbucks. I just sort of free handed a pattern on the backside of some holiday patterned paper. It would have been better if i had 2 extra and could cut one apart to trace but this was fine. This is actually what Lauren does in her much better than mine tutorial. After adhering that i made a little slip over cover like they have at starbucks. I stamped the snowmen from the SU set Flakey Friends and colored them with copics.

Inside my cup i have 2 packets of cocoa mix and then 2 homemade "stirrers" I've heard these refered to these has many things. But they are just about the easiest things ever. Get popsicle sticks (i get mine from craft stores with all the wilton and other baking things), meltable chocolate (i love using the vanilla chips from the same section at the craft store), candy canes (or peppermints of any kind) and then when using the vanilla or white chocolate i like to get mini chocolate chips. Crush the peppermint candy and then lay the crushed pieces out on a plate and mix in the chocolate chips. Melt the vanilla chocolate in the microwave. Stick a large marshmallow on the end of the stick, dunk and roll in the crushed candy. and you're done! They are great to stir your cocoa or coffee, but pretty yummy to eat on their own as well.

Read more...

Give some extra love this holiday season to 2 precious little girls

>> Monday, December 22, 2008

You know i'm all about causes... rak's.... give aways and blog candy.

I love passing forward! I just learned of 2 fantastic reasons to give away your love and talent!!! Please read these 2 worthy families of your care this holiday season...

FROM CRAFTY ENGINEERING
A little baby girl named Francesca is fighting for her life! Andrea does a great job keeping everyone informed and i highly suggest you just go directly to her site to stay updated. You can send cards directly to Andrea and she will get them to the family. Not that you should need any arm twisting, but there is some seriously fantastic blog candy for someone as well.

From Lauren Meader's blog
5 year old Hannah has been diagnosed with a rare brain tumor. Her wish for christmas to to see how many christmas cards she can get!!! How easy is that! just send a card to
Hannah Garman

704 Orchard Rd

Lititz, PA 17543

Read more...

Card Holder Tutorial

This is an old tutorial from about a year and a half ago (GASP it may be 2 and a half years ago!) that i did for an online group i'm a moderator for. It was actually for a christmas in july crop!! A way to get some gifts done a little early! Still, i had a friend contact me today to ask if i had a cute way to package up some cards and envelopes. The first part of the tutorial is just for the holder. But the tutorial does go on to show how you can make 4 very basic cards of of very minimal paper utilizing every scrap.

WARNING! i tried to just copy and paste it from the other site and it was a major no go. So i'm editing and trying to scale everything so you can read it now. if this looks way too large to you... come back in about 15 minutes and everything will be right with the world. ok, so not the world, but everything should be right here!

"Greeting Card and Holder Class"

What you will need: (added note, this list is for the whole class which includes 5 cards. If you are just making the holder you will just need 1 12x12 sheet of cardstock and whatever else you'd like to embellish with!!!

1 sheet 12x12 cardstock (I chose a double sided patterened cardstock by American Crafts)
2 sheets 8.5 x 11 coordinating cardstock <
1 sheet white 8.5 x 11 cardstock <
12x12 Page Trimmer
Scoring Tool of choice (scoring blade, bone folder, etc)
Adhesive of Choice
Ribbons (about 30-35 inches)
Embellishments of choice (i used 8 mini brads, ink for edges and a couple of different stamps)
Photo Sharing and Video Hosting at Photobucket

1. Take your sheet of 12x12 cardstock and cut in half. Set 1 piece aside and then trim other piece to 9.5 inches long. Set scrap aside. NOTE: you will use just about every scrap you have in this project! :)

2. Looking at your sheet as 9.5 wide, make a score line at 4.5 inches. Make another score line at 5 inches.
Photo Sharing and Video Hosting at Photobucket

3. Take other 12x6 sheet of cardstock and cut in half so you have two 6x6 squares. Set 1 square aside.
Cut 1 6x6 square in half and then trim off a 1/2 inch off both strips so that you have 2 strips that are 5.5 x 3 inches. SAVE THE SCRAPS. Really, you'll use them. :)
Photo Sharing and Video Hosting at Photobucket

4. Now take 1 of you 5.5" x 3" rectangles and make a score line at 1/4" and 1/2" on both sides and bottom.
Photo Sharing and Video Hosting at Photobucket

5. Look at the corners of your scored rectangle and you'll see 4 little 1/4" sqaures. You'll need to cut away the 3 outer sqaures as well as a the score line on one side of the remaining square.
Photo Sharing and Video Hosting at Photobucket

6. Fold all your edges in to start forming your "pocket".
Photo Sharing and Video Hosting at Photobucket
Add adhesive to 1/4" square and other edge to hold pocket together.
Photo Sharing and Video Hosting at Photobucket

7. Repeat above steps to complete 2nd pocket and then adhere to inside of holder.
Photo Sharing and Video Hosting at Photobucket
Set aside your card holder, we will embellish it a little later.

8. Now to begin your cards! Take both of your sheets of 8.5 x 11 colored cardstock and cut in half so that you have four 8.5" x 5.5 " rectangles. Make a score line down the middle of each to make your cards.

9. Card #1
Using that first scrap you made from making your holder - you should have a 6" x 2.5" rectangle. Trim to 5.5" x 2.5". Embellish as desired and adhere down the center of card #1. I used a mini brad in each corner. Please note, when using brads and eyelets, it's important to fasten them to the top layer only and then adhere the layer to the card. You dont want the backside of your brads and eyelets shown in the inside of your card.
Photo Sharing and Video Hosting at Photobucket

10. Card # 2
From left over 6" x 6" scrap, trim off 2 3/4", then trim down to 2 3/4" x 4 1/4". Adhere to bottom half of card. Cut piece of ribbon to 4 1/4" long and adhere over seam. Use left over rectangle as an embellishment. I inked the edges and used a christmas stamp.
Photo Sharing and Video Hosting at Photobucket

11. Card # 3
Take your last left over scrap from the 6" x 6" square and trim off 1 1/2". Then cut into 1 1/2" squares. Take the other strip and cut into 1 3/4" squares. Create 3 deco squares to embellish the front of the card any way you'd like.
Photo Sharing and Video Hosting at Photobucket

12. Card # 4
Take your sheet of 8.5" x 11" cardstock and cut off a 3" strip. Then cut that strip into a 4 1/4" x 3" rectangle. Adhere across center of card. Now remember those thin strips you didnt believe you'd use when i told you to save them?? Pull them back out of the trash can since you threw them out anyway and adhere them along the sides of the white retangle. I also stamped on the white as well as stamped a sentiment on the top for further embellishment.
Photo Sharing and Video Hosting at Photobucket

13. Now to embellish the front of your card holder! take about 2 feet of ribbon and adhere around the center of holder. Leave extra ribbon to hang off the side so you an tie a closer for the holder. Take the extra scrap from the white strip and adhere to top half of the card. I stamped a sentiment and also doodled little stars with a pen. I also inked the edges before adhering.
Photo Sharing and Video Hosting at Photobucket

14. Insert your cards in one pocket and your envelopes in the other. Close and tie up your card holder!
Photo Sharing and Video Hosting at Photobucket

OPTIONAL - Take your left over chunk of white cardstock and cut into 5.5" x 8.5". Stamp the outside and adhere ribbon. Use what ever other embelishments you wish. This will be the card you include with your gift!
Photo Sharing and Video Hosting at Photobucket

Thanks for taking my class! Feel free to post any questions and i'll do my best to answer them!

Read more...

Makeup Monday Quickie

Super quick makeup monday post! We JUST arrived here in Indiana and it's so stinkin cold! I forgot how much my body and hair do not like this cold weather and my hair is suffering major static and sticking my face and everything else! Its drivign me nuts, though we did have fun shocking each other in the car during the drive. hehe.

So my quick makeup monday tip since i've been in the car basically for over 10 hours, and dont even have anything unpacked yet, this will have to do!

When you have the horrible static issues with your hair, here's an easy tip. Get some silicone serum (usually for making hair shiny - sprays are oK too, but i prefer the serum) and put a glob in your palm and rub hands together so it's evenly distributed then apply to the ENDS of your hair only. Applying a bunch of this all over will just make your hair look greasy. I avoid putting it anywhere near my scalp! Even though you see the static there, if the ends are weighed down, the static cant lift the hair. so thats my quickie tip. After the holidays are over i'll return to video tutorials and such!

Read more...

seriously quick gift idea

>> Saturday, December 20, 2008

If you are here to see my EtsyInspired post, its up, it's ust the post below this one!

Ok, if you're like me you're still trying to up your ends of christmas gifting! If you are stumped, or need a gift you can make QUICK, or need a gift you can make CHEAP, here's one for you. This took me less than 3 minutes to make AND just cost a few bucks. WOOHOO!


I got my mug at the dollar store. :) And it's a good mug, thick, sturdy. It doesnt feel chincy. Of course you could get a plain mug at walmart, target, etc and it would still probably be less than 4 bucks, or you could go fancier, but there really isnt a need. :) I got my 2oz bag of coffee at Target in the dollar spot, but i've seen similar types and bags at walmart for not much more than a buck. This one is a Irish Cream coffee. I dont know if my brother-in-law drinks irish cream coffee, but he's very very irish (just look at his last name!) and he loves anything irish so it was more fitting for the gift. So we're at 2 bucks for this gift now.

I was planning on stamping on the mug, but i just couldnt get the stazon and stamps to ink smoothly. I was frustrated and was thanking my lucky stars for how well StazOn cleaner works! Being super bummed out that i couldnt get this gift to work like i wanted, i thought, well, what else could i do. I guess just give the mug plain, but that didnt seem fun. Then i remembered my massive collection of rub ons. duh! You know, those things i used before i got into stamping! So i pulled out a pack of making memories alphabet rub ons. I already owned them so no cost for me, but i remember i bought these at big lots for 2 bucks. Ok, so the big lots sticker was still on it and thats how i remembered. Still, i've seen these at the craft stores for anywhere between 4.99-9.99. There are 261 alpha letters in this pack (the smaller letter packs have even more letters!) so i barely made a dent in this pack. I'm planning on going out to get more mugs today! hehe.

The rubon part is pretty easy. And i think anyone who is reading my blog has at least heard of rubons. I mean, you just place the rubon sheet where you want the rub on and rub over it with a popsicle stick. If you actually have no idea what i'm talking about, email me and i'll give you more info! Now i do recommend that you snip away each letter so you arent dealing with the whole sheet of rub obs. It's way too easy to goof and get part of a letter on some part of your project you werent meaning to!

Now, coffee cups get handled a lot. I went an extra step from this just looking cool to spraying it with an acrylic glossy sealer. If you dont have this in our craft arsenal, you should pick one up. A little can will do ya if you arent a major altering person. But there has been many times that i've just thought, you know, i want this glossy! Or, i need to protect this somehow, and it's always a great choice. I'm still recommending the mug be handwashed just in case, but the coating should protect the letters from getting distorted.

So there you have it, super super easy and fast!!!

Read more...

EtsyInspired Challenge #16

Happy Saturday to you! This will be one of a few posts today as i busily get ready to leave EARLY monday morning for my christmas vacation! I'll still have few posts while i'm gone, dont you worry! Ok, so you werent worried and likely wont even be reading blogs unless it's an escape from massive amounts of family! :)

This weeks EtsyInspired shop is Think Outside the Box and she has some fun and fabulous felt designs for you to take a peekie at. She's even doing a giveaway at the end of the week! You just have to use her shop for inspiration and then link your card back to the EtsyInspired post!

And here's my card...


I gotta admit, at first i was inspired by the doves, but i searched my stash and i didnt have a dove stamp. But in my search, i went over a paper salon christmas set i bought when The Scrapbook Company went out of business and i bought it for 75% off plus my 25% designer discount and i hadnt even opened it up! And i said well there were some cute trees i liked too! haha. So i went back again to her shop and those this tree was fun with it's non traditional colors of pink and green...


And i searched my scrap bin for pink and green paper but found this other scrap with more than just pink and green, but mostly various shades of pink and green. it still seemed festive without being traditional so i thought, PERFECT! I paper pieced my tree (it's actually pop dotted up too, but thats hard to see). My background i used the cuttlebug snowflake folder. The rest is pretty self explanatory!

Thanks for stopping by and now pop on over to the rest of the design team...

Ashley Newell
Joy Stagg
Lee Murphy
Lindsay Spencer
Ryann Salamon
Tanis Giesbrecht
Tiffany Johnson

Read more...

Hip Hop Hangover Friday Great Gift Idea!

>> Thursday, December 18, 2008

Ok, now i'm going to go ahead and post this because i'm pretty sure my sister doesnt read THIS blog, and only my other blog. man i hope i'm right! SISTER! If you are reading this - stop now! Do not keep reading or you'll see one of your christmas presents!!!!

(And so you know, i'm not hiding my sister's identity, we just call each other "sister". we always have. :) )

Anyhoo -

There was a challenge in the Hip Hop forum for Unity yesterday to not stress... but DISTRESS! I love distressing. :) Plus i already had some plans to make this gift for my sister, so it was perfect. Before i get into all the details... here is my finished gift... a recipe holder for her kitchen!


Now my sister loves to cook. But she has told me before how annoying it is with recipes when her hands are covered in goo and she's trying to hold up the recipe card to see what comes next. I've seen jumbo clothespins altered before and somewhere a bit back i read someone's idea of using it as a recipe holder. So thats what i went with, but you could easily just alter it to hold a photo like this picture....


This is just me turning the clip around but you could add some flowers or bling or buttons. Endless possibilities really!


Ok, here's how you start... get a jumbo clothes pin (they sell them at all the craft stores and they are really cheap.

Take it apart so it'll be easier to paint. It's super easy to put back together, dont worry.

I then painted mine a brown color. It doesnt really matter if your undercoat layer is dark or light, it just needs to contrast with your top coat. If you wanted to be really festive you could do a red undercoat with the green on top. Really again, its endless possibilities.

(sorry, no photo for this step) Paint crackle paint over the whole thing. You may need to do this in steps so that you arent laying a wet side down on the table. The crackle paint is clear and you can find it in the paint section of your craft store. Its also inexpesnive and gives such a cool look. I'm in LOVE with crackle! :)

Now you'll need to wait a bit before painting another layer. You dont want the crackle clear coat to dry completely though. The less time you wait, the bigger the "splits" will be. I usually wait about 20 minutes or so. Then paint on your constrasting color and the crackle will happen all on it's own!

i wanted to take the worn distress look on my clip 1 step further so i took an antiquing glaze (also in the paint section at craft stores, also cheap) and then took a sponge (i actually used a makeup sponge because thats what i have all over my house but any sponge will do. And then i just rubbed it around my edges. Antiquing glaze is really easy too because it's just a glaze. If you feel like you've got too much on, just wipe it off.

For my "marquee" i sketched it out on a piece of chipboard. This is important because if i had only used cardstock it could have easily gotten bent if it were to be knocked over. After cutting out the chipboard, i traced it over my cardstock so i'd have the same image and adhered it to the top. I chalk inked my edges in chestnut roan cat's eye chalk ink. I used my cricut to cut out the letters. After putting on my letters, i covered them with liquid glass (close to my heart) just to help them stand out.

Now here is when you can do whatever your heart desires for embellishing! Before adhering my letters to the block i created for them, i stamped Unity's distressed dots. If you dont have this background... you NEEEEEED it. Trust me. :) I also sponged my edges with antique linen distress ink and then chalked inked the very edges with dark moss cats eye chalk ink.

(No specific picture for this either) The whole front was sprayed with acrylic spray sealer in glossy. If this was just being used to hold a photo, i would have left it alone, but if my sister's kitchen is anything like my kitchen, it gets messy! I would hate for tomato sauce to get splattered on it and stain the paper. Now if anything gets on it, she can just wipe it clean!

Now dont just stop your hangover here! Go to this thread to see who else has posted some unity love today!

Read more...

Teacher Gifts

I was so pumped up to make teacher gifts for christmas! Afterall, this would be the first time for me to get to do that. But the mom's in jack's preschool class decided to all pitch in 10 bucks and get 2 giftcards. So i offered to make the gift card holders! hehe. I still get my crafting for them done. Of course as i was trying to cram it in there today since their christmas party is tomorrow i ask myself, and WHY did i have to make sure i crafted them something again? haha.

So since i was in a lack of mojo i went with a tutorial! Gotta love tutorials! This one is from splitcoast and you can find it here

And here is the front of my gift card holder...


I used PaperTrey Ink's Teacher's Apple set for all parts of this project. My paper is Real Red, Kraft, a green from Hobby Lobby and then the inside has So Saffron. You cant tell from this view, but i stamped the apple image twice and cut the second out to pop up on the card. The reason the word "teacher" looks grainy in this image is because it is heat embossed and shiny so it's catching the light.

The way this opens is a little tricky and goofy me actually stamped the background and then scored it so that the stamped background would be upside down! but rather than start over, i just let mine "open" from the other side, no biggie.

if you look carefully here you can see where i popped up the apple image since this is a side view. :)

The inside is also stamped like a pattern using various apples. You can actually see the stamped backgroudn design here! The so saffron is actually an envelope i had to make because i didnt have any coin envelopes. It was easy though as i had a tag envelope template from making memories that i had never even used!


I masked the apples to layer them here. Pretty easy peasy. Then you just slip the gift card into the envelope! I'll write a note to each teacher in the larger red space tomorrow before we give the gifts. :)

Thanks for stopping by today! Dont forget that today is Hip Hop Thursday! Come over the unity forum for some fun!

Read more...

finally something i can post!

>> Wednesday, December 17, 2008

It feels so strange to be crafting so much but posting so little! I've been busily trying to finish up some xmas gifts but being that the recipients read my blog... i cant post them! That plus the holiday madness has just kept me away. I hate it, but it's the way it goes. And this post has to be super fast because as i type, we should be heading out the door to a christmas party for Jack's playgroup. And here i sit in my pj's! Jack is nakie (he stripped his pj's but hasnt put anythng on yet). The only one who's ready is the baby!

Anyhoo - today it unity's addicts wednesday and it was quite nice to take a break from projects to create a quick card. I'm not even sure i like the card, but the break was nice. haha.

The challenge for today was from Amy (jazzyscrapper) and was to make a monochromatic card (any color we'd like to use). I for some odd reason chose yellow. I dont know why my brain went to yellow - it's so not a typical color for me!

Here's my card...


I used the angel from Unity's September kit of the month. She was a little smaller than i expected but perfect for a card. I inked her up in roch cocoa memento ink (i thought the black would be too harsh on my yellow card) and colored her with copic markers. I used a white pencil for my highlight. Interesting concept to use pencil over marker. Check out today's post from I Like Markers. I also did a lot of detail work with a stardust pen. Hard to see in the photo, but you can just a wee bit. I used the martha stewart zig zag border punch. some michael's acrylic dots and some random scrap of patterned paper. If you look super close, you'll see a snowflake stamped in the background too. It is also from the september kit of the month and i just stamped it in versamark ink so it's subtle, but there. My edges are all chalk inked with amber clay from colorbox.

ACK - and now i have to bolt out the door. Ok, i'll put clothes on us first. I have more fun news to share, but i dont have time right now. mean, i know! :)

OH - if you participate int he challenge don't forget to link up your cards in the Unity Addicts Challenge thread and use the keyword USC17!!!

Read more...

Makeup Monday

>> Monday, December 15, 2008

It's coming! I promise! I had plans to do it this morning, but i just found out of a prayer vigil for a friend of mine (she has been on a roller coaster with health issues this year and is going to be traveling soon to go to her parents in Ohio for some true healing time). And gasp - her prayer vigil is in 45 minutes, and it will take me a good 25 minutes to get there and i've got to get a 2.5 year old, a 3 month old and myself ready to get there. Needless to say, i cant possibly get makeup monday done beforehand, but i think this is a little more important.

SO - i'll leave you with this very important tip for just for now, but i'll get a good makeup tutorial going a little later today. It'll make up for last week!

AND my important tip is....

How often do you wash your face before you go to bed? Regardless of whether or not you have makeup on?

Did you know that every time you do not wash your face, it ages 17 days more than your freshly washed face would have?

Yep, it's true. Think of it this way... your skin has everyday dirt and grime (and maybe makeup mixed in) just sitting on top of it. And then you lay your head on your pillow to sleep. But as you move in the night, you are just rubbing that dirt and grime into your skin kind of like sandpaper to your delecate skin. Not good! I'm just as guilty about the lazy bedtime routine. If you are a lazy one too... why not get some of those rinse free skin wipes or makeup removers. So when you just cant bring yourself to wash your face, you can at least give it a wipe down. :)

Ok, off to pray! :)

Read more...

blog candy alerts

>> Saturday, December 13, 2008

you know i love blog candy! Here's a few for you! Also - i will be keeping a running log of current blog candy i know of in my sidebar. If you are a blog candy junkie like i am... check out my group on Paper Craft Planet! Blog Candy Eaters

Ok, here is some massive candy at Paper Monkey!

and then some at Corrosive Creations by Janet.

check by for more!

Read more...

EtsyInspired Challenge

Welcome back to another EtsyInspired Saturday! This is week number #15!! And ashley has picked a super etsy store for this week! Check out Purple Toes Jewelry and bonus she offering 3 different pairs of earrings to 3 lucky winners! Just think - a perfect christmas gift down! Or perhaps just a little gift for yourself!


I chose this adorable pair of earrings for my inspiration! Arent they super cute!!! I just love little monkey's anyway. But as i browsed her store the second my eyes says these little guys i just knew!!!! And as luck would have it, i needed to make a birthday card for one of Jack's friends, sooooooooooooooooooooooooo


Here's my card!

Isnt that little sock monkey cute!!! I love sock monkeys. This sock monkey is from a stampin up set. It even comes with extra add ons and what not. I only have some images of this cutie patootie so i colored in the hat and balloon and then cut them out to layer them on the first image. I used a cuddlebug folder (argyle) for my background, papertrey ink ribbon and arylic discs from Michael's for my embellishments.

Dont forget to check out the other EtsyInspired gals for their fantastic works!
Ashley Newell
Joy Stagg
Lee Murphy
Lindsay Spencer
Ryann Salamon
Tanis Giesbrecht
Tiffany Johnson

Read more...

Cause of the Month giveaway!

>> Friday, December 12, 2008

I cant believe i forgot to post this! I guess thats what happens with the holiday rush - my brain goes to mush! (and apparently all the christmas carols make me speak in rhyme!)

Anyhoo - as you may remember, My cause of the month last month was to send cards to Let There Be Mom. Let me tell you, she was tickled pink to receive all these cards and thought it was such a wonderful thing.

Angela of Unity Stamp Company was gracious enough to donate my free shipping offer to Unity! (by the way, today is also hip hop hangover from Unity so read down to my post below this to find my unity creations from Hip Hop!)

I entered all the names into a drawing for random.jack He had so fun picking out a name and wanted to play the game all day!


CONGRATS TO KATHY BARNY! You have won free shipping from unity!!!!

Thank you so much to everyone who participated and used your talents for charity!

Read more...
Related Posts with Thumbnails

Top Blog Sites

Blog Archive

Listen to makeupartistkaties playlist


Get a playlist! Standalone player Get Ringtones

  © Blogger template Webnolia by Ourblogtemplates.com 2009

Back to TOP