Showing posts with label digi paper. Show all posts

PMS Digi Makeover Challenge: Be My Valentine!

>> Monday, January 30, 2012


This week the challenge over at the PMS Digi Challenge is to create a valentine!

And I thought.... holy cow it's already almost time for valentine's day?!
Spring will be here before we know it! Time is going SO fast!

It often happens with me... that even though i love making cards, i forget to send them out.
Or a particular holiday creeps up on me and I don't have time to create the cards I would have liked. So then what do you do? Well, i send e-cards. And while their are oodles of them out there, just like traditional hallmark cards, anyone can send them. So at least it's a little more fun to create my own e-card and feel like i had a little more effort into it. :D

Here is my valentine's day e-card

I used photoshop and created my card in layers using the Sending You Love digi set.
The lip print in the set has recently been recreated so that it has a transparent background.
If you have previously purchased the sending you love set, you can re-download it to get the transparent background heart or just shoot me an email and I'll get the new addition over to you.

So you see my card and say... um, katie... it's still a white background. Why did you want it transparent? Well, it's very very very easy to change the color of an image in photoshop by choosing the color overlay. But with a flat image, the whole image changes color and you'll get a big red screen (or whatever color you were wanting to change it to). With the transparent background, just the image (lip print in this case) will change color. Yeeeeeeah!

Be sure to check out the PMS company blog to see what other goodies the challenge team has for you to see today!

Read more...

Digi Makeover Challenge 11 - create your own background with a digi image

>> Monday, November 14, 2011

Monday means it's time for another Digi Makeover Challenge!


This week our digi team leader has challenged us to create a background using digi stamps!
It sounds a little daunting if you are not a "digi pro". I for one do not count myself as a digi pro by any means, but I do know how to manipulate digis. I will explain how i've done my card here in a bit. But i must mention that the team has done and absolutely FANTASTIC job of showing different wants to use your digis as a background! I am THOROUGHLY impressed!!! Lots of good ideas that I want to try now! Be sure to check them out at papermakeupstamps.blogspot.com

And now here's my card...


In photoshop.... I will start with that it will be helpful to use the .png version of this set. If you are starting with a jpg version, then just use the magic eraser tool (looks like an eraser with a asterisk) and delete the background.
i took the heart from the center of the mitten and copied it. Then i created a new layer and pasted it right where it was. Then in the layer effects, i used the color overlay and selected a deep red color. Then on my other layer with the mitten, i did the same thing, but chose a blue color.
Select your mitten using the marquee (dotted rectangle)...Having those 2 layers highlighted, go to edit and copy merged. This will copy both layers together. Then paste and move around as you'd like your pattern to be.

I also took the same mitten image and enlarged it and then colored it in with copics.
For my sentiment, i printed that also and simply colored over it with the same copic markers so it would match. Super easy and no need to put yet another piece of paper in the printer when printing out your digis!

So there you have it! Thanks for stopping by and remember to check out the PMS company blog for more inspiration!

Read more...

My Time Made Easy Sneak Peek

>> Thursday, September 29, 2011


Soon, My Time Made Easy will have a brand new release for you!
This month there are 2 new templates being released this month, but i'm just showing you a sneakie peekie of one of them! And of the new digi set that will also be released on Oct 1st!

Here is my project using the Thats a Wrap template!

Don't be fooled by the colors... this doesnt HAVE to be for christmas (though it certainly could be if you are one of those get it done early types!)

I used digi paper from the Fruit Medley paper pack (remember back when there was the jame and jelly release! yum!)

Well thats where i went with this gift idea! Adding in some of my favorite jam recipes....
The box is perfect for handmade cards, photos, notecards, address cards, etc as well as all kinds of other things! I just wanted to note how perfect it is for size of these things!
This makes a wonderful gift that is very little out of pocket money!!!

Here's another shot of the template when closed...
I just love how it wraps up! So pretty!
And see the tag in this photo? Thats from the new Well Rounded digi stamp set that is also being released on Oct 1st. Trust me, it will have your gift giving craftiness raring to go!

Now be sure to also visit 3 of my favorite ladies today for some more inspiration! Lauren, Tangii and Lisa!

Have a wonderful day!

Read more...

My Time Made Easy Blog Hop: Back to School

>> Monday, August 1, 2011

Today is the official release from My Time Made Easy!!!!
You can check out all the new goods in the store right now just by clicking HERE.

Today the MTME design team has a bit of a blog hop for you as we always do on the 1st of the month! And in our traditional fashion, we are giving you a card crazy hop full of LOTS of cards!
And we are all using the new digi set, Back to School!

Now... i decided to go a bit out of my comfort zone for my cards for you, and i'm actually kinda pleased with the results!

I have often told people... my card design skills are ehhhhh, not so super fab. I have a hard time coming up with the über fabulous layouts and creative new ways to do things on a card. Where my comfort is... is in coloring. I'm not the worlds best color'er... but i'm confident in the skills i have. So this time... i decided to EEEEEEEEK, not use my copic markers! I even had everything printed out and then i thought... ya know what... i'm going to try to see how fab i can make these stamps using all computer skills! I also tried to take bits and pieces and layer them to create images since thats one of the glorious things about digi stamps!

SO first... here's a peek at what this stamp set, Back to School, looks like...
So you can see the super cute little boy image i used yesterday (i just singled out the boy instead of using all 3 kiddos). Then there are quite a few sentiments both short and long as well as LOTS of other images, some of which are perfect to layer!!!

Onto the cards...

Here's the first using some of my paper scraps from my project yesterday. All the paper used on my cards today is from the Academic Hodge Podge paper pack available here.
First I took the backpack image from the set and then layered the star over it. I use photoshop, so i used the paintbucket to then color the star from black to yellow and also to color in the other pieces of the backpack. THEN... and this is important for successul cool looking color skills... i went to layer effects and chose inner shadow. And wam bam thank you maam, i had some shading! THe overall effect will be more apparent on my next card! You'll notice I also used the You Rock sentiment and colored in the outlined spaces in the same blue from the back pack. :D

Next...

See, the effect of "inner shadow" is more apparent on the yellow. This one again is a layer of stamp images. I took the notebook and enlarged it. Then i took the apple and layered on top as well as the sentiment for my teacher. After filling in all the colors and selecting inner shadow on each layer, i did go to my apple layer and select the normal paintbrush tool but selected the one with the more fuzzy edges. Using white and my opacity at about 55%, i added a little highlight to the apple.

Here's another multi layered image card. I took the ruler (enlarged it) and then using the transform tool (control t) i skewed it so that it would lay on an angle. I then took the pencil image and layered it a bit on top and then added the super fab sentiment that i love (obviously since I also used it on my project yesterday!) The images were color the same way that the ones previously were, even if they are a little smaller. Hint... take the size down in the inner shadow... you should see a toggle that allows you to change the "size" of the shadow. :D

Last but not least...
Ok, this one was NOT colored using photoshop. It was simply printed and then i did use the copic airbrush after I cut it out with the nestie. Fading in color ths way is very easy with photoshop, but not with the nestie border around it. So this one was done the "old fashioned" way. :D I do love that sentiment though!

Ok... now off you go to check out the other design teams amazing creations to get you ready to send those kids back to school (right, because you arent secretly ready for the return to schedules and a little bit of extra quiet right?)

Here they are!

Check out the team for all the previews, and amazing ideas!

  • Lauren Meader
  • Debbie Marcinkiewicz
  • Kathryn Berthiaume
  • Katie Cotton (that's me)
  • Lisa Kind
  • Monique Hansen
  • Tangii Crain


  • Have a wonderful day!!!!

    Read more...

    MTME: Carry Clutch for shopping!

    >> Friday, July 1, 2011


    I have another fun little project from My Time Made Easy to share with you today!
    For this project, I was dying to use the other new template for the month, the Carry Clutch.
    It just creates such an adorable designer handbag out of paper!
    I thought it would be the perfect holder for a gift card. So often when i give someone a giftcard it's because i want THEM to pick out something that will really be beneficial, or fit in with their home, etc. But just going out and buying a giftcard to stick it in a card can seem, well, a little last minute.... not that i EVER do ANYTHING last minute mind you! ;)

    Well, last minute or not, this template makes it super easy for you to pack up your gift card and make it perfect for it's recipient!


    I also used some of the new pretty printables paper! Let me tell you how excited i was at how PERFECTLY it matched my Pier One Gift card! :D But the paper is just divine! My favorite pack is the Blooming with Elegance pack. The main paper on my project is from that pack. I also used a sheet from the Crawling Vines pack and not shown is the Dainty Damask pack which I can definitely see using in my future! I love the color combo!

    Also used on my project is an oldie but goodie stamp set! To match the fabulous purse and shopping theme, I pulled out the Money Well Spent acrylic set (it is also available in digi format). :D I stamped the shopping cart image in a light teal on the cardstock in order to get the idea across and then the sentiment right over the top in a deep brown. :D


    Now just because i only put a slim gift card inside does NOT mean that very few items will fit inside this purse! In fact, I'm going to have to stuff the inside just so the gift card doesnt seem so lonely! Take a peek inside...

    Thats a good deep space in there! That button alone is the size of a quarter. :D


    Now... i'm not the only team member with a project to share today!
    Check out these fabulous ladies and see what they came up with!


    Have a wonderful day!!!!

    Read more...

    My Time Made Easy Group Share: Keep It Organized

    >> Friday, April 1, 2011

    And I'm back with another project from My Time Made Easy!

    Right now the My Time Made Easy release is LIVE on the site and ready for purchase!!!
    You can check it all out HERE.

    Today the MTME design team is showing off an EXTREMELY versatile template called Keep It Organized. Here's a peek of what my immediate thought was when I found out one of the templates this month would be called keep it organized!!!!

    Ok, so the above picture may seem random... but i keep EVERYTHING! It drives my husband nuts. I'm pretty sure it drove my mom nuts growing up. I just find sentimental value to silly things. And I keep them all! In little boxes here and there. And i'm going to guess since many of the readers of my blog are scrapbookers... there are at least a few of you out there that do the same thing!

    In the picture above is a ticket to a band my husband and I saw one. Not even an important date, just kept the ticket anyway. The hotel key from our first getaway to Vegas. A picture of my hubby on the film set that we first "met" or at least got to know each other. A penny with an angel cut out of it that someone gave to me. The inserts to the bracelets i wore in the hospital when i had my boys. A fun ring i've just always liked and a medal i won i think in highschool. hahahaha. RANDOM! :D But oh so special. And how about that sentiment timeless treasures?! Perfect huh? It's from the Sign It stamp set. ;)

    Well this new and fabulous template is perfect for storing all kinds of goodies in all different sizes. here's a view of the whole template, still packed with mementos. :D

    You actually can't even see more of the stuff in there. All taken out of a random big box... this is such a prettier way to keep things! And i nicer way to see them and go thru them if you'd wish. :D The far back pocket is perfect to store 4x6 pictures as you can see and I have quite a few of in them in there. The middle pocket is where i did have my ticket stub, hotel key, along with a note someone had written me once that meant alot, some other ticket stubs and the like and also some foreign money left over from a trip.
    And then the bottom drawer is filled with the things that are best tucked away and smaller. You can also see i drapped a necklace over the top. Jewelry fits perfectly in the bottle drawer, but if it's something special like this one (my friend Rachel made it, check out here other jewelry HERE), or if it's something you wear often so you want easier access, this drapping action is the perfect way to go!

    But perhaps you'd like to see what the template looks like without so much "stuff" in it. :D
    Well alright then!

    The paper I used is from the new Fresh Cut Expressions Collection 1 pretty paper pack which is a digital paper pack. You buy and then just print the sheets you need as you need them! it's genius really!!!

    I also used the Occasional Labels stamp set as well as the Occasional Label cut file.

    Now be sure to check out the entire design team as everyone has a fantastic project to share with you today using this set! You are bound to see so many different ways to use it that it will boggle your mind!!! Have fun checking them all out!!!


    Read more...

    My Time Made Easy with some Pumpkin Pie!

    >> Wednesday, November 3, 2010

    It is no secret i have a mild obession with anything pumpkin. Pie... lattes.... candles.... soup..... the color... really, i love pumpkin! When I saw the Any Way You Slice it template... i knew there was just 1 thing i wanted to make... a slice of pumpkin pie!!!!


    This adorable triangle box can be made into all SORTS of things. The fun thing is thinking up new ways to dress it up! (a tree, santa hat, candy corn, pie slice, cake slice, reindeer, carrot, etc etc!)


    So how what did i do? First i created the template itself. I'm also mildly obsessed with my airbrush. It's just so comfy and happy in my hand. haha. I went over all the edges quickly with the YR14 copic marker... just enough to tinge the edges. I used some natural twill ribbon and ran a strip of scortape on the underside and then pleated it to create my crust. I airbrushed that a bit too so it would look cooked. I also used the twill ribbon to create other crust like features on the box. To create my whipped cream, i took some white tulle and wound it around, adhered it together on the bottom side with a large piece of scor tape. Lost my scor tape!
    Thats pretty much it for the box! Super cute box that takes very little to doll up! Which is nice when gift giving is quick and often around the holidays! You can see in the above photo where the box folds into itself at the point. The whole side wall then just swings out! I probably should have taken a picture of that! Well, click HERE and you will see more detail shots of how it opens, as well as purchase it if you desire. ;)

    Onto my card...
    You know you love that great big pumpkin! Ok, so i know that I love that great big pumpkin!
    hahahahah! Well, that my friends, is the gloriousness that is digi stamps! Last month there was a stamp set released called Spooky Surprise. It was also released as a digi! Instant download... less cost... less storage space. I do like to actually stamp now and then, but I am also a big fan of digi stamps for the reasons i already mentioned. This here is the pumpkin in the stamp set... which the stamp itself is barely over and inch by inch. Super great size for decorating your templates, tags, etc. But i wanted the pumpkin to be my main focus, so i enlarged that baby and had a LOT of fun coloring him in! Here i used copic markers, YR21, YR12, YR15, YR18.

    OH i havent mentioned the paper i used yet! It's one of the new released of Pretty Printables Paper! The paper collection is called Fall Foliage. I love it!!!! If you like the patterns, well check out all the paper packs, great paper patterns in different color combos, all coordinated with the other paper patterns in the same color combos giving you the ability to mix and match your papers on your projects with ease!

    Now be sure to check out Lauren, Tangii, Catherine, and Debbie's blogs as they have also used this super adorable template today!!!

    Read more...

    Just Expressing my Thanks with the MTME release!

    >> Thursday, September 30, 2010

    Tomorrow the new release from My Time Made Easy will be live on the site! And I cant even begin to say how excited I am about it! This month Lauren has brought you LOADS of coffee themed stamps and templates! It does stop there, there is a few spooky sets and an addition to last months Shop Around template! Holy cow... it's a big release and the team has been hard at work to bring you samples but they are oh so worth it because this release just ROCKS!
    8 stamp sets... 4 digi sets, 5 templates and 3 cut files... oh yeah... it's big!

    Ok... so what i have to show you today??

    The Grab a Cup template along with a few stamp sets on my card and some of the fabulous new pretty printables paper!


    Grab a Cup Template $5

    Available in PDF, SVG, DXF, GSD, and WPC

    Completed Project Size:

    3 3/4 Inches Wide

    3 1/2 Inches Deep

    3 1/4 Inches Tall

    Sometime you just want to grab a cup!

    If you like coffee, tea, chai, latte, cocoa or even a cup o' soup you, will fall in love with this 3 dimensional version of the "coffee/tea cup".

    It is simply adorable and perfectly sized for a variety of options.

    You can fill it with a variety of gifts, or use it as the perfect party favor!

    If you love anything that has to do with hot beverages you will definitely want to view our Grab a Cup ©, Grab a Cup Sentiments ©, Fancy a Cuppa ©, Fancy a Cuppa Add On © , and the A Spot of Tea © stamp sets!


    Is this cup not just the cutest thing you've ever seen?! I just LOVE it! You may remember long ago i turned the Bouncing Baby Buggy into a coffee cup. I'm just a smidgen obsessed with coffee! So just imagine my GLEE when Lauren created this super adorable cup which by the way, definitely makes a better coffee cup than i made before! hahaha!

    I printed the Cafe Text paper from the All Steamed Up pretty printables paper pack and GASP printed the pdf file onto it. Yep... i did NOT use my cricut for this one. Sometimes it's just fun to go a little old school. hahaha. The base was printed on coordinating cardstock.

    To the right you can see a better view of the handle and the inside of my mug. I SHOULD have printed a color on the other side of the paper but I didnt think about that at the start, only when i put it together and thought... oh... it's just white in there. Well thats boring. hahaha. So i pulled out my trusty copic airbrush and quickly blasted the inside a nice coffee color. Much better. :D

    Now onto my card... i printed more papers from the All Steamed Up pretty printables paper pack. And then got to work with some of the SUPER fabulous new stamps!

    Most notably the HUGE coffee cup! This is from the Fancy a Cuppa stamp set. I love that you can stamp in a pattern for the cup!! And there are different options for girly flowers to more masculine checkered. I went with solid because I already had a lot going on with my card! There is also a cup outline ( i used that too) but it makes it perfect for paper piecing.

    My steam above the cup is actually from the Grab a Cup stamp set. It may fit the stamps of coffee cups better in that set than my GIGONDOR coffee cup on my card, but by adding 3 steams, i think it works great!!!

    Next up is my sentiment...

    Just Expressing my Thanks is from the Grab a Cup sentiment set. OMG - this set is a MUST have for coffee stamp collectors! You will use it with EVERYTHING coffee related not just the MTME stamps. You will LOVE IT, i'm telling you!!! :D

    I added in the coffee cup from the Fancy a Cuppa set (the same set i got the big mug from).

    So thats my card for you today! Be sure to check out Lauren Meader's, Catherine Doucette's, Stephanie Kraft's, Tammy Hershberger's and Pam Imholz's blogs as well as our guests for the month, Debbie Marcinkiewicz and Ashley Canon Newell! I still pinch myself for being surrounded by such talent!!!!!

    Oh! One last SHAMELESS PLUG - my BLOG CANDY is set to send tomorrow! Dont forget to enter HERE.


    Read more...

    My Time Made Easy - Party Time Toy Gift Shop

    >> Thursday, September 2, 2010


    Welcome back to another day of My Time Made Easy! This is my 3rd version of the recent release, Shop Around Mega Template. I love how easy it is to change up this template into different themes. The stamps this month are fabulous for this as well giving you endless Shoppe Ideas!

    From the moment i laid my eyes on the stamps being released this month, one in particular caught my eye. A plane in the clouds! Now if you are a follower of my blog at all, you should know there are 2 images i adore... clouds and stars! So this plane flying amongst the clouds was a definite must use for me! And since my youngest will... be... sniff sniff... holding back the tears... turning 2 in 2 weeks... i knew i wanted to create a boy party/toy shoppe theme. It's just on my mind, ya know?!

    Here is the shoppe i came up with!
    I used every single stamp set being released on this project! Haha! Dont worry, i'll break them down for you! But they truly are so interchangeable with each other! I love that because I feel like I get more for my money this way!

    Let's start with the shoppe itself... I printed paper from the Custom Construction materials
    pretty printables paper. If you came by my blog yesterday, you saw that super fun stone paper from the Construction Materials... well the Custom Construction materials falls in the Color Me Pretty category. You can color it in after printing OR you can just print on the colored cardstock of your choice! Which is what i did. You'll notice also that my print is blue. If you use photoshop, click on the fx button and then select color overlay. The go to color is red, but click on the red box, and you can change it to any color you'd like. I chose a blue slightly darker than the cardstock.
    Now let's break down the stamps. In the photo to the right, you see the same door i've used on each project. This is from the Home Improvement stamp set. There IS a door cut file as well, but I just love stamping this door for some reason! You could also use the cut file, and stamp on top!
    The window and also the woodgrain stamped onto the steps also from the Home Improvement set.


    The word "Welcome" stamped directly onto the steps (stamp BEFORE assembling, i learned that one the hard way!) comes from the Sign It stamp set.

    Also from this set is the SIGN (well, duh!) and the Party Time words and the cute little present stamped in the circle of the sign.

    The ribbon wrapped around the entire roof of the house is a flannel ribbon that was previously side stitched that i picked up at Michael's for $1!

    Now comes the display window! The window image is from Shoppe Window. I hope you can tell how LARGE this stamp is! The awning was so much fun to color and there is a nice large space left inside the window for you to stamp all sorts of things in! This is definitely a stamp I can see myself using over and over again!

    And now... finally... the close up view of that cloud and airplane image! This image is from the On Display stamp set. This is a stamp set that you can use on a large variety of projects as well and is PERFECT for cardmakers as well as adding themes to your shoppe.

    Now you may note the black lines in there. The stamp image has been stamped in blue. I drew the lines in there because i wanted the appearance like the airplane and clouds were hanging from the ceiling inside the toy shoppe, and not that they were a sign (though it would still be a cute sign!)

    Copic Colors used on the awning are R59, R27, R24; E25 and "E23" colored on kraft Neenah paper.


    One last Shoppe detail before i move onto the card I made to match the templae and that would be the roof. The roof was also printed from the Custom Construction materials Color Me Pretty paper pack into Kraft paper and then the edges were sponged with Brushed Corduroy distress ink.

    And now... my card!


    I love the way the card turned out, even if it is a little more CAS than i usually do.

    I added the words Flyin' By which is also from the On Display stamp set. Though the card is very simple, there were a few keys things i wanted to make sure that the 2 (card and template) were tied together. The first was the color scheme. Even though i didnt have that brown cardstock in the template, i do have some deep rick brown tones (like in the felt ribbon) so this was a nice way to not have it SO matchy matchy, while the same time it totally matches! The cardstock pattern is just a scrap! Which of course makes you feel so much better when you are printing away and using up all that printer ink ;). I stitched the wall pattern cardstock onto the card to make it match the template. Last but not least, i knew i wanted some red accents since I used them in the shop and felt like these red buttons did just the trick!

    So that is my project for you today! Dont forget to stop by lauren's blog today because she has a special project to share with you as well!

    Read more...

    My Time Made Easy Group Card Share!

    >> Tuesday, June 1, 2010

    This is my first post of 3 today! Check back later today for a post for Quixotic Paper Birthday Blog Hop and for the Copic Creations Challenge Blog!

    It's the first of the month! That means all the new products are LIVE for My Time Made Easy!
    Every 1st of the month, the MTME design team shows off cards! You've seen some templates the days before and after, so on the 1st, we all go in together to show off some super fun things you can make for cards with MTME products.

    Well, i decided to go DIGI for this month! Did you know that Lauren offers many many of the MTME acrylic stamp sets also in a digi format?! Some people think of digi stamps as just the lineart images, etc. Well, I wanted to show you why digi stamps can be so cool! Especially in the case of these images, when changing the sizes can make a big difference and make the set extremely versatile!

    Now don't get me wrong, i love actual stamps! And the stamps Lauren has are perfect for their intended uses... BUT since the images are smaller for use of tags and labels on templates and given the fact that i'm a teensy obsessed with coloring, sometimes i like to take a digi image and make it MUCH bigger! And these digi sets are perfect for this!

    I used the Well Preserved Digi set for all 3 of my cards to show you today!
    (you may remember my post from the other day using the stamp version of this set!)

    First, the "boobewy" (as my 20 month old says!) card!

    This card is a 5.25 x 5.25 card! So those blueberries are a pretty darn good size! Since these digi stamps are of a high resolution, making them larger (i just used photoshop) was a breeze!
    And then coloring them.... oh now that was fun!
    I used Copic Markers (now aren't you shocked!) B32, B34, B37, B39.

    I also enlarged the sentiment from the same digi set and i used some of the fabulous paper from the Preserve It © Blueberries and Grapes Pretty Impressions Printables paper collection.

    For my second card, i used the cherries from the Well Preserved Digi set.

    Again, super fun to color! Now if i had just enlarged and printed, my leaves would have been black. This would have looked just fine, but i decided that since i was using some paper from the Preserve It © Cherries and Peaches paper collection and that paper have colored leaves, that I would match my leaves accordingly. Again, super easy. I used photoshop, selected the color i wanted and then used the paint bucket to "fill" the leaves, but any paint program would work the same. For my cherries i used copics again, R24, R27, R29, R59.

    The sentiment is a modified sentiment fromt he digi set. Again, digis are so easy to do what you need to! If i was stamping, i would have had to mask out the word berry and then fill in with the word cherry (which is a single stamp, so it wouldnt have been too tricky) but for this, i just erased the word berry, and then dragged the word Cherry in it's place!

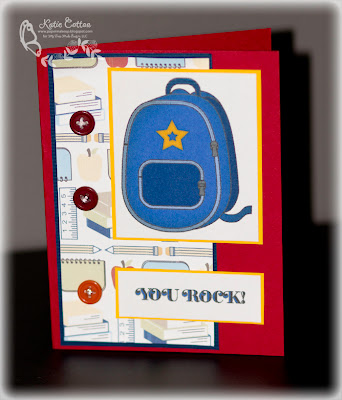
    Ok, one last card for you!


    Again, i enlarged the apple image, but then i decided that i also loved that inside the apple part. If i was stamping, i would have just stamped it inside and it would have been super easy. But this time, i just enlarged it as well and dragged it in to the center of the apple. Also super easy!
    Again, i colored in the leaf of the apple, but i wouldnt have to. I tried it both ways, and they both looked fine. :D

    I colored the image with copics, and still used the same reds as the cherry but since i was using papers that were deeper reds (papers are from the Preserve It © Apples and Pears collection) I used R59 much more predominately than on the cherries and worked my way in just barely used R24, where on the cherries, R24 was my main color. :D The inside of the apple was colored with E43, E42 and E40.

    The sentiment use is also an enlarged sentiment from the Well Preserved Digi set.

    Now can you imagine how much fun you could have enlarging all those fruits! If you love to color like i do, thats a lot of fun coloring space! OR, you could enlarge them, but print them over patterned paper like a paper piecing! Or use some of the fabuloous coordinating digi papers available this month. You could make nice large fruit labels for your jars! You could really theme a teapot for a friend who also decorates her kitchen with apples. You could even make your own digi paper! Digi stamps can be oh so much fun!

    Ok, so enough about digi stamps. You want to see some more fun stuff you can do with the June Release from MTME? Check out THESE fabulous ladies!

    Photobucket

    Lauren Meader

    Catherine Doucette

    Dawn Easton

    Geny Cassidy

    Katie Cotton - that's me

    Lesa Rapp

    Pam Imholz

    Stephanie Kraft

    Tracey Cuccia

    Mona Pendleton

    Silke Ledlow


    Stamps: Well Preserved Digi set from My Time Made Easy

    Papers: Pretty Impressions Printable Paper from My Time Made Easy


    Tools and Accessories: Spellbinders, Distress Ink (antique linen, aged mahagony), rhinestones from Darice, ribbon from Dots & Dashes and Stampin' Up, Copic Markers, White Gelly Roll pen

    Read more...

    My Time Made Easy Sneak Peeks day 1

    >> Saturday, May 29, 2010

    Ok, so i know i havent posted in a week! So sorry about that!
    I will be leaving town in just 1 more day! YEAH FOR VACAY!
    However, it's the absolute worst time for me to be on vacation! During sneak peeks and reviews for both MTME and PMS! YIPES! So i've been hard at work getting ahead, so i'll still have lots of yummy goodies to show you for the next week and a half!

    Today, it starts!

    Sneak peeks for My Time Made Easy and OMG, am i in love with this release!!!!!!
    It's awesome and has just come at the perfect time!

    Check out these gifties i made for Jack's preschool teachers...


    I used the Pretty Packaging template called Jam Packed. Adorable name, no?
    And what else to fill these little cuties? JAM! haha! Not that i didnt give that away on the front! Are you ready for some pictures?


    I will spare you close ups of each and every box as I'm sure you get the idea! Since each box has a different jam inside, i decorated the outside of the box differently for each one (just using the coordinating colors for the jam inside).

    My paper is from the Pretty Printables paper collection called Vintage Plaid and there is just about every wonderful color combo you can think of! I was very easily able to make special colored boxes to match the jam flavors and i STILL had to make choices!

    I also used the Well Preserved stamp set that, i'm telling you, if you like to give gifts and custom homemade treats, you HAVE to have this set! have to have to have to!
    here's a close up of that oh so cute jam jar...

    There are actually 2 jars available in this set. I chose the more rounded jar. I stamped it again over a scrap of the Vintage Plaid paper and paper pieced it onto my jar (using distress ink on the edges to really make it matchy matchy). Then i used the word jam (a separate stamp) across the front. The jar was colored with copic markers to match the jam that would be inside. OH, and my plaid top! Thats another stamp! So you can cordinate your top, or you can stamp the plain on and paper piece, or color it in, or... :D

    Ok, more pictures!


    Here they are opened. I love the little cut out (perfectly made for you in the template)
    so that it snugly fits your jars and gives a nice display. Still, you could easily cut that part out and have an adorable box for just about anything really!


    Last one, i promise! :D

    Here are the jars sans boxes. You notice how i wrapped the same vintage plaid paper around the jars? Well, besides making them very coordinated to the boxes, and very cute, i'm hiding the fact that i dont have a clue in the world how to make jam! Those are just smuckers jams that i covered up! BWAHAHAHAHAHAH!

    Ok, the toppers! Also part of the Well Preserved set! I stamped my fruit image (there is pretty much every fruit you can think of) and then stamped the correct flavor on top. Again, they are all there! Well, just about! There wasnt a Black Raspberry, but there was a Raspberry and a Blackberry! So i just inked up the "black" part of blackberry and stamped it with the raspberry and i was good to go!

    So fun huh?! I know i'll use this trip over and over. Ok, maybe i'll even learn how to make my own! I d have a strawberry and blueberry plant afterall! :D

    Now there is more goodness to see! Check out
    and

    And have a wonderful day!!!!


    Read more...
    Related Posts with Thumbnails

    Listen to makeupartistkaties playlist


    Get a playlist! Standalone player Get Ringtones

      © Blogger template Webnolia by Ourblogtemplates.com 2009

    Back to TOP