>> Sunday, June 22, 2008


A good friend of mine is due any day with her second little girl! I'm so excited for her and plan to fully spoil her rotten now that i know i'm having 2 boys! Or at least i can do crafty pink girly things for her. This card i made so i can be prepared for the day she says she's here! Since my in-laws will be in town (my mil loves crafting so i'm sure i'll be very busy going to every craft store we have - she has none where she lives in canada) and my birthday is THURSDAY! i'm afraid i wont get the time to make a good card for her, so i planned ahead! WOOHOO for planning ahead!!

So here she is... Baby Buttercup by stamping bella. She is colored with Copic Markers (i even colored her ahead of time while we were CAMPING last weekend). I finally broke out my nestabilities dies and cut out little baby buttercup. Her edges are inked and then i raised her with pop dots. I always like the look of alot of dimension on cards but then next do much about it so my goal this time was to have lots of "levels" :)
I also used my fabulous Swiss Dots cuddlebug folder and finally broke out my new Martha Stewart butterfly punch. Oh how i love this punch! It's whimsical and elegant at the same time and it punched thru my cardstock like buttah! To make this punch pop out, i folded up the wings and added some cinnamon stickles to the center to make the butterfly's body. I also embossed the cardstock with the swiss dots before punching.

Sentiment is from Essential Sentiments by My Favorite Things. I used the word window punch to punch it out. FYI - every stamp in the essential sentiments stamp set works perfectly with the word window punch by Stampin Up.

Any other questions... please feel free to comment or email!

Thanks for looking!!!!!

Read more...

Cards for Kristi

These are cards I made for a fellow Bella-Sistah and Splitcoast Stampers Gal. On splitcoast her screenname is kristi_shortie. Her husband has recently been diagnosed with terminal cancer and has been given 2 months. While she has been receiving lots of support, that's a lot of thank you's to keep up with. I'm trying to make lots of thank (afterall she should be spending all the time she can with the man she loves, not making thank you cards!) to send her way. If you would like to join me on this mission, please email me at makeupbykatie@yahoo.com and i can forward her address to you. Or you can always send the cards my way and i'll mail them all off to her.

Thanks so much everyone!

And here's the first set of cards....


The cherry blossom stamp is by Rubber Stampede while the sentiment is from Friendship Blessings by Close to My Heart. The cherry blossom was colored using the watercolor technique of markers and a waterbrush. I just love the ease of this technique!

Read more...

>> Friday, June 20, 2008


Ok - so my hubby is out of town on a fishing trip with the boys. And then of course i felt awful last night (pregnancy wise). Go figure right? I felt queasy with a bad headache. So i decided to make coffee at 9:30 at night. Probably not the best of ideas. The jackster fell asleep on top of me on the couch around 10:30 so i just moved him into my bedroom. I curled up and was ready to go to sleep myself but i couldnt get this Nichole Heady card outta my head. Then i started thinking about stamps i could use the "wall background" with that i owned since i havent yet gotten my "out on a limb" set from PTI. Then my brain just wouldnt stop. "oh i could use one of my 'fluffie' (as jack calls them) stamps", "ooo, i could add fun flock to make them fuzzy (another thing i've seen done to flowers on cards and just not yet tried)", "ooo i could use chalks and versamark". My brain just kept going anf going and i know anytime i obsess with something like that before bed then i'll dream about it all night long and it wakes me up and it's just a pain. So i drag myself out of bed and made these 2 cards (because i couldnt decide what color cardstock to use. I think i hyped myself up on them a little too much because now i just think there is something else that needs done. I may try to make them again since i've had sleep and am not loopy on coffee. :)

But in any case - here are my late night creations...

Read more...

>> Thursday, June 19, 2008


Here's a card i made with My Favorite Things stamp - She's Having a Baby.

Her dress is paper pieced with Bo Bunny Cardstock and i also used DCWV textured cardstock. And she's colored with LePlume Markers. :)

Thanks for looking!

Read more...

>> Tuesday, June 10, 2008


I'm loving image swaps lately! One stampers sends you some images of one of her stamps and you send her images of one of yours. It's a fab way to up your stamp collection all for the cost of a postage stamp and not the real rubber stamp! :)

This image is from a retired SU set that i've been eyeing for awhile. It's called Sweet Treats. But now i have some images of the ice cream cone from Lori Lynn Washburn to satisfy my taste buds for awhile.

For this one, i used my derwent watercolor pencils and aqua painter. I also used my new threading water punch by Fiskars (sent to me by my wonderful friend, Kim Stewart). the sentiment is from a Studio G set.

Enjoy!

Read more...

Oh Billy!

>> Monday, June 9, 2008

Ok, i think only my dearest friend in the world Andrea would understand by subject title. Or get why i laughed hysterically as i typed it. :)


Today i have a card i created for a swap in a local group. It's another stamp from the Billy set by pink cat studio. My object for the swap was to create a birthday card for boys. I used Real Red, So Saffron, and Blue Brocade (all SU) for the paper and copics for the coloring. The star stamps is a wheel by SU.
I also used my cuddle bug with the spots and dots folder to add a little texture. :)

Read more...

Chalking and Versamark

>> Sunday, June 8, 2008

A neat way to color is using chalk with versamark (or other embossing) ink. It's super super easy and give a soft look.
Here's what you'll need to start...
Photobucket
* Stamp of choice
* versamark (or other embossing ink, though i recommend one that is "sticky" like versamark)
* chalks of choice

here's a video tutorial of the process (ignore all the noise in the background - i'm hosting a crop at my house and there are lots of ladies cropping away as well as a crying baby and my child getting in the way!)


http://s235.photobucket.com/albums/ee296/makeupbykatie/classes/?action=view¤t=MVI_4298.flv


(sorry its only a link - my video wouldnt upload to blogger!)

Read more...

Chalking Diecuts

>> Saturday, June 7, 2008

First of all i wanted to say.... This weekend is the Spring into Summer crop over at SwapsNMore! Dont know what swapsnmore is? I havent been doing my job. It's a swap site of women who love to swap! And we scrapbook and card make and chat a lot too. I'll be teaching some tutorials this weekend for the crop. If you are interested in joining the group, go to
http://groups.msn.com/swapsNmore/general.msnw and click join. You will be approved shortly and then can start cropping to your hearts content!

Ok - on with the show....

Do you ever like the idea of using a diecut on your scrapbook page or swap piece but then think it just looks too... BLAH! I agree. I'm not very big on the 1 dimensional aspects of plain ol' diecuts. I do however, think they can be FABULOUS with just a little bit help. I like to chalk to shade the diecuts. It's kind of like doing makeup to me! :) All you need is a basic set of chalks and a little know how of highlights and shadows and you can chalk away!!!! I'm going to show an example of a dinosaur (that i actually used in the dinosaur swap on swaps n more a bit back)

Photobucket 
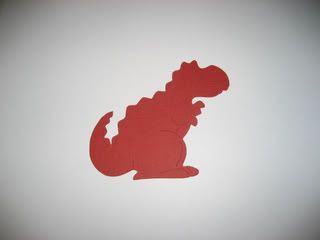
First i started with a plain ol' diecut. This little cutie i cut with the Paper Dolls cart from my cricut. Pay attention to those lines that were cut in the dinosaur. They'll help you with shading later!

Photobucket 
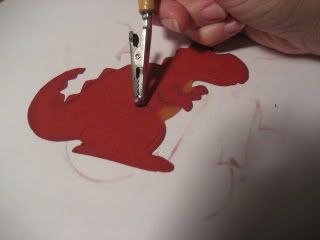
Next i chalked his belly. Now i could have cut the dino out in another color, cut his belly and glued it on top like a paper piecing. That would have worked just fine and in some diecut cases, i do a paper piecing effect. This time, i kept to all chalks so you could see everything you could do with easy. I just took a different color chalk (in this case yellow) and chalked up his belly to make it appear a different color. Easy Peasy.

Photobucket 
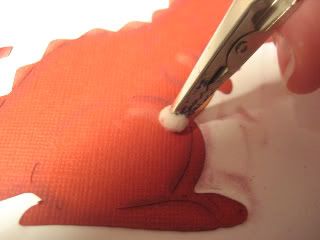
Next i did all of my shading. This is what really makes the diecut look 3D. Follow those lines that were in the diecut. But also shade the areas "where the sun don't shine" like under his tail, feet, chin, etc.

Photobucket Photobucket
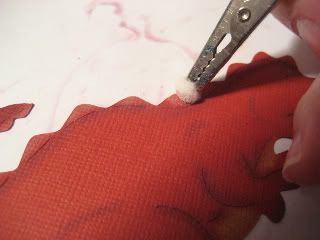
Now it's time to add your highlight. You can use white (i did in this case) or a much lighter version of what the color of the diecut is. Normally, the white is my first choice. To highlight, you will use the white on the tops of where the sun hits. This may not just be the top of the head! I chalked the dino's scales down his back, and head, but also the tops of his thighs, arm, etc.

Photobucket 
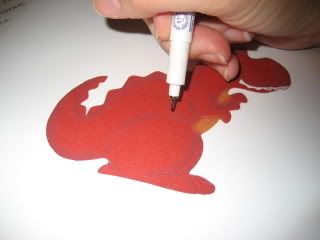
Next add in the little details. I take a (normally black or maybe brown) pen and go over those "cut lines" from the diecut to make sure they are going to stand out. Most of the pen work won't really show up in the lines, but it will be just the little extra oompf you need. This might not be needed at all on a diecut on a lighter paper color to begin with, but for my red dino - it was needed. I also blackened in his eye so it could be seen better, etc.

Photobucket Another detail for me was the dino's teeth. Chalked them white didnt make them look any different than the other highlights on the dinos skin and most dinosaurs i know of dont have red teeth. Ok, so i dont know many dinos... but i still didnt want him to have red teeth. So i took a white gel pen (this one was actually a white souffle pen by gelly roll) and colored them in. Gel pens work great for coloring in on darker cardstock!

And drum roll please... here is my finished diecut!

Photobucket

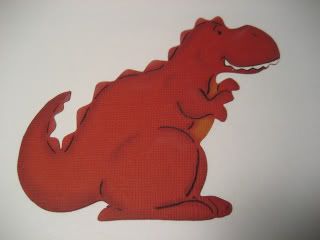
Hope you enjoyed this tutorial. Its a great way to make some elements for your scrapbook pages and cards. Diecuts are cheap, chalk lasts you eons and they really stand out on a page or card!

Thanks! Feel free to leave comments or ask questions but if you do make sure to leave your email so i can respond back!

Read more...

More of Sew Simple cards

>> Sunday, June 1, 2008

As promised... here are some more cards for the Sew Simple class i'll be teaching this week...


As promised... here are some more cards for the Sew Simple class i'll be teaching this week...

The first only uses minimal stitching. For this you just poke a couple of holes and connect them with thread. Pretty self explanatory. But it's a great way to add a little depth to your card and bridge the gaps between layers. Sentiment is from Stampabilities. Paper is Bo Bunny.

The 2nd is a sweet thinking of you card. I machine stitched around the border a few times to give a layered look. You can free style lots of shapes onto your cards using this technnique. Then i just layered some flowers on top.

The 3rd uses the fab DCWV glitter nursery paper. Love it! Not only did i stitch around the border, but more fun is stitched over ribbons to attach them to the card. It's simple, easy, but looks pretty good. The elephant on top is a 3d sitcker by Jolee's. The sentiment is handwritten. I also used Bling Bazzill to accompany the glitter paper.

Read more...
Related Posts with Thumbnails

Listen to makeupartistkaties playlist


Get a playlist! Standalone player Get Ringtones

  © Blogger template Webnolia by Ourblogtemplates.com 2009

Back to TOP