Oh where oh where has my....

>> Sunday, November 28, 2010


phone gone?! And the time? It seems like a week flew by in a matter of days!

I hope everyone had a wonderful thanskgiving holiday (for my friends here in the US).
We had our bought of fall colds, mine is in full force today. yippie.

I had my anniversary with my hubby (5 years!) this past week as well! We saw harry potter. Hahaha! And by the time we bought our tickets, popcorn and drinks and paid the sitter, it cost 60 bucks to see a movie. Ah well... it was fun!

Now i'm finally going to share a card i've had ready for, oh, 2 weeks now! I'm really out of the blogging habit with all the busy schedules that have been going on!

Here is my card...

For this card i used my favorite color combo (bet you never would have guess it! haha!)
Grey and Pink!

The stamped image is Moody for Coffee from Paper Makeup Stamps. She is one of my all time favorite moody girls! Scroll down to the post just before this one, and I showed a video tutorial on how i color the moody girls. It's in color, but I do use the Moody for Coffee image and show both the color and black and white final version. :D


This card was made for my Copic Coloring Class at Scrapnesia. We worked on a few different black and white images and then also made this card. I'm VERY excited, but I think my new camera is going to allow me to link up to a monitor while teaching so everyone can closely see what i'm doing! VERY excited about that! SO for those who are local - be looking for word on my next coloring class!

The paper used is in this card is from from Kaisercraft and is called Blush. Also perfect for me, right?!

Ok, thats all i have for today! Once i find my camera, i'll get some more things posted as a lot of my pictures i take with my camera phone!!!!

have a wonderful weekend!


Read more...

Holy cow! And a coloring video tutorial!

>> Monday, November 22, 2010

Has it really been a week since i've posted on here?! Where does the time go?
I've been plenty crafty... but i guess a busy schedule and a sick kiddo, i just forgot to post anything on here! WOOPS!

Well, to make up for my lack in posting, i'm going to share a coloring video.
This video was send out to all the Paper Makeup Stamps newsletter subscribers on November 20th. We're doing some fun new things with the newsletter. On the 20th of the month, we'll be sending out a fun filled newsletter that might have a tutorial, or project for you to try, or even a freebie digi. It will change from month to month, but you gotta sign up to get it.
But this time, I'm sharing!

Here it is...


Edited to add, i'm not sure why the video isnt coming up for everyone. Try this direct link if it doesnt show up above...
http://www.youtube.com/watch?v=IQSQuBIjTKc

THis is probably my most asked question... how do you color the moody girl faces. So... this video takes you thru 2 moody girls!

Check it out!

And have a good day!

Read more...

Copic Creations Challenge with Tickled Pink Stamps

>> Monday, November 15, 2010


It's the 15th which means another fun and fabby challenge coming to you from Copic Creations!
Since our next challenge (they are the 1st and 15th of every month) falls on a holiday... we'll be taking that one off and are giving you a WHOLE MONTH to complete this challenge. You have NO EXCUSES! You must play! ;)

For our challenge - we are asking that you paper piece! Yep, that doesnt sound very copic challenge-ish does it? Well, there is a often forgetten thing when people paper piece. In order for the over all image to have that depth you need to shade your paper piecing! So thats the challenge!

Here's my card...
Before i get into card details... i need to tell you about our sponsor for the challenge!
Her name is Kellie Winnell and she's the owner of Tickled Pink Stamps in Australia.
This gal is too fun! She first opened her online shop down under because stamps like magnolia's, etc were hard to come by. Then she thought... well i want to start my own company too and the Lil Lolita stamp line was born! She sells her stamps both digi and in rubber so there is something for everyone! AND... RIGHT NOW... Tickled Pink Stamps is have a PRE-Christmas SALE! With 10% - 35% OFF some selected stamps, a discount of paper pads, charms and well EVERYTHING in store! So be sure to get that something you have always wanted before it's all GONE....
You really have to check them out!

The image i used is from the christmas cllection that was JUST released. You can view them all HERE.

First I printed the digi out onto xpress it cardstock, and then printed the digi again on 2 different patterned papers (it's just as easy to run patterned paper thru your printer as it is the cardstock! THen i cut out my pieces and paper pieces away. I will note, it is easiest to me if you color the rest of your image you arent paperpiecing before you add the paper on top other wise you kind hit the walls of the paper and that colorless blender just doesnt work as well to get the ink back where it's supposed to on top of the patterned paper.

Once you are at this step, you shade your paper pieced imaged much like you would shade a regular image. You can use a color if you have one that matches the paper... i chose greys instead to create more shadows (N2, N4 and N6 to be exact)

When i was done with my image, i added liquid applique to her hat and dress for that extra santa effect.

Now go check out the copic creations blog to see more samples and then go buy some goodies from Kellie!

Have a wonderful day!!!!

Read more...

It's a Baby Shower Blog Hop!

>> Friday, November 12, 2010

My very good friend, Ginger, is adopting a baby boy! She is heading out of town tomorrow. I am so silly excited for her I cant even stand it! I have known friends who adopted before, but have never been so close to someone who has adopted. Oh the roller coasters of emotions!
She has remained so strong thru it all! I'm so proud of her and she is going to be a terrific mommy!!! But if you could, just say a little prayer that everything goes as smoothly as possible!!!!

Ginger is a member of the Paper Makeup Stamps design team. The team decided to do a little send off blog hop of happy warm chunky baby wishes! We hope she is surprised!!!
So if you are doing the hop with us (and I hope you are) you should have hopped here from Randee. If you are just coming to my blog, why dont you start back at the beginning! :D

Here is my card...


Today is ALSO the makeup 4 the weekend challenge, and Stephanie challenged us with this sketch....

Now... my plan was to totally use this sketch, and i think i got so excited that i forgot about it because my card only looks about half way like the sketch. WOOPS. At least i still like my card, right?!

The stamp is a single wordart available here from Paper Makeup Stamps. The patterned paper is from American Crafts.

Ok, now it's time to hop to the sweetest gal since Hawaiian bread, Michelle Van Patten!

Read more...

You know you've grown up...

>> Wednesday, November 10, 2010


The above sentiment reads "You know you've grown up when what you want for Christmas can't be found in a store". This is one of the newest releases from Paper Makeup Stamps. When i came across this sentiment one day, i just knew i had to have it in stamp form. Lucky thing about owning your own stamp company, you can make that happen. haha.

Also being released as a single is the Celest Fairy. You may remember her from the Celestial Possibilities card kit. Well now you can get her as a single image as well. I think she works great for holiday cards but is also good for cards all year around. The funny thing is i still colored here in aquas like the card kit. But i added grey this time, and colored her hair orange... doesnt that count for something?

For my background paper, i created it just using photoshop and layering the phrase Peace for the World. Because afterall... thats the one thing i think is the most important. One day, i hope we {the world} gets there!

There are more samples of the latest release over on the PMS company blog today!
Check them out!

Read more...

Paper Makeup Stamps Blog Hop!

>> Sunday, November 7, 2010


It's the 7th which means it is time for another PMS blog hop!
In our blog hop we are showing off all the new Holiday stamps from PMS! You should have hopped here from Christi's blog... but if you didnt,
you'll want to start at the beginning though to get all the details for the happenings of the day, plus enter yourself to win 1 of 3 gift certificates. Not to mention, you dont want to miss all the eye candy that the other Paper Makeup Artists have in store for you!

The image for my card today is definitely one of my favorites of the release.

This is Moody for Holly. I adored coloring her! In fact, she was the first stamp i inked up from this release! I was just aching to color in those pigtails!

I colored the image using Copic Markers (bet ya didnt see that coming).
Her hair is my absolutely favorite blonde color combo; Y21, YR23, E99
Skin is E00, E21, R20 and her eyes are B12, B16
Shirt and berries are R59, R27, R24 and holly leaves are G21, G24, G28

The sentiment is this month's freebie sentiment with any order while supplies last.
I cut it out using the Nestabilities Fancy Tags by Spellbinders and airbrushed inside the nestie.
Paper used is basic Grey, Wassail.

Now i bet you want your letter! This letter helps to give you the phrase to get 15% off the new release! My letter for you is... E!!!! Since i'm the last stop, you may have figured it out, but i'm so glad you stopped by anyway!!!

I hope to see you tonight at our Release Party!!!! 9pm EST! Be there or be square!!!!!

Read more...

PMS peeks, Christmas Cheer!

>> Saturday, November 6, 2010

It's another day of sneak peeks from Paper Makeup Stamps!
Today we are showing off a new illustrated christmas set called Christmas Cheer.

This set is SUPER fun! At least i think it is! There are 5 images, all large enough to work with on a scrapbook layout, but still small enough to use on cards. These ornaments are my favorite!!!


I kept my card simply ( i had a date night tonight with my hubby! woot woot! but less time to work on a card!) The great thing about this image is that since the word joy is in the ornament, i felt like it could go sentiment-less.

I colored the image using copic markers (R22, R24, R27, R29, R59; YG63, YG67, YG11, YG91, E42, E41). The paper is from the i believe collection from My Minds Eye.
I used Labels 9 from spellbinders to cut out the image and then used my copic airbrush and w1 marker. A white gel pen completed the look for me.

Be sure to check out the PMS company blog for more images from this fantabulous set and enter yourself to win it!

Have a great day!

Read more...

My Time Made Easy group post

>> Friday, November 5, 2010

Holy cow, i'm sorry this post is going up about 30 minutes late! I have had the worst luck today! I wont go into the details cause, well, why would you care! haha!

EDITED: Phew, the camera finally charged up so i have some proper pictures to share!!!


(ahhhh... thats better)

For my project, I knew i have dont a lot with christmas lately and it's barely november! Since i'm a Last Minute Lucy (nooooo, meeeee?) it seems odd to me to already be working on christmas things! So i decided to take what is more of a christmas themed release and do something FALL with it!

Here I've created a Fall Fairy home. I used the new leaf cut files minus their veins because i was cutting the leaves pretty tiny. I airbrushed the leaves to give them a little more dimension.
They were glued haphazardly on the roof because, of course a woodland fairy would adorn her roof top with leaves, right?


And what about that fairy... Well thats the fairy from the tooth fairy stamp set! See, she has lots of uses!!!!

I also used the door and window stamp from the Sugar and Spice stamp set. That sweet door doesnt have to be used for a Gingerbread House only!

I pulled out a previously released from the much loved Home Improvement set to create the rocky pattern on the house walls.

For my card, i used some of the left over leaves, the fairy stamp image again and then the Believe word sentiment from the Secret Santa stamp set.


Be sure to check out the rest of the team as everyone has something remarkable to share today!!!!


My Time Made Easy Design Team:
http://laurenm.blogs.splitcoaststampers.com/" target="_blank">Lauren Meader (owner)
http://kristinscrafts.blogspot.com/" target="_blank">Kristin Bueter
http://thedancingpear.blogspot.com/" target="_blank">Catherine Doucette
http://papermakeup.blogspot.com/" target="_blank">Katie Shawger Cotton
http://tmcuccia.blogspot.com/" target="_blank">Tracey Cuccia
http://stamphappy-tammy.blogspot.com/" target="_blank">Tammy Hershberger
http://kindcreations.blogspot.com/" target="_blank">Lisa Kind
http://www.debssimpletreasures.blogspot.com/" target="_blank">Debbie Marcinkiewicz
http://fortheloveofpaper-moniques.blogspot.com/" target="_blank">Monique Hansen

and remember, throughout the fall and onto the holidays...


Read more...

November Fairy Sneak Peeks for Paper Makeup Stamps

>> Thursday, November 4, 2010


The sneak peeks have begun for Paper Makeup Stamps! Yesterday the newest wordart was sneaked, today it's new fairies! This month I decided to visit a favorite childhood christmas memory! The Nutcracker!!! Not as many crafting friends know this, but i was a hard core dancer at one time (ok, in my YOUNGER years!) but i continued to dance Ballet thru college.
I have been in The Nutcracker Ballet 9 times! I never reached the prize role of the Sugar Plum Fairy, but I did dance the part of Claire (among many many other roles thru my years of dancing).
So for me, the holidays and the nutcracker go hand in hand!
When i asked Diem to create some nutcracker themed fairies, she was very excited. We had a lot of fun chatting back and forth about the images. Be sure to check out the company blog for sneak peeks of all the fairies!

Here is my card using the Sugar Plum Fairy and one of the new holiday wordarts!
I used yesterdays sketch challenge (SC305) for my card layout and the papers are from My Minds Eye. The collection is from their Lost & Found line and is called Market Street: adore. It's a little hard to see in the photos, but the text paper is written in french! I have no idea what it says, but i thought it was awfully appropriate for a ballet image!

Here is a closeup of the Sugar Plum Fairy...
She was color with copic markers... R81, R83, R85, R89, E53, E51, E21, E00, E25 and a lot of spica pen which unfortunately i didnt get a good picture of.
I played around a bit with the shading around the image. I'm not sure i've quite got the hang of the "dots" but it's fun to play! Even though this isnt an overly christmas card, it is still the Sugar Plum Fairy. I plan on sending this card to my ballet instructor all those years! She trained me from the time i was 6 til i was 22! She deserves a card!


DOn't forget there are ways to win free rubber this week over on the PMS company blog, so check it out!!!! And please join us in our release party this coming sunday from 9-11 pm EST in our forum!!!

Read more...

My Time Made Easy with some Pumpkin Pie!

>> Wednesday, November 3, 2010

It is no secret i have a mild obession with anything pumpkin. Pie... lattes.... candles.... soup..... the color... really, i love pumpkin! When I saw the Any Way You Slice it template... i knew there was just 1 thing i wanted to make... a slice of pumpkin pie!!!!


This adorable triangle box can be made into all SORTS of things. The fun thing is thinking up new ways to dress it up! (a tree, santa hat, candy corn, pie slice, cake slice, reindeer, carrot, etc etc!)


So how what did i do? First i created the template itself. I'm also mildly obsessed with my airbrush. It's just so comfy and happy in my hand. haha. I went over all the edges quickly with the YR14 copic marker... just enough to tinge the edges. I used some natural twill ribbon and ran a strip of scortape on the underside and then pleated it to create my crust. I airbrushed that a bit too so it would look cooked. I also used the twill ribbon to create other crust like features on the box. To create my whipped cream, i took some white tulle and wound it around, adhered it together on the bottom side with a large piece of scor tape. Lost my scor tape!
Thats pretty much it for the box! Super cute box that takes very little to doll up! Which is nice when gift giving is quick and often around the holidays! You can see in the above photo where the box folds into itself at the point. The whole side wall then just swings out! I probably should have taken a picture of that! Well, click HERE and you will see more detail shots of how it opens, as well as purchase it if you desire. ;)

Onto my card...
You know you love that great big pumpkin! Ok, so i know that I love that great big pumpkin!
hahahahah! Well, that my friends, is the gloriousness that is digi stamps! Last month there was a stamp set released called Spooky Surprise. It was also released as a digi! Instant download... less cost... less storage space. I do like to actually stamp now and then, but I am also a big fan of digi stamps for the reasons i already mentioned. This here is the pumpkin in the stamp set... which the stamp itself is barely over and inch by inch. Super great size for decorating your templates, tags, etc. But i wanted the pumpkin to be my main focus, so i enlarged that baby and had a LOT of fun coloring him in! Here i used copic markers, YR21, YR12, YR15, YR18.

OH i havent mentioned the paper i used yet! It's one of the new released of Pretty Printables Paper! The paper collection is called Fall Foliage. I love it!!!! If you like the patterns, well check out all the paper packs, great paper patterns in different color combos, all coordinated with the other paper patterns in the same color combos giving you the ability to mix and match your papers on your projects with ease!

Now be sure to check out Lauren, Tangii, Catherine, and Debbie's blogs as they have also used this super adorable template today!!!

Read more...

Crisp and Clear Fall is HERE!

>> Tuesday, November 2, 2010

It's finally starting to feel like fall around here! The leaves are turning a bit and the weather is cooling off. I love fall... the colors... the smells, the foods and the holidays! Yep! I love fall!

My project to show to you today is actually the final product of an altering canvas class i'm teaching at Scrapnesia, a local scrapbooking store near me. The cost of the class is $30 but will include EVERYTHING you need to create this canvas (including the canvas!) The only thing you need to supply is the photo!


To create this canvas we will be starting an 8x8 bare canvas. Using the cricut machine, we will cut some stencils and masks AND I will show you how to create your own stamp using the cricut. Then we will get to work airbrushing the canvas using the Copic Airbrush system.
We will create our own background paper using the stamp we cut from the cricut. Last but not least, i will show everyone how to create custom colored rhinestones for your project.

If you are interested in taking this class on November 11th, from 7-9, please call Evelyn at Scrapnesia to reserve your spot!
864 288 7771

Have a wonderful day!!!!

Read more...

Chrismtas Cards Made Easy

>> Monday, November 1, 2010

Note: I have 2 posts scheduled for today. If you are looking for my Copic Creations post, please scroll down.

It's November 1st which means 1, the My Time Made Easy release is live and ready for purchase online! You can see all the fabulous new products HERE.
And 2, it's time for a MTME design team group post! Today we are all showing you chrismtas cards that you can made quickly and easily!

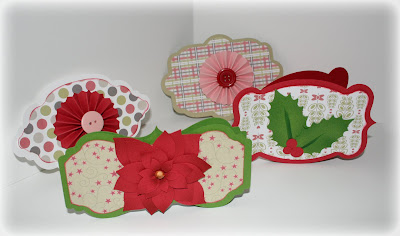
I opted to utilize many of the new cut files that are being released today and created 4 chrismtas cards with NO STAMPING! GAAAASP.... i know. hehe. I will likely stamp the inside when i've determined what I will use each card for. But as they are now, they can go on gifts, or be mailed out as christmas cards!

Here is my set...

To create my cards, i used 4 different Trendy Tags. There are actually 6 being released!
These tags are so fun! I love the design of them, and at $1.50 each, they are SUPER affordable!
Each tag set comes with 3 cut files. These enables you to have a 2 layers inside the tag that fit perfectly without having to mess with resizing. On each of my cards i have used 1 of the layers, but not the additional inside layer (sometimes it's a perfectly sized oval, other times a rectangle, etc). The 3rd layer is perfect if you are stamping inside, adding a to from, or any other message. I omited this step because i wanted to play with just SOME of the other new fun cut files! Here are the details for each card...

This one is my favorite out of the bunch! I used Trendy Tag 1, along with paper from the Taylor's Teeth Candied Thislestalk paper pack (which i also used another paper from this collection on my star box the other day.
Then I cut the Perfect Poinestia. I LOVE how this layers together! And it was SO easy! I loaded it inso SCAL, click cut and was done! I did want to add some dimension to the petals so i used my copic airbrush to quickly get the center and outside corners. It took maybe an additional 20 seconds!

Next up.... I used Trendy Tag 2. I love this tag too. I should have mentioned before... i found the best place to score on each tag which was usually at the "in" point of a scallop or bubble. You can see it clearly in this photo. I scored both sides and then adhered the smaller portion top and bottom together to create an edge to the card.
My paper on this card comes from the new paper collection being released called Timeless Tradition. Yep, i love it. All of these papers can be used christmas after christmas!
For the Holly, i used the Holly Day Accents! Again, i airbrushed the edges and flicked my copic marker up the center to create a vein.
Onto card number 3. For this one i used Trendy Tag 4.
Again I used paper from the Timeless Tradion paper pack, but this time i decided to pull from the more faint pink in the paper pattern and create a pink rosette using the Rosey Posey Rosette cut file! Oh my word... i've always been impressed when others do this... i had no idea it was so easy! I think i'll do this more often!!!!
I added a button on top just because i did want my card to stay quick and easy, but a bow would have been nice as well. Or any other embellishment, a cut stamp image maybe?

Last but not least! Card 4! For this one i used trendy tag number 3.
Again I used paper from the Timeless Tradition paper pack and this time for my center rosette, i used the cut that had the more zigzag edge rather than the scalloped edge (they both come with the same cut file purchase). Now i will say before you think you can just cut your own... these are the perfect length to create this rosette! I am in love with how easy it is with this cut file. I just cant get over it! haha!

Ok, now that this post is about a half a mile long... let me escort you on your way to the other fabulous design team members....


My Time Made Easy Design Team:


Have a wonderful day!!!!

Read more...

Copic Creations

My head is still reeling from this weekend! I have 3 weddings to do hair and makeup for, not to mention halloween festivities for the kiddos (i'll get pictures of that up soon) but it is release time for many companies i design for (um... including PMS in just a few days... so stay tuned for that too!) For my My Time Made Easy post for today, just scroll down. :D

For newbies to my blog... every 2 weeks Copic Creations has a new challenge! This 2 week's turn is being sponsored by Make it Crafty! Make it Crafty has so many adorable fun and whimsy digi stamps as well as a slew of other cardmaking tools and supplies! For this go around... the Copic Creations design team all used one of her adorable digi stamp images! Our focus was to create a scene, something that her images are perfect for! We also decided to incorporate a lot of brown tones into the images since we get asked alot for browns and they work great with these outdoorsy woodland themed stamps!


Here is my card...
I used the following colors on my card....
E30, E31, E55, E57, E49, B000, B12, B14, B16, B18, G21, G24, G28, N2, N4, N6

The way i have found best when trying to fade out a color (like the sky) is i start next to the lines of the image with my darkest color first and just trace all the way around it (B18). Then i go to my next color (B16), "scrubbing" over the line as i like to say and expanding the color a bit. Then i go to the next lightest color (in this case B14). Following th esame pattern of scrubbing on the line of white and previous color, but follow the color both into the image and expanding it a bit as well. Then onto the next color. You just keep getting lighter and lighter. The final step is to scrub the outer most line with the colorless blender.

ANd thats it! Now be sure to check out the Copic Creations blog to check out the rest of the design teams work and also to see what awesome prizes are available this week!

Read more...
Related Posts with Thumbnails

Top Blog Sites

Blog Archive

Listen to makeupartistkaties playlist


Get a playlist! Standalone player Get Ringtones

  © Blogger template Webnolia by Ourblogtemplates.com 2009

Back to TOP