Showing posts with label MyTime. Show all posts

My Time Made Easy: Spreading Spring Cheer

>> Friday, March 2, 2012


WHEW! Sorry my post is a bit late going up.... my internet was down all afternoon yesterday, BLEH! and I finally gave up at about 12:30. I just couldn't keep my eyes open! Luckily for me, i awoke to that lovely blue light on my router! WOOHOO!

Well, if you didn't already know... the March release for My Time Made Easy is live and available for purchase on the website. Today some of the design team members are showing off more projects using the new templates, papers and digi stamps.

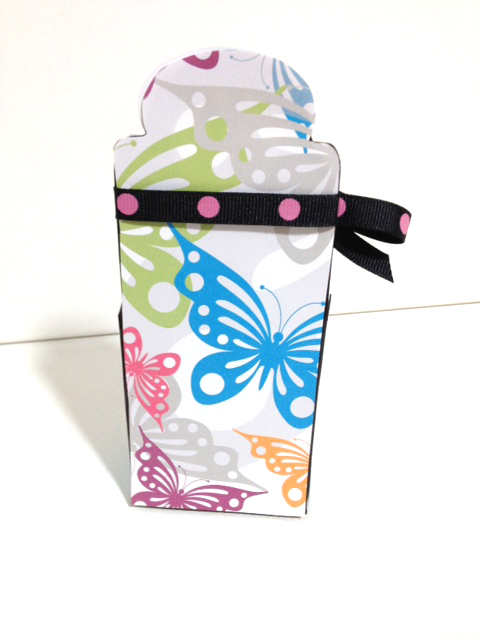
Here is my project just using a part of the template Well Contained. I'm only using the base/holder of the template for this project. View THIS POST to see my project using both pieces of this template.

Here is my project complete together with the candle i purchased for inside. For the record... i don't recommend using paper products as candle holders. This is just as a gift holder. :D

I used paper from the Spreading Spring Cheer printable paper pack. And since i'm not exactly a spring time color person, i used a dark grey card stock as my base. There are some greys in both of these papers chosen (lighter greys than my card stock) but I thought they would play together well and still have a me element in there. I'm hopelessly addicted to grey. haha!

Here is a shot without the candle inside...
I used paper to line the entire inside of the template including the base. I thought this gave a nice pop of color behind the candle and also made it able to serve for another purpose after the candle is removed.
Here is a quick shot of the back. You might notice since I used one of the oval digi stamps from the Round and Round set on the front. Prior to cutting, i actually removed the the oval cut out from the template using my SCAL software, but i still felt like the back was a bit drab in comparison to the bright colors of the front, so I used more of the gorgeous butterfly paper from the pack to also cover the back.

OK... now check out these fine and fabulous ladies and their awesome creations today!

Read more...

My Time Made Easy: Spring is Here!

>> Thursday, March 1, 2012

Spring is HERE! Well, at least it almost is and it sure feels like it around South Carolina!

Today is the new release day for the latest My Time Made Easy!

Today I'm showing off the new template Round and Round...

I also paired this with the Round Off digi stamp set which has lots of fun oval shapes and different sentiments to perfectly fit inside!

Here's an opened view of my package...
And then one more shot of the package empty.... because Lauren thinks of it all! She made sure to design this template so that it looks completely polished from outside and in! It works great to use double sided printed card stock (either that you create yourself using the pretty printable paper packs or other good quality card stock. Mine here is October Afternoon. Check back tomorrow for some using the newest paper from MTME!


Be sure to check out the entire design team and their amazing creations today!

Read more...

PMS Kitty Challenge with a sneak!

>> Monday, July 6, 2009

So it's Monday which means a new paper makeup stamps challenge!  THis week Meli inspired us to use anything from this picture....


We could use any part of this image as our inspiration. Since PMS doesnt any kitty images, i went with the flowers and colors. Then i realized, Well PMS doesnt have much by the way of flowers either! That needs to be fixed. haha. I guess it's still a new company so the other stamps will come in time. :)

But i still used floral paper! :) And a new sentiment that will be released soon! :) It will even be available as a digi on July 7th! WOOHOO!

I made this little basket using Lauren Meaders Pack a Picnic template from PTI's Timeless Templates. This is my favorite template to date! IT was so easy! And it comes in 2 sizes so you can either make baskets that coordinate, or just choose which size basket it the most appropriate for your project! I chose the small basket because i was making it to hold lots of paper flowers to give to a friend who makes cards and sells them on Etsy so she would need lotsa flowers!

Here's my basket...


I was really happy with how it came out and how easy it was to put it all together. But since i was giving it as a birthday present, now i needed a card! I've also been dying to play with my new copic airbrush more, so i created this card and airbrushed the flower to match my paper!


Here are


Stamps:
If Friends were flowers digi sentiment from Paper Makeup Stamps to be released July 7th
Birthday Wishes sentiment from Paper Makeup Stamps

Copic Airbrush Colors
R81, YR00, YR12

Paper:
Patterned Paper is Magnolia from the Just Dreamy collection
Cardstock is Chocolate Chip from Stampin Up

Tools and Accessories
Pack A Picnic Timeless Template by Lauren Meader for PaperTrey Ink
Copic Airbrush
Paper Gerbera Daisy by Bazzill in Vanilla
Pearls by KaiserCraft in Champagne
Ribbon is Twill ribbon from Papertrey Ink in Summer Sunrise
Button is from Creative Cafe
Brads are from neautrals pack from Paper Studio
Cat's Eye Chalk ink in Chestnut Roan and Amber Clay


Don't forget to check out the other design team's fabulous creations on the PMS blog
and to link up your creation to Mr. Linky!  Check back tomorrow for the final PMS sneak peek and the release party tomorrow night going live at 9pm EST!

Read more...

Bella clutch take 2

>> Sunday, June 14, 2009

So it's amazing what i'm finding in my computer that i havent posted on my blog. Woops. Looks like i could have been posting this past week afterall! Well, that would have required me to sit in one place for more than 10 minutes!

My class/copic club meeting at Funkie Munkie went fabulously yesterday. Everyone really seemed to enjoy coloring in black and white. I have photos of my sample images taken, but i've decided to go ahead and wait til i actually get them put on a card to post them here on my blog! But i will say that i do adore how it turned out and my marathon search for my tilda stamp (for those that follow me on twitter) was well worth it in the end. :)

Here is take 2 on the bella clutch i made for last month's bella club at Funkie Munkie. After i had finished it and took it into the munkie, Stephanie said she loved it, but she had a confession to make, she forgot what paper i had requested and she had let one of the other design team members take ALL of the pink polka dot paper!!!! I mean every single last sheet! And Steph needed to mail kits out to the club members pronto. ACK! So we changed the color scheme and pulled some new paper and created a new bella clutch. For all intents and purposes, it looks pretty much the same. Not as much detail, i.e. no stitching, because i wanted o create the new one ASAP but it just goes to show what a lifesaver Lauren Meader's templates can be! I worked this new little clutch up in seriously 10 minutes... MAYBE! It might have taken me LESS! Really, when all you have to do is print, cut out, score, fold and tape... and bada bing bada boom, you're done.... it's fantastic! Tiny plug, she has new templates coming out tonight at midnight! And one of them is seriously the cutest picnic basket i've ever seen! I WILL be purchasing it! Thank goodness it's a download and she cant sell out because i dont know that i can stay awake til midnight! hahaha.

SORRY! i'm wordy today! Onto the clutch!


Still cute right? Just think of it this way, every girl has to have her favorite purse in multiple colors, right? This is bella's summery clutch for when she's hitting the boardwalk. hahahahaha.

Look cardfully at the base... thats some embossed cardstock by bazzill. It comes in a variety of different embossing designs and it retails for the exact same time as all the other bazzill. Nice! And it comes in a variety of colors. Funkie Munkie does carry quite a bit of this stuff, so you can check it out for yourself if you are local.


Stamps
Content-to-be-a-bella from Stamping Bella, the one seen is the mini that comes in the pack!; sentiment is one of Mwahbella's accompaning sentiments

Coloring
Copic Markers (again, not a lot of shading going on... this is the SMALL bella so there isnt much space to color!
Skin: E00, R20 (just a dot for cheeks)
Hair: Y21
Shirt: R21
Pants: B12
Flower: Colored using the Leaving White Space but using my "1/2/1 coloring technique" (see the video tutorial i posted the other day), R24, R27

Paper
Patterned Paper: American Crafts, Everyday Collection
Cardstock: Bazzill

Tools and Accesories
My TImeless Templates by Lauren Meader

Nestbilies Circle Nesties, large


Dont forget to check out the blog candy! I'm taking all comments and suggestions to heart! I'm looking into trying some stamps that might now be "my style" but others want to see. I'm A OK with that. I really like to expand my horizons. :)

Read more...

A Bella Clutch

>> Friday, May 29, 2009

Hi everyone! Sorry new stuff never went up on the "feeding the habit" blog. My camera wouldnt charge for me, so i was stuck. I think it's charged now though so i'll be off to take more pictures after i get this post up. :)

This is my entry for Lauren Meader's My Timeless Template challenge over at Stampin Out Alzheimer's event

I also needed to create something for the Bella Club meeting at Funkie Munkie Scraps this saturday. Did you know you can use Lauren's templates like that? You can! You just have to keep all copyright into printed onto the template! And i thought her templates would be perfect since we need a project to do, but it's isnt really a full on class. PERFECT! And i'm hoping that the ladies in the club will realize how perfect Lauren's Templates are and go purchase some of their own! :)

I used her Purseonality Clutch template to create this little bella clutch! Inside I've filled it with stamped out bella images, some baubles and other emBELLAshments and something that every girl needs.... CHOCOLATE! :)

Here's the finished project...


I was really pleased with how it came out and how fast it was able to come together! I printed the bottom out on Bazzill Cardstock (that i forgot to check the color on, SORRY!) and then the top (a separate template design making it super easy to have 2 colors) onto Bittersweet Bazzill Cardstock. The patterned paper i cut slightly smaller and then adhered it to the top side of the template centering it where i wanted and THEN i scored it. It makes it a lot easier to adhere it first so that way the score lines are perfectly fit together! I then ran it thru my sewing machine to give that true purse look. :) I followed this same process to the handle.

The bella is the mini Contentobeabella that comes with the larger version. She was the PERFECT size for this project!!!!


STAMPS
Contentobeabella and the sentiment is one of mwahbella's

COLORING:
Copic Markers: now this was small, so not a lot of shading going on, just straight colors!
Skin:E00, R20 (just a dot for cheeks!)
Hair & pants: E25
Shirt: R20, R21
Flower: R22, R24

PAPER
Cardstock is Bazzill
Patterned Paper is American Crafts from the Everyday Collection

TOOLS:
My Timeless Templates by Lauren Meader available at PaperTrey Ink
Scallop circle punch by SU
Sewing Machine

ACCESSORIES:
Bellas Baubles

Read more...
Related Posts with Thumbnails

Listen to makeupartistkaties playlist


Get a playlist! Standalone player Get Ringtones

  © Blogger template Webnolia by Ourblogtemplates.com 2009

Back to TOP