
>> Tuesday, November 27, 2007
What you will need:
heat tool
stamp of choice
embossing ink pad (i prefer versamark)
colored embossing powder of choice.
Instructions
1. Very simple, stamp just as you would any project only use an embossing ink (i prefer versamark for it's super stickiness).
2. Sprinkle embossing powder of choice over image. Shake off excess.
3. Heat with heat gun.
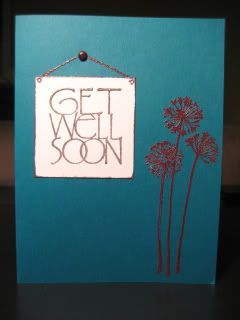
The flowers on this card were embossed using colored embossing powder. The sentiment was embossed using clear embossing powder over pigment ink. The "thread" to hang the sentiment was doen by using an embossing pen (clear) and then colored powder sprinkled over it and heated.
Heat embossing with pigment inks
What you will need:
heat tool
stamp of choice
Pigment Ink Pad
clear embossing powder
Instructions
1. Instead of inking with the embossing ink, ink up your stamp with a juicy pigment ink. Some good ones are stampin up craft inks, versacraft inks, colorbox pigment inks. It's very important that they are pigment inks as dye based inks dry too quickly.
2. After stamping image, sprinkle clear embossing powder on top. This also works well with prisma or glitter embosing powder or frosted embossing powder.
3. Shake off excess and heat with heat tool.
What you will need:
heat tool
embossing powder (color of choice)
metal brads, any size
something to hold onto the brad (like tweezers, alligator clip, etc)
Instructions
1. Hold onto brad with tweezers (or other tool)
2. Heat brad with heat tool for about 10 seconds
3. Dip heated brad into embossing powder (no ink required, the heat from the brad will melt the powder to the brad)
4. Zap brad covered in powder again with the heat tool (only for a few seconds)
5. Allow to cool (only about 5-10 seconds) before releasing from the tool holding it. It doesnt need to be totally cool, just enough that the newly melted embossing powder doesnt smudge.

What you will need:
heat tool
embossing ink
shimmer embossing powder (like embossing tinsel, polysparkle powder, or dazzle dust)
stamp(s) of choice
black ink (or ink of choice)
markers (optional)
Instructions
1. Stamp image with black ink and then color in with markers.
2. Ink up entire image with embossing ink pad.
3. Sprinkle sparklie embossing powder over image.
4. Heat image with heat tool (it's helpful to have paper laid on aluminum foil to speed the process).

What you will need:
heat tool
embossing ink
clear embossing powder
stamp of choice
markers or ink
Instructions
1. Color stamp with markers for a multi-colored stamp effect.
2. Very important, remember to huff (blow hot breath) on your stamp before stamping to remoisten the ink if you've colored the stamp with markers.
3. Stamp image.
4. Clean off stamp and then ink up stamp again with clear embossing ink.
5. Carefully line up stamp on top of already stamped image and "over stamp" with the clear embossing inked stamp.
6. Sprinkle clear embossing powder over image.
7. Heat image with heat tool.

MORE TECHNIQUES AND WAYS TO USE EMBOSSING TO COME!


