My CHA blast of a trip!
>> Thursday, August 12, 2010


I actually created this card the other day when i was playing with my new jewel tone shimmer chalks by Pebbles Inc. i'm telling you.... i love these chalks! I learned a little trick that you can post to your blog days before (thank you Lauren Meader!) so i have a couple of posts ready for while i'm out of town! I just think this is fabulous! Haha. Ok, and on to the card!
I feel like this isnt a typical card for me. It's a little more subdued than what is my norm. However, i'm in the process of coming up with some card designs to do sets of for a fundraiser craft fair my church is doing in October. Seeing as i wont be able to do much October 1st when this craft fair is said to be, i'm trying to be a little ahead of the game! I'm also doing LOTS of stamping on candles and i'm so pleased with how they've turned out so far. I'll try to remember to take pictures of the ones done so far the next day i'm at the church crafting, but i've left them there so i cant post pictures now.
I started this card with a simple brown base and patterned paper by Anna Griffin. The stamp set is Everyday Blessings by PaperTrey . I love this set. The sentiments are fabulous and there are SO MANY in the set! I stamped the cross on the white cardstock and then stamped it out again on some scratch cardstock. The scratch cardstock i cut out and put a little removable adhesive on the back to use as a mask. (my super helpful tip is if you do this with a set, save your trimmed out image so you dont have to go thru the process the next time). After putting my mask on top of my stamped cross, i used the jewel tone chalks to add a shimmery halo around the cross. I did layer 2 colors for a little added depth, but it was so so easy! Then peel off your mask and viola! The shimmer looks fantastic, but it's very hard to capture the look on camera. So just trust me on this one. I then layered my sentiment on top. In my recreations of this card, i'll probably move the sentiment down as it's a little hard to read where it is now.
The stitching is actually just rubons by Kaiser Craft. I was pleased with how easily they came off the backing, but not pleased at how easily it stuck to my fingers! Just an FYI when you're handling them!
Thanks again for stopping by!!!!
Ok, so i'm posting twice for today! Because of my serious lack of posts from last week. :)
I was seriously hurting for some mojo when i made this card. I was feeling pretty nauseous and acid refluxy and i couldnt even concentrate let alone be crafty. But somehow this card emerged and i was actually quite happy with it. I will say i dont think it photographed nearly as nice as it turned out because you cant see all the shimmer and glitz. But since i discovered a new to me technique, i want to show it anyway.
Here is my sympathy card using Papertrey's Birds of a Feather. This set is just stunning to me. I just love the font on all the sentiments included. The sentiment and flowers on this card are also from this set.
I knew i wanted to use this set because i just wanted a very pretty sympathy card to send to someone from church. Remember my no mojo when starting this card. I picked out a bird and just stamped it on a piece of white cardstock. I also stamped out the with sympathy sentiment but ended up not using it.
I pulled out a scrap of one of my favorite patterned papers (maker is Graphic 45) I'm tellin ya, if i had an entire pad of this paper, it still wouldnt be enough. You may remember i used these papers for a set of cards i did awhile back using the same brown card base. I love blue and brown together. I then scalloped the scrap using my new Stampin Up Scallop Border Punch.
I inked the edges using Cat Eye Chalk Ink.
I then cut my birdie bird out using my Creative Memories circle custom cutting system and also did a mat out of another piece of scrap paper.
Then i looked at my card and i was stuck. Just simply stuck! So i decided to just stamp on the dark brown using white daisy pigment ink by Close to My heart (my fav for pigment white ink... and heads up, ctmh has decided to do their vanilla cream and colonial white in the pigment base as well! Oh i am just so so so excited!!!) I was going to just stamp my flower once, but then it just grew and grew. Also to note, this is a 3 step flower so i was able to position each piece just where i wanted it on the card. This is one of my favorite aspects of the PaperTrey stamps!
So now what... i thought as my mojo was still a little slack (though i was feeling a little better as my card started to come together. Thats when i remembered my jewel tone chalks by Pebbles Inc that i just bought! I had no idea how i was going to use them, but i was bound and determined. Now i'm sure many of you reading this are probably saying oh yes i chalk over ink all the time. Well this gal had never even thought of it! Not with a color ink at least. I use chalks ALL THE TIME with versamark. So i wanted to test it out. Now the key to get this technique to work for me was to pounce the chalk not rub. I was loosing the image of my flower when i rubbed. So i alternated my colors and just pounced a bit on top of the white flowerand suddenly before my eyes was this beautiful shimmer among my flowers. Needless to say, stumbling on a new technique definitely kicked up my mojo. I then stamped out my with sympathy sentiment also in white daisy but left it solo so it would pop out. I did then take my atyou spica pen in clear and just added glitz all over the . It's all around the sentiment, within the flowers and outlining my birdie bird. Now let me tell you, my atyou spica pen is one of my favorite "tools" but i've never gotten it to photograph how stunning it really is. So i highly suggest you buy one to see for yourself. You'll be pleased, i guarantee it!!
Some simple 1/8" satin brown ribbon finishes off my card. And there is my mojo-less card which i thought turned out pretty sweet.
A neat way to color is using chalk with versamark (or other embossing) ink. It's super super easy and give a soft look.
Here's what you'll need to start...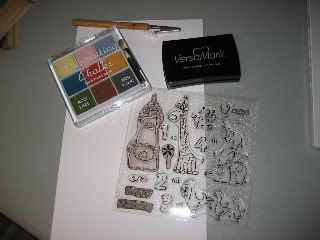
* Stamp of choice
* versamark (or other embossing ink, though i recommend one that is "sticky" like versamark)
* chalks of choice
here's a video tutorial of the process (ignore all the noise in the background - i'm hosting a crop at my house and there are lots of ladies cropping away as well as a crying baby and my child getting in the way!)
http://s235.photobucket.com/albums/ee296/makeupbykatie/classes/?action=view¤t=MVI_4298.flv
(sorry its only a link - my video wouldnt upload to blogger!)
First of all i wanted to say.... This weekend is the Spring into Summer crop over at SwapsNMore! Dont know what swapsnmore is? I havent been doing my job. It's a swap site of women who love to swap! And we scrapbook and card make and chat a lot too. I'll be teaching some tutorials this weekend for the crop. If you are interested in joining the group, go to
http://groups.msn.com/swapsNmore/general.msnw and click join. You will be approved shortly and then can start cropping to your hearts content!
Ok - on with the show....
Do you ever like the idea of using a diecut on your scrapbook page or swap piece but then think it just looks too... BLAH! I agree. I'm not very big on the 1 dimensional aspects of plain ol' diecuts. I do however, think they can be FABULOUS with just a little bit help. I like to chalk to shade the diecuts. It's kind of like doing makeup to me! :) All you need is a basic set of chalks and a little know how of highlights and shadows and you can chalk away!!!! I'm going to show an example of a dinosaur (that i actually used in the dinosaur swap on swaps n more a bit back)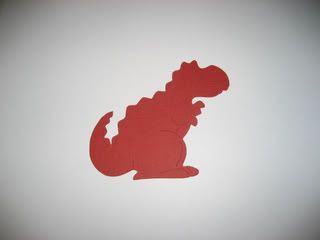 First i started with a plain ol' diecut. This little cutie i cut with the Paper Dolls cart from my cricut. Pay attention to those lines that were cut in the dinosaur. They'll help you with shading later!
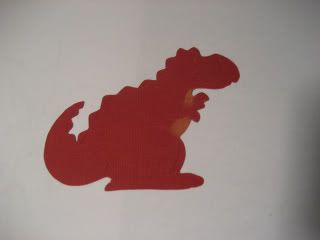 Next i chalked his belly. Now i could have cut the dino out in another color, cut his belly and glued it on top like a paper piecing. That would have worked just fine and in some diecut cases, i do a paper piecing effect. This time, i kept to all chalks so you could see everything you could do with easy. I just took a different color chalk (in this case yellow) and chalked up his belly to make it appear a different color. Easy Peasy.
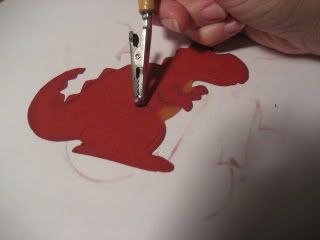 Next i did all of my shading. This is what really makes the diecut look 3D. Follow those lines that were in the diecut. But also shade the areas "where the sun don't shine" like under his tail, feet, chin, etc.
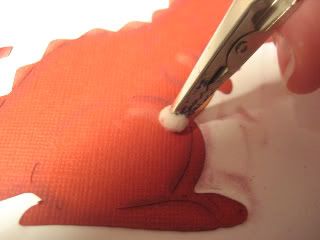
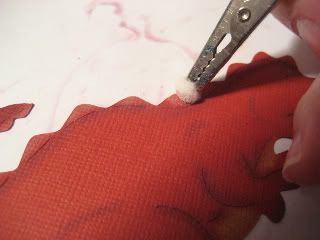
Now it's time to add your highlight. You can use white (i did in this case) or a much lighter version of what the color of the diecut is. Normally, the white is my first choice. To highlight, you will use the white on the tops of where the sun hits. This may not just be the top of the head! I chalked the dino's scales down his back, and head, but also the tops of his thighs, arm, etc.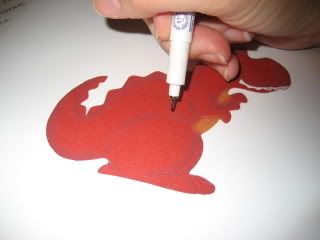 Next add in the little details. I take a (normally black or maybe brown) pen and go over those "cut lines" from the diecut to make sure they are going to stand out. Most of the pen work won't really show up in the lines, but it will be just the little extra oompf you need. This might not be needed at all on a diecut on a lighter paper color to begin with, but for my red dino - it was needed. I also blackened in his eye so it could be seen better, etc.
 Another detail for me was the dino's teeth. Chalked them white didnt make them look any different than the other highlights on the dinos skin and most dinosaurs i know of dont have red teeth. Ok, so i dont know many dinos... but i still didnt want him to have red teeth. So i took a white gel pen (this one was actually a white souffle pen by gelly roll) and colored them in. Gel pens work great for coloring in on darker cardstock!
And drum roll please... here is my finished diecut!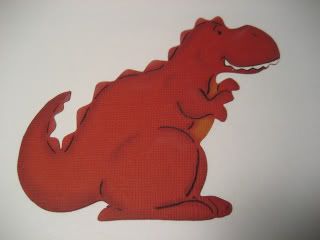
Hope you enjoyed this tutorial. Its a great way to make some elements for your scrapbook pages and cards. Diecuts are cheap, chalk lasts you eons and they really stand out on a page or card!
Thanks! Feel free to leave comments or ask questions but if you do make sure to leave your email so i can respond back!


© Blogger template Webnolia by Ourblogtemplates.com 2009
Back to TOP