>> Tuesday, September 6, 2011


Ok, so this blog post is going to focus on the EASY rather than the QUICK! haha. I know, i know, my sunday posts are normally about the quick! But this is a super easy and fun project that when not too terribly embellished, can be super quick. My version, not so embellished, so it was quick. :)
Now i will admit, this was a kit from My Mind's Eye. But, you could have a cheap and easy version by going to any hardware store and purchasing a long piece of wood and then sweetly asking the man working to cut it into squares for you. Dont feel bad asking, it's their job! :)
Here's what you'll need to start...
9 square pieces of wood
6 pieces of patterned paper (the size of paper will depend on the size of wood you use, you just need enough to cover the tops of 1 side of each block)
Modge Podge or other white glue
Sand paper - will make your world much easier
Another helpful tip to make your world an easier place.... number each side of your blocks. So have them laying out in front of you, and write a 1 on the top of each. Then turn them all the same way...and number then 2, keep going til all the sides are numbered. Then each paper will correspond with a number so if you suddenly dont know where you are in the process (trust me, it happens!) then you can easily get back on track.
Cut your paper so that it's the appropriate size for your block. I recommend doing 1 sheet at a time and try to keep them in order!!!! again, it will make your world easier! Brush the glue right onto the block and stick the paper on top. It is up to you whether or not you want to put glue on top of the paper.
Then just step by step work thru all the blocks. This is also an easy project to do in bits and pieces. :)
When you are done... your project will look like this...
Now this looks great on a a coffee table. If you purposely choose, you could have the patterned paper mixed up and turn it into a puzzle. Or perhaps this is what you tell people... it's supposed to not match up, i promise. hahahha.
You could also add photos and such. Beware of adding thick embellishments though or the blocks wont lay flat. :)
Ok, thats the EASY project for today, even if it isnt so quick. :)
Time for another lazy sunday! Actually - i plan on doing some crafting today if i'm lucky! Hubster has to work some, so i'm hoping that i may get to work on some projects! But as promised... Sunday's posts will be of quick and easy projects so you can be lazy the rest of your Sunday afternoons! :)
Today's project is tile coasters. They look stunning, but can take minutes to create! Now dont get me wrong, i've seen tile coasters that i know must have taken the creator ages! I've even made some of those myself... but not the ones i'm showing you today!
What you need:
Tiles (go to a shop store like Home Depot or Lowes and go to the tile aisle. You can buy them in singles in various styles. They usually cost between .25-.50 cents!
Staz On ink (this is important! You need a permanent ink to really stick to the tiles)
Acrylic Spray (i've done projects without it and this is ok if they are for decoration only, but if they will be used, you'll want to spray them to make sure the design doesnt get damaged)
Stamps of choice! - Swirls and decorative backgrounds look fantastic for the quick and easy. A simple swirl and then a word or quote and you're done!
Felt Feet - also optional but i highly recommend them to protect your table tops! I picked up a pack at the dollar store but you can also find them just about anywhere. I'm sure the hardware store you are buying your tiles at will have them.
Here is my quick and easy coasters...
I used the Barouque Motifs set from Stampin Up for this. Stamp the flourish from the set in 1 color (i chose black) and then the flowers from the set in an opposing color (i chose red) and then one of the words and you are suddenly done! And they'll look fantastic!
Now, Gina K made a fabulous tutorial on splitcoast on this whole technique. Her project is absolutely stunning and is a great way to see some different ways to stamp on coasters!
And thats it for my Sunday Quick and Easy post! Have a wonderfu lazy day!
So sunday's are days about spending time with family, worship, fellowship, good times. I've decided (we'll see how long this lasts! ha!) to post a quick and easy project on sundays. Not every project I will have actually created on a sunday, but the idea is that the project will be something easy to put together so if you should feel like crafting on a sunday, you could do this and still have time to spend with family!
Here's my first Quick and Easy project...
A bulletin board! I actually altered this already pretty sleek looking bulletin board for my Secret Sister. She's gotten the gifts now and knows who i am so i'm not spoiling anything!
Here's an overview of the board...
This project (i thought) was a terrific idea because my SS is a principal at a middle school, so she has an office. However, she is fun and sassy and deserved a bulletin board that matched her very fun personality! Not just the average i bought this to stick stuff to bulletin board. Thats just not her!
So i bought this multipurpose board at Michael's. It was half dry erase for notes, and half cork. Now it was time to personalize it! Easy!
My SS's favorite colors are "black and red and white together forever!" So I took that thought and ran with it!
First i found these adorable paper clips at walmart. I knew they would make a great addition. I used really strong permanent adhesive to mount the clips to the board in various places. To give her an idea, i created some simple photo mats. She can either use those mats and use photos, on her board, or she can remove the photomats and clip in whatever she'd like.
I didnt take a closer pictures of some of the other details, but i did add some bling rhinestones to the corners of the board, etc.
All in all, i think this project took me about 15 minutes! But it still made a cute and easy gift that means a lot more than just a storebought gift. I made a bulletin board around christmas time for my Brother-in-Law and used rubons on the frame to put his name, and made more masculine clips, etc. No flowers or bling on his. haha. but you can see how easy it is to adapt it to the person you are creating it for!
Thanks for dropping by today!
Today is my good friend Molly's Birthday!!! I didnt post this project this until later because i wanted to be sure i had given it to her before i posted!
I knew her favorite quote was this quote..
"The best and most beautiful things in the world cannot be seen or even touched - they must be felt with the heart. - Helen Keller"
I also knew i had this in a stamp set by Paper Trey Ink (stamp set is Out on a Limb Sentiments). So my brain starting turning. What do use this on...hmmm... hmmmmmmmm. Then i remembered a Project that Shannan Tuebner had done awhile back using a wood plaque. Ok.. truth be told... i was digging thru my trunk of alterables (yes, i have an entire trunk dedicated to stuff that one day i'll get around to altering) and i found a bunch of wooden plaques which i bought after reading this post of shannan's and always planned to do something with.
SO - i finally had something to do! I still have a few of the wooden plaques left... i may be making more soon! It was so easy and super fun. :)
Ok, here is my project...
It's not the bestest of pictures because i kinda forgot to take a picture until we got to her house! Luckily i had my camera in my back pocket so i just took a quickie in the car (hence the yellow tissue paper around it!)
I simply painted the wood plaque with acrylic paint and let it dry. I then swiped all the edges with antiquing medium. The top i stamped the branch and leaves (from Papertrey's Out on a Limb. I adore this set because the branch is a separate stamp from all the flowers. AND there are different stamps to put on the branch (some pretty flowers, leaves of different types, berries, etc). And since they are a different stamp, using different ink colors is no problemo! I stamped the sentiment from the Out on a Limb Sentiments set above the branch. I then sprayed the entire thing with a matte acrylic sealer mainly because i wanted her to have the option of using it for a coaster if she so choosed. This is also why i didnt add anything 3d to the front. I wanted the surface to remain flat but i did think of putting pearls inside of each flower petal and if she does decide to put it up on a wall, i will probably sneak the pearls on there. hahaha.
This weekend is a busy one for me! My mom gets into town late tonight! Tomorrow i have a wedding to do and then Sunday i am getting Copic Certified! WOOHOO! Super excited about that! I do have a post set and ready for tomorrow and then i'm sure my mom and i will craft some saturday night so i wont be a stranger! :)
I participated in a super fun swap on splitcoast. The swap was called Love of Labor swap. The idea what that you hand craft an item tailored for your secret gal. It's been a lot of fun as we've been chatting the past couple of weeks but no one is telling who has who. :)
Well... i'm post dating this post so hopefully my secret gal has already received it (though i dont think she reads my blog, so i'm probably safe. Still... i'm not going to mention any names just to be safe. :) I created a basket/tin that could be used for all kinds of things. It could be to store cards (my first thought) but could also store stamps, tools, or whatever else she wants to have within close reach. Inside my tin are lots of other goodies for her to craft with but most notably in a plastic screw top jar tower with matching embellishments to the tin (to go with the idea of a place to store cards and cardmaking supplies). There are also some stamps, stickles, and other small items inside just for fun.
To create my tin purse, i started with a tin purse base i picked up at Hobby Lobby. I then picked up some pizzazzill cardstock by bazzill as well as some patterened paper by Sandy Lion at a local scrapbook store. After careful measuring... i modgepodged the paper to the tin. I wasnt pleased with my seam lines, so i decided to add the ribbon along the edges instead of just around the middle as i originally planned. I was pleased with the more finished look the ribbon gave (ribbon is soft sky double stitched ribbon by Stampin Up).
The flowers and fabric covered brads added a great dimension touch to the project i thought (and all of the extras from the packs are included inside the tin for her to use!). I also included this bella card in my tin. I tried to keep within the same color scheme as the tin. If you remember my post earlier in the week from my baby shower you notice the same trim of embossed paper ad scalloped border. Yep, thats because i had an extra of each still sitting on my craft table. I'm not a waster. I use EVERYTHING. :)
My card base is actually very vanilla by SU. I wanted to match the off white of the tin. Then i layered an embossed cardfront (that i received in a swap, though i do have that embossing folder) and my left over pieces from the baby thank you. I colored my bella (Gardenbella from Stamping Bella) with copic markers and for the first time, i added a base (the grass) to her. I've seen this done on other blogs and i just think it's so neat. Its especially worked with this bella for me because i've always been a little curious with what to do with her feet since she doesnt have the typical trendy shoes that the bellas wear. Well, i personally like to be barefoot in grass so i made her some grass! Other cardstock pieces on the card are all from the scraps bin (i'm a little meticulous with how i keep my scraps, i have different compartments for every color so i'm sure to be able to find perfect colored mats, etc. Like i said... i use everything!)
I then added a rub on from a small spring pack from making memories. I really like the rub ons over embossed cardstock because you still get the whole sentiment without the distortion you'd get if you stamped the sentiment.
So i really hope my secret gal enjoys my creation i made for her. it was a super fun swap and i'd join another on in a heartbeat! :)

This is a frame i made out of cork coasters from the dollar store. We will also be doing this project at my upcoming stamp camp on sunday. :)
first of all, this frame didnt photograph nearly as pretty as it is in person. I still think it needs some extra touches, but there are lots of layers that are popped up with pop dots, but the flash washed it all out so you cant see all the dimension.
Supplies:
Paper: Boom-di-ada Paper from Close to My Heart
Cardstock is Autumn Terracotta by Close to My Heart
Stamps: Cottage florals by Close to my Heart
Spot on Backgrounds by Close to my Heart
Sentiment from SU (let me get the name of the set and get back to you!)
Inks: Chocolate, Autumn Terracotta, HollyHock, Garden Green all Close to My Heart
Brad: is Colonial White by Close to My Heart
Ribbon is Very Vanilla by SU
Tips and Tricks
Anytime I use a mask with a stamp project, i stamp my image to be cut out on good thick cardstock and then store it with the stamp set. That way the next time i want to use the stamp set, i dont have to go thru the trouble of cutting out another mask. For this project, i cut out an image of the main flower and laid it on top of the stamped one in the picture and stamped on top to make my leaves.
To add extra dimension to popped out flowers, wet the edges with a fine mist water bottle (i use evian in a spray can - really meant for your face ) After the edges are dampened, you can then pinch the petal tips to get a cool flower look.
Tired of solid stamp images? Use a background stamp to kiss off some of the ink. Simply ink up your solid stamp, and then stamp the solid stamp onto your background stamp. Some ink will remain on your solid stamp and then the pattern will appear when you stamp your image onto your paper.
Thanks for looking!

I was inspired by a recent PaperTrey Ink challenge of altering and decorating coffee bags. Of course the design team of PTI is absoluletly outstanding so i wont even pretend to think my coffee bag is better than any of theirs! Each design team member came up with a creative use for their coffee bag. One planted a seedling... 1 used it as a cookie gift bag, another for amish bread, etc. I was pretty literal with my... i used it as a *gasp* coffee bag! haha. I wanted to give my dad some yummo coffee and i thought it would be more fun to decorate the bag first. PTI sells some great versions of coffee bags (as well as other gift giving items to alter). Some of the bags are white, others are the "kraft" color. Some have windows and some do not. My coffee bag is one that i snuck away from BiLo (the grcoery store by my house) and in fact i snuck 8 away because i'm cheap. haha. The quality probably isnt as nice at PTI's but they were lined with plastic so that is a plus. I will be using the other bags in coordination with the stamp camp i mentioned in a previous blog entry.
Ok, onto the coffee bag deets...
Supplies:
Coffee Bag from BiLo
Coffee Talk stamp set from Close to My Heart
(coffee beans are from the Gel A Tin's Coffee & Tea stamp set)
Martha Stewart 18x18 cardstock (to cut the strip to go around the coffee bag)
Other scrap paper (i used blue bayou from SU and Colonial White from CTMH)
Brads by Spare Parts
Chocolate Grosbrain ribbon (CTMH)
Distressed Lines embossing folder & cuddlebug machine
Inks: CTMH bamboo, chocolate, grey flannel, SU blue bayou and chocolate chip
Thanks for looking!!!!
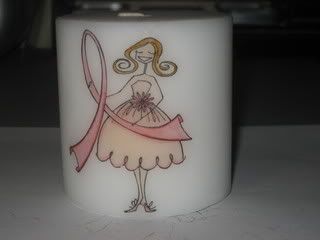
This super easy technique makes quick and stunning gifts and the possibilities are endless! Here's what you need...
* Stamp(s) of choice
* Ink pads of choice (if coloring in, use a good black ink, i prefer versafine in black onyx)
* Markers (optional)
* Tissue Paper (just the gift wrap kind)
* Wax Paper
* Heat Tool
* White or Ivory candle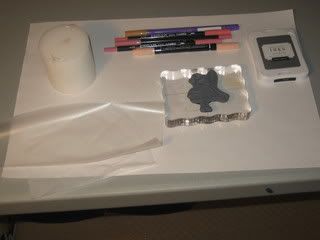
Your first step is to stamp your image onto the tissue paper. It is important to have a scatch sheet of paper underneath your tissue paper as color will bleed thru to your work surface.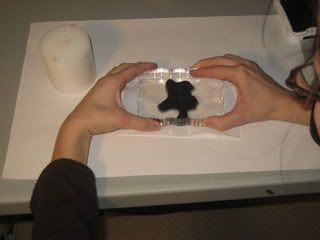
Next you will add any additional coloring to your stamp (if desired). I will note that the stamp i used is Causabella and you can pruchase this stamp at www.stampingbella.com
Now trim out your stamped design (it does not have to be perfect or right on the image, just be sure that your tissue paper is not larger than your candle).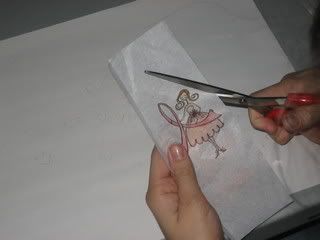
Lay your cut image on your candle.
Cover the entire candle with wax paper and pull tight. You do not want air bubbles in your design.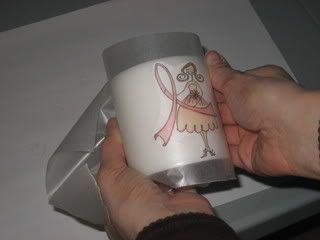
Heat covered candle with your heat tool. I recommend moving your heat tool in circular motions as to not overheat any one spot. You will see your tissue paper start to "disappear" into your candle.
Peel off your wax paper and Viola! Your stamped candle!
In an alternate version... you can cover your whole candle using a strip of tissue paper. Be sure than your strip is not wider than your candle.
Stamp all over your tissue strip. Layering colors looks very nice...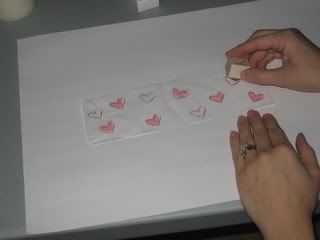
Wrap entire strip around candle.
You will have to heat the candle in sections. Be very sure that your tissue paper and wax paper remain flat against your candle otherwise wax will pool on your candle giving a lumpy appearance after you peel off your wax paper. (stamps used for this candle are by Stampin Up!)
If you complete this class i'd love you to share your finished creations! Please post the link to your candle in the comments section of post!
* added note * it was brought to my attention that credit was not given where credit was due. I learned this technique from my friend, Rachel. She showed me how super easy it was one day at her house. I decided to make a tutorial to show some of the gals in a online swap group i am in. I did not create this technique on my own. And in fact, I believe my friend learned of this technique off of Splitcoaststampers.com (which is a fabulous site for techniques and tutorials by the way!). Unfortunately, i do not know who the original creator of this is, but whoever they are, they ROCK!


© Blogger template Webnolia by Ourblogtemplates.com 2009
Back to TOP