Sew Simple Cards

>> Saturday, May 31, 2008


These are some cards i'll be teaching at The Scrapbook Company for a sew simple card class. The class focuses on teaching some simple ways to use various forms of sewing on cards.

The first card layers 2 stamps from the Mod Design 12x2 stamp set from Fancy Pants. The paper is two scoops by Basic Grey. The technique is simple... you just stitch along framing certain elements of your card and then color over the white thread with chalk. I choose Pebbles Inc shimmery chalks. They went well with the two scoops but i also stamped using Brilliance Inks on a glossy cardstock so the whole card has a bit of a sheen to it. :)

The 2nd card uses the Clear Design Letter Y set. The sentiment stamp already had "holes" so i simply poked thru the holes with a paper piercer. Along the edge of my cardstock, i also pierced holes with the paper piercer. Connect your holes with a white gel pen for a fabulous faux stitch look. :)

I'll be posting more Sew Simple card ideas this week! :)

Read more...

Mucho Love to My Bella Sistah, Kim Stewart!


I just love my bella sistah. She's one forever, thats for sure!

I got a fabulouso package from her today! In it i got....

the fiskars threading water punch i've been searching endlessly for
3 spools of super pretty ribbon
a box of pop tarts - which are staying upstairs in my craft room. No one else gets to eat them!
a cuddlebug embossing folder
2 super sweet cards
and an IOU of a bella. hehehe.

I just love her to death! I truly will never give her up as my bella sistah. :)

Read more...

Oh So Pretty!

>> Wednesday, May 28, 2008


Here's another bella! This one was actually for a swap and i can NOT take credit for the idea of putting her pretty reflection in the mirror. I saw it on Lauren M's blog (as she is one of my absolute favorite designers... i like to copy her alot... teehee).

She made her card flawlessly and i shamelessly took the idea and used it on my cards for the Anytime Bella Card Swap in the bellaholics group. The paper piecing is super easy... but i did take some pictures along the way for anyone who may like to try it out...


First i stamped OhSoPrettyBella onto plain white cardstock and colored her with Copic markers. Then I cut out her mirror using a craft knife. Next i stamped the bella again on another piece of cardstock but you can notice i didnt even ink her up all the way. I then just colored in her face and hair and then positioned her the way i wanted (i did a little angle) in the oval cutout. Then trim off any of the excess paper underneath that will be seen and viola - you've got a bella reflection.

The rest of my card is Close to My Heart printed paper (from the Life Delights collection) the top piece i scalloped using my corner rounder, scraps of DCWV cardstock in a lilac color, misc bling and then the sentiment is my new favorite sentiment (obviously) from Verve Visual Stars stamp set

OOOOH and i almost forgot (because it's hard to see in the photo) but i used the copic spica pen in clear as well as some stardust glitter pens to add lots of sparkle to ms bella herself. :)

Read more...

Blingabella

>> Monday, May 26, 2008

My craft room is finally coming to a finish line. There is still a lot more i'd like to do with it of course, but EVERYTHING has been cleaned out. I got rid of some bulky furniture that just simply too up too much room. I've purged out a lot of things i dont use and have moved them all down to a not well used enough armour in my dining room. So now i truly have a pif/rak/trade stash! And it fills an entire armour! Sad, right? My room should be much more functionable now - finally. I still want to "alter" some of my storage, make the room flow nicely etc. But now i feel done enough that i can finally get back to some crafting!


here's 2 cards i took some time away to do this past week. Both are the same card, just using different colors. Stamps are Blingabella from www.stampingbella.com and the sentiment is from Verve Visual

Cardstock is stampin up (groovy guava and brocade blue (i think! it wasnt labeled!) which lighter scraps which i stamped on top (using Life Delights by Close to My Heart).

Extra accents is using my word window punch to fake the ticket corner punch and misc bling from my "stash". :)

Read more...

>> Tuesday, May 20, 2008

Oh my - i cant believe it's been so long since i've posted! Well, at least there is good reason. I've been doing makeup like crazy (which i think most of you know, but thats my actual job!)

I had 6 jobs of bridal trials, portraits and other makeup jobs last week, a large wedding on saturday and then 2 back to back portraits yesterday, one this afternoon, a consultation tomorrow and then another bridal portrait on thursday. PHEW! Its wedding season, thats for sure!!!!

I've also been hard at work redoing my craft room which means lots of purging! It was just crazy in there!!!! Its coming together, but not done yet. I'll be sure to post pictures when it is.

I'm also happy to say that my first stamp designs will be coming out hopefully by the end of June! I'm so excited for this release! But the busy-ness of the rest of my summer has me working overtime, so hopefully i do hit that date! With any luck i can be a week or 2 early! :)

Ok - onto my cards. These were super quick cards i actually made before the bride brigade began, but i hadnt been able to edit them for the computer. The were really dark so they needed some photoshop help to lighten them up. :)

Anywhoo - here they are. Both use the Enjoy Life set from Stampin Up!

Read more...

Layouts!

>> Thursday, May 8, 2008

Believe it or not, i count myself as a scrapbooker before a cardmaker but all i've ever posted on my blog are my cards. Dont know why exactly.


Here are 2 layouts that i'll be teaching at The Scrapbook Company (a local store). The first is one is one i did a caseing of off of twopeas but for the life of my i cant refind it so i cant give the original author credit. i will do some more digging tonight so i can honor their amazing layout. I of course made a few changes to suit my needs (and supplies!) for the layout, but the original design is not my own. :)


The next is one i used my CTMH Imagine book to get a layout sketch and then tweaked it from there using the Polar Bear Express Sorbet line. The letters were cut using the Doodletype cricut cartridge and the other part of the title was stamped with CTMH alphabet.

So those are 2 of my classes for the summer. I'll also be teaching some card classes but i dont have those planned out yet. Wish me luck, these will be my first classes!!!

Read more...

My Shoebox Card Kit

>> Monday, May 5, 2008


This is my card i created from my own shoebox card kit. For the shoebox swap we were to include 1 6x6 piece of patterned paper, some ribbon, a stamped image (bella) and some other embellishments. Sentiments and other paper or cardstock was optional. This was my first shoebox kit and the other kits i received back were simply outstanding. I hope that the other ladies enjoyed mine as much as i enjoyed there kits!!!

My kit included - 6x6 patterned paper from Close to My Heart, More to Adore collection
Stamped image - Fashionistabella from www.stampingbella.com
Sentiment - www.stampingbella.com
Cardstock - Chocolate from Close to My Heart, Very Vanilla from Stampin Up
Buttons & ribbon from my stash
Colored with Copic Markers
Scalloped Corners using scallop punch from Creative Memories

Read more...

>> Friday, May 2, 2008


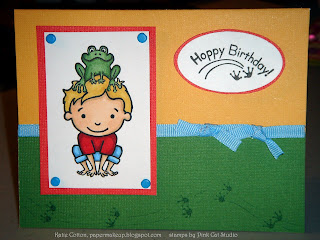
My new set from Pink Cat Studios came in the mail yesterday! I was so excited i just had to use it right away! I made a little birthday card for a friend of mine (well, technically it's for her 3 year old son, but really i'm sure he could care less). The set name is Billy and there are all kinds of cute get ups that Billy is in.
Billy is colored in with copic markers and i just used some scraps of DCWV cardstock i had finished off with some brads and ribbon from my stash.

Read more...
Related Posts with Thumbnails

Listen to makeupartistkaties playlist


Get a playlist! Standalone player Get Ringtones

  © Blogger template Webnolia by Ourblogtemplates.com 2009

Back to TOP