My Time Made Easy: Tricky Treats!

>> Wednesday, August 31, 2011

Today is the first which means lots of crafty goodness coming your way from EVERYWHERE!
The 1st is always fun because lots of companies have releases, or sneak peeks start. Challenges have their posts... it;s just a fun time!

My Time Made Easy is one of these companies! RIGHT NOW the new release is live on the site!

The 7 digital stamp singles are all halloween themed! (don't worry, for those who do not celebrate halloween, or halloween just isnt their thing, the other stamps are just as fun and cute!)

Today the team was challenged to create a halloween treat using one of the 7 digital singles and one of the new templates. The templates this month are PERFECT for so many things!


Now when I was challenged to make a halloween treat I started to think... well I do want to be different.... how do I make it different. Then 1 peek of the digital images and I knew EXACTLY what I wanted to do!


Have you ever known one of those "crazy" people who treat their pets like they are their children? They make gifts and treats for them and celebrate their birthdays. THey have their own stockings for them at christmas? Well... if you arent one of those people, or don't know one of those people.... NOW YOU DO! Because I am TOTALLY one of those people! haha!

I took one look at purr-fect pumpkin digi and i fell in love! I do love my kitty!

So I decided to make a little treat pack for him! Or to give to a friend who loves their kitty as much as I love mine. meanwhile my dog who is currently sleeping at my feet seems none too happy that there are currently kitty treats all over the room and no doggie treats! (but as you may recall, she got her gift package not too terribly long ago!)

Ok, back to the current project!


I decided to use the Tying Up Loose Ends template using my SCAL program and cricut machine. Here is a picture of the end...

I opted not to add any major embellishment to the ends but to only wrap the ribbon around. But embellies on the end look super cute too! You can easily see the flaps in this picture. When the ribbon is removed, they simple open up to reveal the treat inside!

Here is a close up of this adorable digi stamp...
Don't you just wanna SQUISH him? I am loving the new digis Lauren has to offer! Maybe it's just because i DO love to color! :D

Don't forget to check out the fine ladies and their wonderful creativeness today, and then go check out the MTME store and maybe do a little shopping!!!


Have a great day!!!

Read more...

MTME group post!


Busy busy busy! Well, at least i'm catching up! Next week my littlest one goes to preschool 5 days a week! What a joyful and quite 3 hours i will have in the morning! Granted that time will be used for work related things, whether for makeup, the stamp company or other design team related projects, but man, I cant wait to have that extra time!

Have you been craving that back to school time? Maybe you are fully in it!

I dont know about you, but i adore the change of seasons. It just seems like by the end of it... you're just ready for the change!

Well the new release for My Time Made Easy will be live tonight at midnight!
Today the design team is each making 4 cards to share using this months digi stamp release!

I decided to really dive into this change of seasons and focused on using the Happy Hallows stamp set to show you some different ways to use it and while it is fabulous for fall, this set it really great for every single season! I also decided to pair it with the singing silhouette acrylic set! Yes you CAN mix digi and acrylic! My cards are simple and easy to put together this round. The coloring of the digi's were all done using photoshot and under layer effects using color overlay and inner shadow when necessary.


Be sure to check out these fabulous design team members for more samples today!

Read more...

Free Digi for you!

>> Friday, August 19, 2011

Today there is a new Friday Freebie wordart available over on the Paper Makeup Stamps blog!

My dear friend, Tina, has created yet another super fun wordart for us to share! I think this is my favorite one of hers yet!!!! I love the quote, the font, everything about it really!!!

Last saturday I *GASP* did not have any work lined up! So i decided to create a whole lotta work for myself and do a yard sale! PHEW! We did a good bit as far as yard sales as concerned but i have a whole lot left! I will post the remainder of the craft items when i have a moment to type them all out! But while i was waiting in the afternoon lull... i grabbed one of the frames i was selling for a mere 50cents and pulled out some crackle paint in the garage. My husband asked me how i was going to make any money if i started taking back all the stuff i had out to play with. I said the 50 cents i was going to make on it was worth the fun i was going to have for the next 30 minutes! :D And it was fun! Now i did intend on doing a bit more to the frame, and add some pictures and what not... but heres where it's at now with the friday freebie wordart in one of the photo slots (which is exactly where it's going to stay!)


Now i should have done a better job photoing just the wordart for you, but i didnt. The zoomed in version is quite clear, but I assure you, thats my rush of picture taking and not the quality of the digi. :D


Be sure to go over to the PMS blog and snag this wordart for yourself!
And have a wonderful weekend!

Read more...

Design Team Call for Digi Lovers!

>> Thursday, August 18, 2011

As many of you know... Paper Makeup Stamps offers digi images. I love digi, and I have a few team members who also love digi. Don't worry, PMS isnt going to digi only, but Senior Team member, Jami Bova is going to head up a weekly digi challenge called the Digi Makeover Challenge! This challenge will have it's only digi design team.

Are YOU a fan of digis? Would You like to be on the PMS digi team?

Check out the PMS blog today for all the details!!!

Read more...

PMS hosts the Party Time Tuesday Challenge

>> Tuesday, August 16, 2011


Today Paper Makeup Stamps is the sponsor over at the Party Time Tuesday Challenge blog!

I actually got a card made and school isnt even in session yet! Jack starts kindergarten TOMORROW! I know a lot of mom's get really sad but i am just SO excited! For him and for me. HAHAHAHAHA! I love my kids and i love hanging out with them, but man, freelance and work at home mom (minus when i'm gone for weddings and photoshoots, etc) is busy and exhausting in the summer!

Still I do love summer and wanted to celebrate the Party Time Tuesday sketch challenge with a summery feel card!

Here is my card...

I used the set Sailing By which is available both as a rubber set and a digi download set!
I paperpieced the sails. I've seen so many others do it and always loved the look so I thought it was high time i did it to this set as well! And I must said, it's such a fun way to dress up the stamp! And on top of that, the sails are large and not at all difficult to cut out so putting this card together was so quick and easy! I did use copics to color the boat itself. Super quick! I used E27, E25 and E23 with BG49 and BG45 for the blue line.

The other thing that made this card so easy was a fun sketch to work with!
And when you use the Party Time Tuesday sketch and enter it over on their blog, you are entered to win a $15 gift certificate to the PMS store for any rubber or digi stamps you want!

So be sure to check it out and also check out the PMS blog since a few of the design team members played along as well and made AWESOME samples of this sketch using PMS stamps!

Read more...

Copic Creations with A Day for Daisies

>> Monday, August 15, 2011


The copic Creations challenge team is back with another challenge for you...
to break out those BG's! Any BG copic marker will do!
Check out the Copic Creations blog to read all the details including reading about our awesome sponsor for the next 2 weeks, A Day for Daisies!

A Day for Daisies has adorable digi stamps that you just simply must check out! :D

Here is my card for the challenge (i may have gone a little BG overboard... i didnt use a single marker from another color family!)

Digi stamp is Angelic Angel. She reminds me very much of the West Wind character from the Anime film, Unico that i used to love and adore and watch over and over and over as a kid.
Man, i loved that movie.

Ok, back to the copics...
I literally only used BG color for this. So there are a lot in there. Her skin and clouds are the lightest, BG0000 with a little BG000 to shade. Her dress is BG70, BG72, BG75 and BG78. Her hair... well thats just a hodgepodge of everything really. It's main colors are BG32, BG34 ,BG75, BG49 and BG10 I also outlines the entire image with BG96 and B93.

Be sure to check out the rest of the team by going to the Copic Creations blog and get your card entered to win a fabulous prize!!!

Read more...

Paper Makeup Stamps Blog Hop: Oldies but Goodies!

>> Sunday, August 7, 2011

Well there is no new release from PMS this month (remember the releases are every other month) but as always, it's the 7th so we still have a fun hop for you!

You should have hopped here from Jenn's blog. If you are just starting at my blog, go back to the beginning. We have lots of fun things going on and you wont want to miss anyone's creations!

Here is my card...
Even though this is one of my favorite monsters from PMS, it occured to me when I was choosing which Oldie but Goodie stamp that i'd never used him! I got excited and inked him up! Only to remember we were supposed to ""sign up" for which one we wanted to use so there would be no repeats. Um... Well if you are doing the hop you've already seen Jami's amazing card. WOOPS. I forgot my own rules. Guess it's a good thing i won't fire myself!

I love this guy though! And if YOU are a big fan of the monsters and have missed them terribly... i have good news for you! We DO have some new monsters in the works so definitely stay tuned for our upcoming release!!!

THis card also qualifies for our CHALLENGE issued to you today by our new challenge master, Dawn Mercedes. She wants us to use some fun summery sun colors. Thinks reds, oranges, yellows, etc. Ok, so it's not overly orange but it is orange and I did it with the challenge in mind!

Here's a close up of good ol' sourpuss...
I seriously love this guy. Kinda how i feel on rainy days. I'm not a big fan of rain.

My copic colors used on this are YR14, YR21, and YR20.
For my greys i used C0 C1, C3, and C5

I used nestabilities by spellbinders (labels 11) and airbrushed inside the nestie for some added color.

And now... it's time for you to hop along to the wonderful Lisa Kind!


Read more...

>> Friday, August 5, 2011

Every month the My Time Made Easy design team does a year in review post! We take a template from the past (so not just the past year, but any previously released template and stamps to create something NEW for you all!)
*sigh* Unfortunately for me... my evening did NOT pan out like i had wanted it to!
I had a photoshoot that ran a smidgen long, but no worries.. plenty of time to work on a project until WAM, my 2 year old jumped off something in his room and cut his head bleeding all over. I spent a lot of time consoling him that it wasnt really that bad (no stitches this time, yea!) but by the time that was all over... well i just didnt have the will to muster a project together! So i decided my review post was just going to have to REALLY be a review post! It's a better option that never sleeping as i have a photoshoot tomorrow as well and 3 weddings on saturday! Gotta love the season! Hopefully it's new to many of you! It really is my favorite project i've ever made! :D


This project uses the You've Got Mail template (which is really designed to look like one of the blue mailboxes you see on street corners and grocery store parking lots) and I turned it into something else because it's always wonderful when you can get a little bit more bang for your buck when it comes to crafting supplies. Let's face it, it can be an expensive hobby once you accumulate so much!

If you want to see my original You've Got Mail project (where it actually looks like a mailbox!, click HERE). The change was super easy too. And i love the outcome! I used my SCAL to cut out my template, so when cutting the front piece, i added in a rounded corner rectangle. it's just a shape that comes with SCAL so i didnt need to do anything fancy.

Had i used a PDF the window could have easily been cut out with a craft knife or even a punch.

Here is my project!


Fun huh? Ok, well i thought so! The little details (so easy to change) is really what makes this switch from a mailbox to an oven. I added an oven door handle but just so it wouldnt look like a mailbox handle, i stamped on a little scrap of white paper to create a "towel". I also added 2 circle punch outs to create my stove.


The heart used on the towel was used all over the template. It's from the You've Got Mail acrylic stamp set. I also used the Home Made stamp as this little box is now perfect to give away home made baked goodies, or in this case... some soap that LOOKS like a homemade goodie. :)


Here is the heart again stamped onto my printed digi paper. This paper is from the Darling Dots collection and i just love this shade of pink! I used some pink ink to stamp the heart on top and then also added on some pearl baubles.


I also created a little matching note to include with the gift. This is actually a cut file called love notes and it's only 2.50! Here's a tip, you dont have to cut out everything in the cut file. If you are used SCAL, you just ungroup it, and only keep whatever you want to cut. Why spend a fortune on a scalloped heart punch or even nesties when you can have this one and just resize to fit whatever needs! Perfect!


The little cupcake in this picture is the same little guy that was sitting inside my oven in the pictures above. Believe it or not... it's SOAP! Super easy to make too. Just buy some melt and pour soap and some of those silicone bakewear muffin cups. I also poured out my left over soap onto a silicon baking mat and let it set a few minutes. In the meantime, i stamped a butterfly from the All A Flutter stamp set and cut it out. BUT there is a cut file for that too, which i would have used if i wasnt sitting in my kitchen. Then i just placed the cutout butterfly on top of the set soap, and cut around it with a knife. Easy peasy.


The Love Notes cut file also comes so that you can easily have a little note that opens. here's a little quick shot so you can see what i mean...


So don't be mad at me for my literal review! Instead, go love on the rest of the MTME design team and their awesome review projects!

Read more...

My Time Made Easy: It's in the vase?

>> Tuesday, August 2, 2011


Hello! It's my special day to post a new project from My Time Made Easy!
I'm using the It's In the Bag template again but I've modified it a bit. :D
By not using the closing flaps (i just cut them off after cutting out the template using my SCAL)
and not using any of the scoring tic marks, i've created a vase!

I did keep it REALLY simple! Mostly because time got away from me! haha! However, this came together lickity split so it would make a great hostess gift! Flowers that don't die!

I cut the It's in the Bag template using my SCAL and cricut. Then I used the decorative panels to cut out adhesive fabric (from american crafts) which then easily just stuck right onto my vase! You don't get the fun texture feel that the fabric gives in the photo, but I love using fabric paper on projects! You just have to touch it when you see it! A simple ribbon tied around brought it all in together.


The sentiment stamped right onto the fabric paper is from one of my all time favorite stamp sets Sentimental Occasions which you can find HERE.

And those sweet tulips inside the vase are a cut file from My Time Made Easy called Tender Tulip. You can find it HERE.

Be sure to check out Lauren and Tangii's blog today as they too have some super fun ideas on how to use this awesome template!


Read more...

Copic Creations Challenge with Lily of the Valley

>> Monday, August 1, 2011

2nd post of the day! Scroll down to see my post for My Time Made Easy!!!


Today the copic creations challenge blog has yet another challenge for ya.... to draw grass and landscaping around your image! You know you've seen it done and have been aching to try... so now is the perfect time!

And our sponsor for this challenge is a perfect one... Lily of the Valley!
Their images are just so cute and many of them are perfect for a little landscape doodling!!!

Here is my card...
Is this image not just the sweetest thing! Reminds me of my boys... only these days, my boys are either playing crazy or fighting. I mean, i know it's the norm of brotherhood... but MAN, it's getting a little bit extreme! haha! Every once in awhile i might get a moment of sharing a milkshake with them! :D

Here's a close up of the colored image so you can see my take on the challenge at hand...
To the left you can see the actual stamp itself. THat way you can see that I decided to create a stone wall. It does look like thay are sitting on something, but it could have been a log, a hill, etc. I like the idea of the stone wall for some reason. :D I did also draw in some grass. Since some grass lines were already added my the illustrator, i kept my extra flick marks to a minimum, but adding grass is a GREAT way to enhance your images, and so so easy too! Just a little flick of the pen or marker and you have grass! I like to use a couple different colors for some added depth. :D

Now unfortunately, I dont happen to own any lily of the valley sentiment stamps though they have QUITE a few! You can check them out here. Instead I used one of my absolute favorites from Paper Makeup Stamps, you make the world a better place. Because afterall... the boys may be at each others throats half the day, but they truly are always by each others side and are not at all happy if the other is away or sick, hurt, etc. So it seemed so fitting for this card. :D

A quick recap of the colors used on my card... and then i'll send you on your merry way...
Boys Hair: Y21, YR23, YR30 (YR23 was only used on the boy to the left)
Skin: E00, E21
Shirts: Left G40, G82, G28, Right YG97, YG95, YG91
Pants: E21, E25 ,E27
Wall: C3, C5, W4, N2 (he various grays from warms, cools, yada yada help to give it a more earthy look)
Grass: YG63, YG67, G99,
Sku: BG72, BG70

Now be sure to check out the copic creations blog to get yourself entered in this challenge!!!

Read more...

My Time Made Easy Blog Hop: Back to School

Today is the official release from My Time Made Easy!!!!
You can check out all the new goods in the store right now just by clicking HERE.

Today the MTME design team has a bit of a blog hop for you as we always do on the 1st of the month! And in our traditional fashion, we are giving you a card crazy hop full of LOTS of cards!
And we are all using the new digi set, Back to School!

Now... i decided to go a bit out of my comfort zone for my cards for you, and i'm actually kinda pleased with the results!

I have often told people... my card design skills are ehhhhh, not so super fab. I have a hard time coming up with the über fabulous layouts and creative new ways to do things on a card. Where my comfort is... is in coloring. I'm not the worlds best color'er... but i'm confident in the skills i have. So this time... i decided to EEEEEEEEK, not use my copic markers! I even had everything printed out and then i thought... ya know what... i'm going to try to see how fab i can make these stamps using all computer skills! I also tried to take bits and pieces and layer them to create images since thats one of the glorious things about digi stamps!

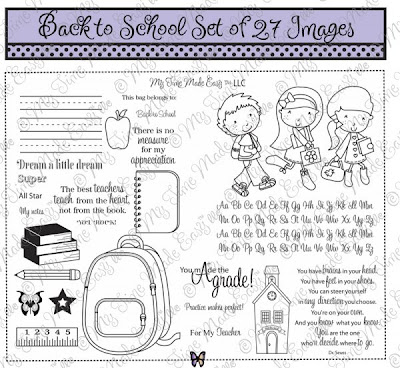
SO first... here's a peek at what this stamp set, Back to School, looks like...
So you can see the super cute little boy image i used yesterday (i just singled out the boy instead of using all 3 kiddos). Then there are quite a few sentiments both short and long as well as LOTS of other images, some of which are perfect to layer!!!

Onto the cards...

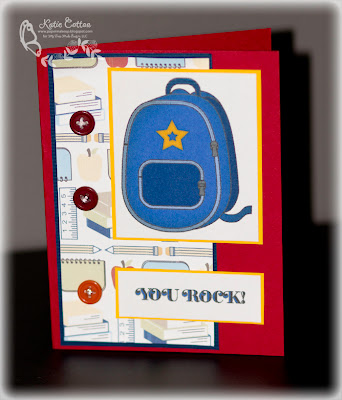
Here's the first using some of my paper scraps from my project yesterday. All the paper used on my cards today is from the Academic Hodge Podge paper pack available here.
First I took the backpack image from the set and then layered the star over it. I use photoshop, so i used the paintbucket to then color the star from black to yellow and also to color in the other pieces of the backpack. THEN... and this is important for successul cool looking color skills... i went to layer effects and chose inner shadow. And wam bam thank you maam, i had some shading! THe overall effect will be more apparent on my next card! You'll notice I also used the You Rock sentiment and colored in the outlined spaces in the same blue from the back pack. :D

Next...

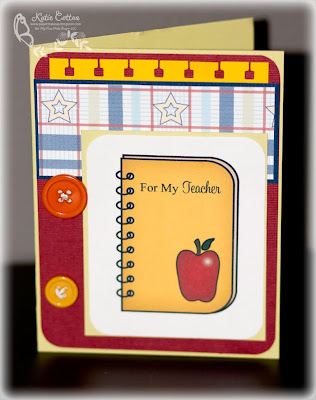
See, the effect of "inner shadow" is more apparent on the yellow. This one again is a layer of stamp images. I took the notebook and enlarged it. Then i took the apple and layered on top as well as the sentiment for my teacher. After filling in all the colors and selecting inner shadow on each layer, i did go to my apple layer and select the normal paintbrush tool but selected the one with the more fuzzy edges. Using white and my opacity at about 55%, i added a little highlight to the apple.

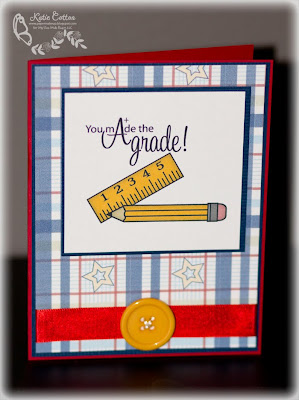
Here's another multi layered image card. I took the ruler (enlarged it) and then using the transform tool (control t) i skewed it so that it would lay on an angle. I then took the pencil image and layered it a bit on top and then added the super fab sentiment that i love (obviously since I also used it on my project yesterday!) The images were color the same way that the ones previously were, even if they are a little smaller. Hint... take the size down in the inner shadow... you should see a toggle that allows you to change the "size" of the shadow. :D

Last but not least...
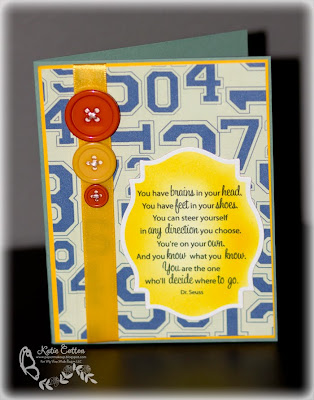
Ok, this one was NOT colored using photoshop. It was simply printed and then i did use the copic airbrush after I cut it out with the nestie. Fading in color ths way is very easy with photoshop, but not with the nestie border around it. So this one was done the "old fashioned" way. :D I do love that sentiment though!

Ok... now off you go to check out the other design teams amazing creations to get you ready to send those kids back to school (right, because you arent secretly ready for the return to schedules and a little bit of extra quiet right?)

Here they are!

Check out the team for all the previews, and amazing ideas!

  • Lauren Meader
  • Debbie Marcinkiewicz
  • Kathryn Berthiaume
  • Katie Cotton (that's me)
  • Lisa Kind
  • Monique Hansen
  • Tangii Crain


  • Have a wonderful day!!!!

    Read more...
    Related Posts with Thumbnails

    Top Blog Sites

    Blog Archive

    Listen to makeupartistkaties playlist


    Get a playlist! Standalone player Get Ringtones

      © Blogger template Webnolia by Ourblogtemplates.com 2009

    Back to TOP