PMS Digi Makeover Challenge: Color Challenge
>> Monday, October 24, 2011


Today is the My Time Made Easy ™ LLC Release and to celebrate we have a BLOG HOP with some hidden treasure!
Each design team member is featuring a different themed house/Shoppe! You won't want to miss anyone!!
· Katie Cotton (that's me)
and Dawn Easton
Be sure you leave a comment on each design team member's blog today because TWO of the design team members are going to be picked to have someone from their blog comments WIN a $50 Gift Certificate to My Time Made Easy ™ LLC!
NO ONE knows which two designers are hiding the treasure, so don't forget to stop by each design team members blog and leave a little love there. Include your email address-so you can be contacted if YOU are one of the lucky winners!
Winners will be drawn September 3rd, and announced on Lauren Meader's Blog .


 I used a really cool "background" ish stamp from Unity Stamp Company called So & So loves. I've always really loved this stamp and hadnt used it in quite some time, so it was time to bust it out. It's quite large and would just about cover the entire cover of a card. This is one of those large candles! I colored the image with copic markers.

My subject title is multi purposeful! I really am going home for the holidays! Well, the thanksgiving holidays anyway! :) We're packing up the kiddos into the truck and making a very long 9 hour drive to Indiana. Please pray for me with no potty accidents and boys who dont try to poke each other!
The other reason for my post is Verve's Project Parade for the month! Now if it no small secret that I'm in love with verve's stamps along with the sketches, challenges, and delicious inspiration from the design team. It truly is the best place for me to go to work up the crafty mojo! And each month they have a project parade showing off the releases from that month fit with a prize at the end!
This month's project parade was to make a holiday gift. The samples from the design team were all less than $10! Well i followed suit making a gift for less than $5. Go me!!!!
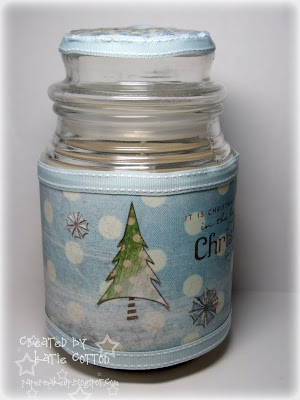
I simply altered a candle jar. I love giving candles, and AC Moore has these fabulously smelling candles for only $4! All the paper and ribbon used on my candle were scraps! (the paper is actually baby boy paper! shh, dont tell the candle it's not christmas paper!)
Here is my gift...
Now of course since it's around the jar of the candle it was hard for me to photograph the scene. So here's a couple other shots...

This was super easy and quick to make! I always have these jar candles around (because we always have them lit in the house, and at 4 bucks a piece and them going on sale for 2 for $5 often, i buy them a lot!) So all i needed was a 3.5 strip of patterened paper, whatever other scraps and bit you want to embellish with and then maybe some ribbon. You could easily add other 3D embellishments. I stuck to paper piecing to make the images stand out. And since they were pieced onto the main patterned paper, i didnt want to distract from them so i kept the entire thing pretty flat.
To paper piece the trees and snowflakes i just stamped them onto paper and cut them out. I also stamped onto the main paper and glued the cutouts inside the stamped images. Also stamping on the background helps to give the paper pieced image a little more oompf.
There a new friday freebie over at the PMS blog... check it out!

Hi everyone! Sorry new stuff never went up on the "feeding the habit" blog. My camera wouldnt charge for me, so i was stuck. I think it's charged now though so i'll be off to take more pictures after i get this post up. :)
This is my entry for Lauren Meader's My Timeless Template challenge over at Stampin Out Alzheimer's event
I also needed to create something for the Bella Club meeting at Funkie Munkie Scraps this saturday. Did you know you can use Lauren's templates like that? You can! You just have to keep all copyright into printed onto the template! And i thought her templates would be perfect since we need a project to do, but it's isnt really a full on class. PERFECT! And i'm hoping that the ladies in the club will realize how perfect Lauren's Templates are and go purchase some of their own! :)
I used her Purseonality Clutch template to create this little bella clutch! Inside I've filled it with stamped out bella images, some baubles and other emBELLAshments and something that every girl needs.... CHOCOLATE! :)
Here's the finished project...


I was really pleased with how it came out and how fast it was able to come together! I printed the bottom out on Bazzill Cardstock (that i forgot to check the color on, SORRY!) and then the top (a separate template design making it super easy to have 2 colors) onto Bittersweet Bazzill Cardstock. The patterned paper i cut slightly smaller and then adhered it to the top side of the template centering it where i wanted and THEN i scored it. It makes it a lot easier to adhere it first so that way the score lines are perfectly fit together! I then ran it thru my sewing machine to give that true purse look. :) I followed this same process to the handle.
The bella is the mini Contentobeabella that comes with the larger version. She was the PERFECT size for this project!!!! 
STAMPS
Contentobeabella and the sentiment is one of mwahbella's
COLORING:
Copic Markers: now this was small, so not a lot of shading going on, just straight colors!
Skin:E00, R20 (just a dot for cheeks!)
Hair & pants: E25
Shirt: R20, R21
Flower: R22, R24
PAPER
Cardstock is Bazzill
Patterned Paper is American Crafts from the Everyday Collection
TOOLS:
My Timeless Templates by Lauren Meader available at PaperTrey Ink
Scallop circle punch by SU
Sewing Machine
ACCESSORIES:
Bellas Baubles
Ok, so i know i said i'd be back with my card for my sketch... but i lied. Well, not entirely. I will be back with that, but i had started this project yesterday and i wanted to finish it (and clean off my craft table!) before i started on a new project. Even though i'm not currently on any design teams, i still feel like i have so much crafting to do this week! WHy? Because everyone has new stamp releases coming out and with these sneak peeks i want them all! And it seems like each company has challenges, and sketches, and prizes to be won! Oh i love it! So, with the recent no spending and use up what i have motto (imposed much more so by my husband than myself), the opportunity to win the stamps means a happier husband. haha. If not, i'm just going to seriously try to work some magic because all these new releases are steller!
Ok, back to my project...
Who says halloween has to be over after october? I had an idea to do something cute with a box and halloween pictures so when i read the All That Scraps challenge for this week (read the blog entry here) i thought, oh this will be perfect!
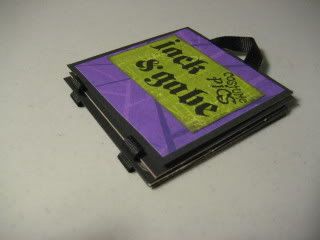
So i made my pizza box using this tutorial and then used some images from the september CC Designs releases. I colored my little "bat bear" with copic markers and used patterned paper from reminisce.
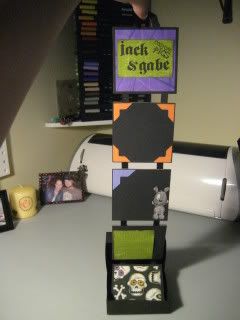
For the inside i put together a sort of "jacob's ladder" only much simpler. To do this, i simply cut square pieces of chipboard to fit inside the box. I connected them using pieces of grosgrain ribbon. My ribbon does not run down each chipboard square though it looks like it does. I cheated and just used strips about an inch and a half long and glued them to the chipboard using fabritac (which is a super strong adhesive, acid free, but bonds ribbon to paper like cement!). Then i topped each piece of chipboard (front and back) with a piece of black cardstock. Then i decorated each square piece (front and back)
So when you open the box you see this...
And as you lift the ladder (using ribbon i looped on the top piece) you see the ladder of different chipboard squares. Keep in mind there are no photos. Each year i will add the halloween photo from that year. By the time the boys are about 10, it will be full! But i can always add more pieces. The backside will have photos as well. But i wanted you to see the project without photos since i only have a couple of years to put on there for now!
Here's a picture of the ladder...
and here's 2 photos so you can see what the ladder (which is removable) looked like.

Thanks for stopping by for a 2nd time today!


© Blogger template Webnolia by Ourblogtemplates.com 2009
Back to TOP