
Chrismtas Cards Made Easy
>> Monday, November 1, 2010
Note: I have 2 posts scheduled for today. If you are looking for my Copic Creations post, please scroll down.
It's November 1st which means 1, the My Time Made Easy release is live and ready for purchase online! You can see all the fabulous new products HERE.
And 2, it's time for a MTME design team group post! Today we are all showing you chrismtas cards that you can made quickly and easily!
I opted to utilize many of the new cut files that are being released today and created 4 chrismtas cards with NO STAMPING! GAAAASP.... i know. hehe. I will likely stamp the inside when i've determined what I will use each card for. But as they are now, they can go on gifts, or be mailed out as christmas cards!
Here is my set...
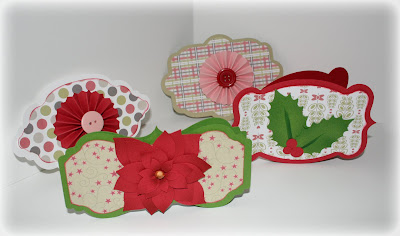
To create my cards, i used 4 different Trendy Tags. There are actually 6 being released!
These tags are so fun! I love the design of them, and at $1.50 each, they are SUPER affordable!
Each tag set comes with 3 cut files. These enables you to have a 2 layers inside the tag that fit perfectly without having to mess with resizing. On each of my cards i have used 1 of the layers, but not the additional inside layer (sometimes it's a perfectly sized oval, other times a rectangle, etc). The 3rd layer is perfect if you are stamping inside, adding a to from, or any other message. I omited this step because i wanted to play with just SOME of the other new fun cut files! Here are the details for each card...

This one is my favorite out of the bunch! I used Trendy Tag 1, along with paper from the Taylor's Teeth Candied Thislestalk paper pack (which i also used another paper from this collection on my star box the other day.
Then I cut the Perfect Poinestia. I LOVE how this layers together! And it was SO easy! I loaded it inso SCAL, click cut and was done! I did want to add some dimension to the petals so i used my copic airbrush to quickly get the center and outside corners. It took maybe an additional 20 seconds!

Next up.... I used Trendy Tag 2. I love this tag too. I should have mentioned before... i found the best place to score on each tag which was usually at the "in" point of a scallop or bubble. You can see it clearly in this photo. I scored both sides and then adhered the smaller portion top and bottom together to create an edge to the card.
My paper on this card comes from the new paper collection being released called Timeless Tradition. Yep, i love it. All of these papers can be used christmas after christmas!
For the Holly, i used the Holly Day Accents! Again, i airbrushed the edges and flicked my copic marker up the center to create a vein.

Onto card number 3. For this one i used Trendy Tag 4.
Again I used paper from the Timeless Tradion paper pack, but this time i decided to pull from the more faint pink in the paper pattern and create a pink rosette using the Rosey Posey Rosette cut file! Oh my word... i've always been impressed when others do this... i had no idea it was so easy! I think i'll do this more often!!!!
I added a button on top just because i did want my card to stay quick and easy, but a bow would have been nice as well. Or any other embellishment, a cut stamp image maybe?

Last but not least! Card 4! For this one i used trendy tag number 3.
Again I used paper from the Timeless Tradition paper pack and this time for my center rosette, i used the cut that had the more zigzag edge rather than the scalloped edge (they both come with the same cut file purchase). Now i will say before you think you can just cut your own... these are the perfect length to create this rosette! I am in love with how easy it is with this cut file. I just cant get over it! haha!
Ok, now that this post is about a half a mile long... let me escort you on your way to the other fabulous design team members....
My Time Made Easy Design Team:
Have a wonderful day!!!!


7 comments:
What a fantastic idea Katie!! I love these!!Your poinsettia looks fabo!!
What a clever idea to turn the tags into little cards! So absolutely stinkin' CUTE :)
Super adorable little cards Katie!
Oh, not only perfect little cards...but how cute would they be sitting on a gift??!! CUTE!
These are fabulous chickie!!! So brilliant :)
Katie these are wonderful - way to showcase the trendy tags girl - and NO stamping!>!? WOW - easy and cute.
Those are so cute!! I really need to get SCAL and learn how to use it so I can use these awesome templates - I'm not so great at using them as pdfs.
Post a Comment