Just Expressing my Thanks with the MTME release!

>> Thursday, September 30, 2010

Tomorrow the new release from My Time Made Easy will be live on the site! And I cant even begin to say how excited I am about it! This month Lauren has brought you LOADS of coffee themed stamps and templates! It does stop there, there is a few spooky sets and an addition to last months Shop Around template! Holy cow... it's a big release and the team has been hard at work to bring you samples but they are oh so worth it because this release just ROCKS!
8 stamp sets... 4 digi sets, 5 templates and 3 cut files... oh yeah... it's big!

Ok... so what i have to show you today??

The Grab a Cup template along with a few stamp sets on my card and some of the fabulous new pretty printables paper!


Grab a Cup Template $5

Available in PDF, SVG, DXF, GSD, and WPC

Completed Project Size:

3 3/4 Inches Wide

3 1/2 Inches Deep

3 1/4 Inches Tall

Sometime you just want to grab a cup!

If you like coffee, tea, chai, latte, cocoa or even a cup o' soup you, will fall in love with this 3 dimensional version of the "coffee/tea cup".

It is simply adorable and perfectly sized for a variety of options.

You can fill it with a variety of gifts, or use it as the perfect party favor!

If you love anything that has to do with hot beverages you will definitely want to view our Grab a Cup ©, Grab a Cup Sentiments ©, Fancy a Cuppa ©, Fancy a Cuppa Add On © , and the A Spot of Tea © stamp sets!


Is this cup not just the cutest thing you've ever seen?! I just LOVE it! You may remember long ago i turned the Bouncing Baby Buggy into a coffee cup. I'm just a smidgen obsessed with coffee! So just imagine my GLEE when Lauren created this super adorable cup which by the way, definitely makes a better coffee cup than i made before! hahaha!

I printed the Cafe Text paper from the All Steamed Up pretty printables paper pack and GASP printed the pdf file onto it. Yep... i did NOT use my cricut for this one. Sometimes it's just fun to go a little old school. hahaha. The base was printed on coordinating cardstock.

To the right you can see a better view of the handle and the inside of my mug. I SHOULD have printed a color on the other side of the paper but I didnt think about that at the start, only when i put it together and thought... oh... it's just white in there. Well thats boring. hahaha. So i pulled out my trusty copic airbrush and quickly blasted the inside a nice coffee color. Much better. :D

Now onto my card... i printed more papers from the All Steamed Up pretty printables paper pack. And then got to work with some of the SUPER fabulous new stamps!

Most notably the HUGE coffee cup! This is from the Fancy a Cuppa stamp set. I love that you can stamp in a pattern for the cup!! And there are different options for girly flowers to more masculine checkered. I went with solid because I already had a lot going on with my card! There is also a cup outline ( i used that too) but it makes it perfect for paper piecing.

My steam above the cup is actually from the Grab a Cup stamp set. It may fit the stamps of coffee cups better in that set than my GIGONDOR coffee cup on my card, but by adding 3 steams, i think it works great!!!

Next up is my sentiment...

Just Expressing my Thanks is from the Grab a Cup sentiment set. OMG - this set is a MUST have for coffee stamp collectors! You will use it with EVERYTHING coffee related not just the MTME stamps. You will LOVE IT, i'm telling you!!! :D

I added in the coffee cup from the Fancy a Cuppa set (the same set i got the big mug from).

So thats my card for you today! Be sure to check out Lauren Meader's, Catherine Doucette's, Stephanie Kraft's, Tammy Hershberger's and Pam Imholz's blogs as well as our guests for the month, Debbie Marcinkiewicz and Ashley Canon Newell! I still pinch myself for being surrounded by such talent!!!!!

Oh! One last SHAMELESS PLUG - my BLOG CANDY is set to send tomorrow! Dont forget to enter HERE.


Read more...

A Card for no reason....

>> Monday, September 27, 2010


I have no real reason for my card today. And sometimes, those are the best cards! When you dont feel like it has to be one way or another. :D
Not to mention the fact that i have be hard at work on a new craft adventure with my hubby.
Hopefully i will have more to show you all on that very soon!!!

Ok, back to my card...
Here's Webster the Owl from Paper Makeup Stamps.

The colored image is from a class i taught this past week at Scrapnesia.
We were working on a few brown families (E21, E25, E27 and E33, E35, E37)
I wanted to be sure to point out to my students that the brown tones look AWESOME colored on kraft paper. Not only are they very fun to use this way, but they provide a different final color since they are colored on a brown paper and therefore, give you a different look making you FEEL like you have more markers than you really do! WOOT WOOT!

Here's a close up view...
Here i used the following browns... E25 and E27 make up the darkest parts of the feathers. The medium is E25 and E21 (which while tricky to get the right blend on white paper is MUCH easier on kraft paper) and then the lightest parts are E00 and E21. I did add a little R32 on the owls cheek just for run. Remember, you need a brighter pink (or any color for that matter) when you are coloring on kraft cardstock as some of the vibrancy will be lost.

That brings me to the package... believe it or not... those are YG03, YG05, YG07 and YR04, YR07. They dont seem nearly as bright, do they? The paper you use greatly affects the outcome color. This is even true of white cardstock... your colors will look much brighter if you use for example, Neenah Solar White verses Georpia Pacific white. This is why your chart should alway be printed on the paper you most often color on.

The whites in the owls eyes were made with a simple White colored pencil.

My paper on this card is a design from the city park pack from AC (a division of American Crafts). There are 6x6 pads of this paper available in the PMS store, but you might want to act fast, i think there may only be a couple left of City Park!

The dotted paper is from Bo Bunny.

Well... thats all i have for ya today!!!! Have a good one!!

Read more...

MTME SPOOKY SNEAK PEEK! Available for preorder NOW!

>> Saturday, September 25, 2010


Isnt this stamp set super adorable! I'm absolutely IN LOVE with it! Fellow design team member for My Time Made Easy, Catherine Doucette, has begun to design some stamp sets for MTME and boy am i so glad that she did! This stamp set is perfect for halloween treats and such! You can see some awesome samples on Catherine's blog!

Now since halloween is fast approaching... Lauren decided to ordered a limited quantity of this stamp set and in fact... you can put in your pre-order NOW to assure that it will be mailed by October 1st! You can order it by going HERE. Of course there is also a digi version if you'd like! You can order that one HERE.

Now this set has actually been available to preorder since thursday! So you better get on it! I finally had a chance to sit down and make a fun little card with it... but i can already tell... i will be using this one BUNCHES this october!

Here is my card...
Fun huh? I am totally in love with that spider web! Isnt it just fantastic! It fits perfectly inside the label that is in another stamp set being released called A Secret Surprise. Um... yeah... all your crafters out there that like to join in secret sister swaps and what not... you MUST have that set. but you'll have to wait to see it. HAHAHAHA.

The pumpkin and spiders are also from the A Spooky Surprise set as well as the sentiment. The diamond pattern for my background is from the Argyle Amazement stamp set.

Here's a close up view...

So fun!

Ok... one last thing.... Lauren's daughter, Alexa was admitted to the hospital with a severe case of pneumonia. You can read about this on Lauren's blog. But some extra prayers would be wonderful!

Be sure to check out Catherine's, Pam's and Lauren's blog for some cute samples using A Spooky Surprise!

Have a wonderful day!

Read more...

Makeup 4 the Weekend Challenge!

>> Friday, September 24, 2010

It's friday so that means another Makeup 4 the Weekend challenge for you from Paper Makeup Stamps. I KNOW - i've participated 2 weeks in a row! WOOT! This week we were challenged by Lisa McKinney to use this fun photo as inspiration for our project.


Now for anyone who knows me... they know i take inspiration challenges a smidgen literally. Probably entirely TOO literally! haha! Here's the card i so didnt really come up with...

Yeah i'm not so original, huh? I did have fun stamping the grass in orange. hehehe. Ok... so here's my breakdown of how i made the card...

First i took the grass from the Faith Hope Love set and first stamped it a little high in a burnt orange ink color (Autumn Terracotta by CTMH) and then again in a brown color so that the grass hung off the cardstock a bit giving me 2 different heights.
Then i stamped the swirlie tree in the same brown ink over the whole cardfront.
The sun image i created the same way i did in my post the other day (you can see it HERE if you missed it). This time i used Y15 copic marker with YR18 to give it a little depth.
Last but not least, i stamped the Ready for Fall sentiment right on top of it all.
The edges were sponged with Rusty Hinge distress ink.
I then layered my cardfront twice and bada bing bada boom my card was done. All in about 10 minutes. So i may not be original, but i was fast! hehehe!

Be sure to check out Christi Thorsen, Christi Snow and Dawn Barrett for some more fun projects using this inspiration! And check out the PMS Company Blog if you want to play along and get the chance to win the PMS stamp of your choice!

Read more...

One of Jack's Cards

>> Wednesday, September 22, 2010

Today i'm letting my 4 year old take over my blog. He's giving mama a break. Ok, so not really.
Most know this, but there may be a few readers that are newer to my blog, so here's my quick run down. My oldest son is 4 years old. He loves to craft with me and is very independent and adamant what he wants to do to a card or project and i do NOT get to help him! His teachers say the same thing. But at least he likes to craft with me, so i'll take what i can get!

Today, one of his friends in preschool turned 5!!!! He thought that was really impressive. My heart ached at the fact that in the spring... HE will be turning 5!!!!! WAAAAH!

Here is the card he made for his friend... other than getting out the airbrush for him... i had no part in this! (and yes, i'm crazy enough to let him use my copic airbrush... with a LOT of paper laid out on my table just in case!

He chose this alligator from a Close to My Heart stamp set because his friend "likes animals a lot". He colored him in with a G82 copic marker (he wanted to use a G28... i had to explain that it might be a little hard to see the alligator after using such a dark green, so he said ok and chose the G82). Then he cut him out. They have been practicing cutting in school and he was very pleased to cut everything out himself. Next came the airbrush. eeeeeek. This is the first time i've let him use it.

The ribbon at the top he was very pleased with as well. He is very into tying knots right now and he wanted one for his card. then he layed it across the top and said "there, now it's like one of yours". Perhaps i use ribbon a bit too much?

He added the stars in a "pattern". He said he was just going to have to have more than 5 stars even though he was turning 5 because he needed to finish the pattern. Silver Gold Silver Gold, Silver... what comes next mama? Um, Gold i say? Very good mama! Now you can have a star!
Ahhh, preschool.

Then we decided it needed a sentiment and he said just make it say happy birthday. So i pulled out the Birthday Cheer set from Paper Makeup Stamps and told him all of these say happy birthday, so he can choose. And so he did.

He was so proud of his card... he even took the picture himself and told me i could type it for him later. hahaha.

I love my kid.


Read more...

Paper Makeup Stamps and Quixotic Paperie Blog Hop!

>> Monday, September 20, 2010

Today the Paper Makeup Artists are teaming up with the Quixotic Paperie Design Team. Quixotic Paperie is an online retailer of TONS of scrapbooking products in the UK and they are the ONLY online UK provider of Paper Makeup Stamps.


Elaine came to me with the idea to do a joint hop from our design teams and let me tell ya... i just LOVED it! Elaine has a superbly talented design team and i tend to love my paper makeup artists as well so today's hop is sure to inspire!

Here is my card for you today...

It's a simple almost one layer card. :D I did mat my main layer and add photo corners but other than that, it's all one layer. I rarely do one layer cards or simple cards at all because i always feel like i'm missing something, but i LOVE when i see them done by others. So i thought i'd try my hand at it again!

For this sunset card... i used the Faith Hope Love set which for UK fans, you can get HERE and for the US fans you can get HERE.

For those a bit scared of the whole "sunset" type of card... here's a brief rundown of how i do it.


1. First use any die cutting system or punch to cut a circle from a scrap of cardstock. You will need both pieces.


2. On a larger piece of cardstock that will become your card front (note, i like to go larger than what i will need and then cut to the size i want) place your circle shape where you want your sun to be. Then using an airbrush system or sponging technique (here i used the airbrush and copics) begin to spray around your circle (sun) shape. Progressively get darker as you move away from the sun shape.


3. Once you have completed step 2, remove your circle cut out and then place your other scrap piece (that you cut the circle out of) over your paper so that the cut out space is directly over the white space left from step 2.


4. Now airbrush or sponge into the hole left on your other cardstock piece. I like to choose 1 side to be a little darker in color. It just gives for a pretty effect. It makes the sun look a little rounder, even though when we look at the sun in real life, we don't see a ball, but just a bright circle. haha!


5. Now your sun scene is created! And you can stamp on top as you'd like to! I created a scene using the grass from the Faith Hope Love set and then also some of the smaller flowers.

I also used the sentiment Hello Sunshine right on the same layer.

This sentiment can be found HERE for the UK
or HERE for the US.


Final step, and this really is just one of those helpful tidbits... but as i said, i like to stamp on a larger piece of cardstock than i need. This way i dont make a mess on my table and i also can be assured that i have perfect placement of my over all image. See here you can see the bottom of my grass, but on my final card it's been cut off. :D


I hope you enjoyed my little mini tutorial. Now to go along to the rest of the hop! If you are going in order... Christi Thorsen is next on your list. However, i've included the list of all the hop participants below! Have fun and have a wonderful day!


Have a wonderful Hop!!!

Read more...

Makeup 4 the Weekend #42

>> Friday, September 17, 2010

Friday means another Makeup 4 the Weekend challenge from Paper Makeup Stamps and I played along AGAIN! Woot Woot! Go me for playing my own company's challenge. BWAHAHA. I say that in jest because i often miss the deadline to play. So sad really. I'm REALLY going to be more on top of it this fall. :D


Ok... here's the challenge... it's a sketch challenge, but Ginger adapted the sketch so that both cardmakers AND scrapbookers can play! I LOVE that!

I went the route of the cardmaker because quite frankly... that was what i had time for this week!

The 2 sketches are very similar... but obviously are just tweaked slightly for if you want a layout or a card. I really wanted to have 1 of each for this challenge! but hey, at least i have something, right?

I used paper and embellies from the Arelia's World of Makeup Believe kit again. I'm telling you, i love that kit! The papers are all from Echo Park's Life is Good collection. I also used some fun glitter ribbon from Making Memories and cut strips of the adheisve fabric (from American Crafts) all of which comes in the kit. Also in the kit are the In Stitches blossoms with the buttons already sewn on. Man i love those things. The only elements on my card that are NOT from the kit is the cream cardstock that i used around the circles, the liquid pearls next to the sentiment and then sentiment itself. However, the sentiment is one of PMS's many simple sentiment stamps that is sold by itself and is currently on sale for only a buck (as bare rubber)! You can find it HERE.

Be sure to check out the Paper Makeup Stamps blog to see what else this challenge has to offer you! There are more samples, and another sketch for you to check out if you are a scrapper! AND there is a free stamp up for grabs! But you have to play to win! So check it out!!!

Read more...

Skipping Stones supports Breast Cancer...

>> Thursday, September 16, 2010

Today while doing my daily inspiration hopping... i came across Shannan Tuebner's blog. Her card is grogeous by the way! Anyhoo - she's taking part in Skipping Stone's Blogs 4 Boobies blog hop! Skipping Stones... i know them! I have some of their stamps that desperately need to see ink... the wheels in my head begin to turn!

Ok, back to the Blogs 4 Boobies hop because you NEEEED to know about it!
You can read the special info at the start of the hop HERE. Basically... all sales from Skipping Stones will donate $2 per stamp set to the Susan G Komen foundation. There is also a release of 2 new sets that are super cute. :D And not only that, but you can BID on cards in the hop from some of the top notch crafting girls in blogland and those winning bids will also go to the Susan G Komen foundation. Pretty cool huh?!

So i looked at the clock... and thought... yeah i have time before preschool gets out. Mind you i have other things i'm supposed to be doing, but shhhhhh. :D

Also in my daily inspiration with my coffee i saw that the Color Throwdown color challenge is one of my all time favorite color combos. Um... how can i NOT play?!

So i got to work on this card.. i wish i had paid more attention to the Blogs 4 Boobies hop because there is a sketch challenge issued. WOOOPS. Oh well. :D I still like my card. :D

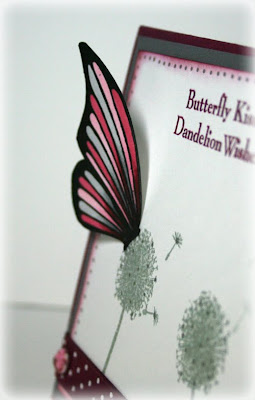
I comboe'd 2 stamp sets for this card. The dandelions, extra seeds and sentiment are from Dandelion Dreams (you know i cant resist a dandelion set!). The butterfly is from a wonderful heartfelt set called Healing Wings.

Here's a detail shot. I stamped the butterfly on a scrap piece of paper, colored it using copics (R81, R83, R85, R89, N2 & N4) Then i cut it out and set it aside.

On my main piece of cardstock for the cardfront, i stamped the dandelions in grey ink and then used the separate seedling to stamp some fluffs scattering the sky.r Inside the seedlings and main dandies i used a silver glitter pen from gelly roll. Then i stamped my sentiment in Rich Razzelberry ink and sponged the edges.

Then i took the butterfly, bent it back a bit from the "body" and glued just the body part to the top of one of the dandelions.

One more detail shot... I decided the card didnt look "done" enough after i put the ribbon down along the bottom so i added some extra bling by using pink rhinestones and dotting all along the edge with the same silver glitter gel pen.

And that completes my card!

Be sure to check out this spectacular blog hop... maybe bid on a card or 2? Buy yourself a fabulous new stamp set (i didnt mention this... but Skipping Stone Design stamps are clear stamps of great quality and a great price point!) You really need to check them out!

Have a great day!!!

Read more...

Arelia's World of Make Believe Kit Review

>> Wednesday, September 15, 2010


2nd post of the day! Scroll down to see my card for the Copic Creations Challenge!

I'll keep this post short... since it's my 2nd one of the day!

Today Lisa Kind and I are reviewing the Arelia's World of Make Believe card kit from Paper Makeup Stamps. Since you already saw a card with the Arelia Fairy on it (if you didnt, click HERE), i decided to use the word art for my card today!


Sometimes all you need for a fun card is a good wordart and some fun papers to make layers with. This card came together in NO time! And i was primarily using up some scrap pieces from previous cards i've made with this kit! I distressed my edges (especially on the fabric paper which is the aqua and white polka dot paper) to give it a more antiqued look. I airbrushed inside the nestie to help the wordart pop out a bit. The ribbon (also from the kit) was just used as a little accent. I love the sheer-ness of the ribbon so you can see the details behind it. I also topped the card off with some ready make embellishments by Sassafrass Lass (also in the kit) called Institches blossoms. I LOOOOVE these! They have foam adhesive on the back, are already stitched together with the sewn button on top. Such an easy way to make an extra impact to a card with very little work from yourself!

Be sure to check out what Lisa has done with the kit for today and continue to scroll down to read my Copic Creations challenge post and check out my card using Kraftin' Kimmie's Stamps!

Read more...

Copic Creations Challenge - No 35

Copic Creations has 2 challenges for you every month! This round we have been sponsored by Kraftin' Kimmie's Stamps! I just adore Kimmie Reid so i was super stoked to have us sponsor us in this challenge. Please stop by Kraftin' Kimmie's Stamps to check out her most recent additions to her line. Then be sure to check out the Copic Creations blog to see the other talented designers cards and also enter yourself in the challenge. The winner will receive 2 Kraftin' Kimmie's stamps!!!

Our challenge for these next 2 weeks is to use shadow colors! The girls have really rocked this challenge, and while i was proud of my card... well... correction, i WAS proud of my card until i saw theirs! They really did an amazing job. I dont think i went "far enough" with the challenge to use the gray value markers for shadows. Alas, here is my card anyway!

Is this sweetie not just hilarious with her little finger up in the air, ready to poke her doll with a pin!

Now i did use the neutral gray markers both around my image and also within my image where there was an absence of light. In real life (look at photos) where there is an absence of light (take for example where a tree branch is in the way of the suns light and your face... you get a shadow. Well that shadow has GRAY VALUE. It's not just a darker color that you skin. So i wanted to use the gray colors in those areas with absent light (the top of the dolls head under her cheek/chin, under and beside the the doll on her dress, under the pockets on her dress (like they were really sticking out), on her bloomers just under her hemline, etc.

I probably could have gone even further... o maybe did more around the entire image. But i'm still pleased with how the overall look turned out.


Now take a peek at the sentiment...
This sentiment is actually NOT a kraftin' kimmie's stamp. It's one i've had forever that i picked up at AC moore to stamp on the envelopes of cards i make for people. I think its just hilarious! But it was just SO appropriate for this card and when else am i going to be able to put it ON the cardfront itself! I just HAD to take advantage!

The Deets
Stamps Kraftin Kimmie's Stamps (Drucilla), sentiment is from Limited Edition RS
Copics Used: N3, N4, N5, N6, YR12, YR16, YR18, YG21, YG25, BV00, BV02, BV04, E00, E21, E31, E02, R27, R25
Paper: XPress It white cardstock, Echo Park Happy Halloween,
Accessories: Ribbon from the stash; Epoxy Brads from Kaisercaft (Sakura park collection)

Have a wonderful day!

Read more...

My Sweet Baby is 2!

>> Tuesday, September 14, 2010


I dont have anything crafty to share today, but i just have to give a shout out to my favorite pint size guy!

I cant believe this little guy is 2 today! Obviously not in the above photo... there he is just 1 week old. Here he is recently... this is from his first day of preschool...

(he must have heard the rumor there was homework in preschool so he's practicing on his computer)

(very proud of his school bag like big brother Jack's)
Told ya he was proud of it, i was asking him to hold it... not hold it up, just hold it!

Here's Gabe and Jack getting ready to head to school!

So yeah.... my baby is 2. I think i'll go cry some more!

but i'll get my act together before my post tomorrow, i promise. :D

Read more...

A scrapbook page with My Mind's Eye

>> Monday, September 13, 2010


This post is going to be a quickie, but this is a scrapbook layout I did a bit back. Remember the My Mind's Eye scrapbook page i did of gabe at the zoo? Well this is the matching page. :D
I used different papers from the Alphabet Soup collection from MME, but of course since it's the same collection, it all matches pretty well. :D

Quick story on whats going on in the photos... at the Indianapolis Zoo there is a cheetah exhibit. To raise money to help the almost endangered cheetah species, you can pay .50¢ to "race a cheetah". Now of course the cheetahs dont actually line up. Haha. You do run past their exhibit, but you are racing a light that is the speed of a cheetah running. Yeah, i think Jack made it about 2 feet before being outrun. hahah. But he had fun and Bopi (my dad) got a great camera shot of him in action!

I used elements from the "pop out" elements page. The scallop border, picture frame and arrows all came from this sheet. I used the sheet on a card and another scrapbook page too and i STILL have left overs.

So whats what i have to share with ya today! Have a great one!!!

Read more...

A Friendly Challenge with Verve

>> Sunday, September 12, 2010

So at the most recent Verve Stamps release... i was hemming and hawing over what stamps to get. And i was thinking, i do have so many stamps that need to see some ink... but man these are so cah-uuuuuute! I NEEEEEED them. We've all been there right? Trying to decide whether or not we truly need to have another flower set? Well... my dear friend Tina is ever the enabler. She said, oh you HAVE to get them, because i am going to challenge you to use them! And challenge she did! She issued 2 challenges... one to use a sketch based off of THIS CARD and then to make a tag. We ended up getting the same stamp sets, so this was a fun "challenge". I can't wait to see what she came up with! She issued these challenges the night of the verve release, but we both had so much going on with other releases (included both of us with PMS) that we decided September 12th would be OUR challenge day! It's a bit of a...um.... throwdown if you will!

So here's what i did with the sketch challenge...

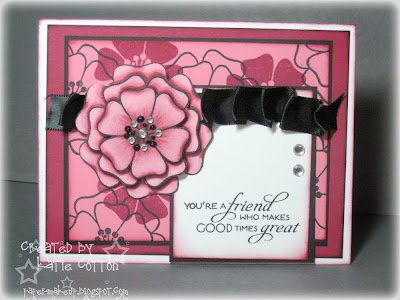
I used Verve's set, Great Friend. I LOVE those flowers! And i mean LOVE! I love that there are both outlines and solids. I even created my own background paper with them. I was 100% the stamper for this card! :D And look what else fun you can do with this set...
Layers GALORE! I love giving added dimension to a card or scrapbook layout and foam adhesive just rocks! Plus it doesnt add a lot of weight but it does give depth!!! I did add both blind and stickles to the top most layer to so there is some mega depth. It's a good thing i hand delivered this card yesterday (i had a friend having a bummer of a day so i had her in mind for this card the whole time anyway!)


Ok... next challenge was to make a tag. Easy enough, right? Well i stamped the front of this um, maybe 7 or 8 times? Or MORE. I just couldnt get it right. The ink wouldnt do what i wanted to, and then the embossing wouldnt work the way i wanted. I finally figured out my perfect combo and then i was very pleased with the result. I think this tag would make a great bookmark and i have just the person in mind to send it to. :D Oh yeah, you have to see it right?

I had a really hard time photographing it after everything. The embossing powder really reflected the light. hahahaha. It does look prettier in real life, but you get the idea.

Ok... so now you have to see what tina did. No doubt they are STUNNING!

Read more...

1 card - 3 "assignments" WOOT!

>> Saturday, September 11, 2010

oooooo... i multi tasked for my card today! I wanted to have a card up for the Release in Review post for Paper Makeup Stamps... I am the sponsor for the challenge that went live at midnight over at Color Me Creative (more on that in a bit) AND sketch saturday is having a sketch challenge today that i was lucky enough to get a peek of the sketch before making my card!


So... 1 card... 3 "assignments". I feel accomplished!

My card went a little circus on me... no no no... it's daring. Afterall, life is a daring adventure, or nothing! RIght? hehehehe. Ok, so yeah, it's a seriously bright and glittery card! But i was in a chipper mood making it since i just had my first date night in a couple of years (not kidding!)

Ok... so here's my "assignments" for the day!
Well... the review was easy... just wanted to use one of the new releases from the September release! Done and Done and in fact, i used 2! The pinwheel is Kat's Pinwheel and it is SO much fun to color (again.... more on that later!!!) and the wordart is the new larger sized Daring Adventure wordart.

Next up... I (personally, not the stamp company) am this week's challenge hostess in the Copic Challenge group over at the Color Me Creative Classroom. Anyone can be a member of this challenge group. Just become a member of Suzanne Dean's Color Me Creative Classroom (she also have phenom classes, but you can be a community member for free). For the challenge this week, I challenge everyone to use feather blending of 2 contrasting colors. So by contrasting, they need to be opposite of each other or at least very different from each other. In this case, i used Blue into Red (B37, B34, B31, R30, R32, R35, R37 - yes i fit all those into that tiny space!) and then also YR18, YR15, YR12, YG11, YG13, YG17.

To achieve this look, i work from the outsides in starting with my darkest colors first and then eventually overlapping my lightest colors in the center.

GIVEAWAY - i'm giving away 2 new release stamps to a participant of this challenge! So go over and check it out!!!

Ok, last but not least is the sketch challenge over at Sketch Saturday.
The sketch is fun and since i knew i wanted to use the pinwheel image for my copic challenge i thought, well hot dog! That star can be a pinwheel! hahaha! And a wordart is still an image right? Well, it is to me! ;) My hardest part was the thinnest strip. I knew i wanted to follow the sketch and have something there... but my background paper had been covered quite a bit. So i used fun fiber! I rarely pull this out, but i just feel like it worked out perfectly! My other variation is my mat on the wordart image. Thats actually a negative cut from a MTME project i did a bit back. I save every single scrap. I was going to cut off the bump on the top, but it looked kinda fun and very marquee esque. Since my card was already a little carnival-ish... i decided to run with it and even used some bling to add to the glitz! I also used my new Smooch Spritz on 2 of my extra cardstock pieces. Holy MOLY does that stuff sparkle! That pink and blue cardstock was just plain ol' cardstock before my smooch got a hold of it (and my fingers! hahahahah, i am one glitter monster today!)

Ok... perhaps i'm still giddy from my date night, but now i must go. Have a wonderful day! Be sure to check out those awesome challenges and play along!!!!!


Read more...

Paper Makeup Stamps Release in Review and my BLOOOOOG CAAAANDY

>> Friday, September 10, 2010


ETA: Blog Candy Winner Annouced Below!

Hey everyone! I know i promised my blog candy days ago! Shame on me! But this is my release burnout time, so i'm sorry about that! haha!

Today is a Release in Review day for PMS so I thought i'd share the card i made for one of the Release party Challenges (a sketch! - link up your card to this post!) There are prizes involved!

Here is my card!

I used Chatty Cathy and some super fun paper by My Mind's Eye that i snagged from my LSS the moment i saw it because i knew that miss Chatty Cathy was coming! It's perfect, is it not?


this post gives you the details about the release party challenges, the prizes and samples! You dont want to miss out on the fun.

I changed the square to a circle and cut Chatty Cathy out with a nestie before airbrushing some bright orange for an extra pop of color.


Ok ok ok, i know you are excited about this blog candy! Well, i've been gathering it all together and need to get a good picture of it all. Still, i suppose better get it posted already! For those who missed why i'm having a blog candy, i recently went over 100,000 hits on my blog! So i'm pretty excited and have been gathering "favorites" to put together in 1 big blog candy!

Here's some of my favs i've collected for you!

Paper Makeup Stamps! You know I'd have some PMS didnt you?!
Ok, so many of my followers have some paper makeup stamps in their collection, so i'm putting up a $50 gift certificate towards any stamps of your choice!

PLUS - The Will to Daydream Card Kit

Copics - My most everyday used colors... E00, E21, E25, Y21, YR23

Spellbinders BRAND NEW RELEASE of the Eyelet Square Die Set
(quite hard to find mind you!)

Rosary Bracelet from Arelia's Pretties in pink and grey! Made just for one of my readers and donated by Rachel. It is just GORGEOUS!

$5 gift certificate from My Time Made Easy so you can get yourself a fun new template to play with!

And now some other new stamp sets from some fav companies....


Inspiration from Close to My Heart

Wishing you the Best From Verve Stamps

A Slew of embellies from PizazzaPlenty

A clear stamp set - super cute... wish i knew who made it. hahahaha

And i'll likely add more... but right now we're just under 200 work of goodies!!!


You know you wanna win this! Well... my blog is propelled by my followers! So leave a comment here telling me how YOU follow my blog. If you are already a "follower" then great. In you google reader? Subscriber? Blog Roll? I'm just very interested to find out how you guys like to see what i do! If you want to repost this candy on your blog... maybe help me find a new crafter who might like my blog, thats great! But not required. :D

You have until September 30th to enter!!!!

Have a wonderful day!!!!

AND NOW!!!!

The winner of the blog candy chosen by Random.Org is....


Read more...
Related Posts with Thumbnails

Top Blog Sites

Blog Archive

Listen to makeupartistkaties playlist


Get a playlist! Standalone player Get Ringtones

  © Blogger template Webnolia by Ourblogtemplates.com 2009

Back to TOP