My Time Made Easy - Day of Cards!

>> Saturday, May 1, 2010

Well today the My Time Made Easy May release is live on the site and ready for your orders!

Last month on the first the design team had a card day. Lauren said she had a great response to it so we're doing it again!

Ok, so many of you know that My Time Made Easy has awesome templates to make gift giving SO easy, stylist and NOT expensive! But MTME also has awesome and i mean AWESOME clear stamps! Superb quality! And they match the very cute templates!

But this month.... not only are there cute stamps to match the templates, but there are some awesome sentiments AND background stamps! WOOHOO!
Possibilties are now truly endless with these products!

Here's my card for you today...


I made all my own patterns on the paper! :D it was fun!
I used the Paper Patterned pieces stamp set that only costs 12 bucks!
This stamp set also has a bunch of cute frames (including the one you see on my card).
I stamped the set of 6 circles repeatedly in sorbet (CTMH) ink. I then stamped the small flower inside the circles in creme brule and juniper breeze inks (CTMH). In the center of all the juniper breeze flowers, i added various small sizes pearls by Kaisercraft.

For the red piece, i used the stamp set Puckered Up Patterns that also is only 12 buckaroos.
I actually had fun making some background using this set as i instantly fell in love with the largest stamp in this set, but then ended up liking my other paper more! haha! I didnt even end up using it because i didnt want to cover the other pattern up! So maybe you'll see it on another card soon! :D

Here are some detail shots of the card...


And here's a closeup of the sentiement...

This sentiment is part of a sensationally wonderful new sentiment set released TODAY
called... what else... Sensational Sentiments! And again... this set is 12 bucks!
What a steal!

I did try the card one more way... i'm not sure which way i like better... what do you think?

Not much is changed, i just added some fun ribbon. I just cant leave well enough alone sometimes. hahahahah!

Ok, now be sure to check out the rest of the design team as everyone has some fun cards to share today as well as our NEW TEAM MEMBERS! So check them out!


Photobucket

Lauren Meader - Owner, designer


Dawn Easton


Geny Cassidy


Katie Cotton - that's me


Lesa Rapp


Pam Imholz


Stephanie Kraft


Tracey Cuccia


Mona Pendleton


Read more...

My Time Made Easy Sneak Peeks day 1

>> Wednesday, April 28, 2010

Holy CRRAAAAP! WHen did it get to be the end of the month!
That to do list i was telling you about, well it still exists! HAHA, wasnt that supposed to be done by now? I think i need a to do list fairy to take care of all the little chores for me so all I have to do is play! :D

Well today is the first day of sneak peeks from My Time Made Easy and let me tell you,
this release is AWESOME! It's by far my favorite release yet!
I think i said that last time, but this time, i promise it is! hahaha!

And it's a darn good thing to because i think my mojo got lost in my to do list!
It's also a darn good thing that the recipient of this would adore it and not be critical!

It's for my little man, Jack. He has had some ups and downs this past year. But he's REALLY been trying to work thru some of his "issues" (ok, as well as a 4 year old can!) but he even addresses them! "I know i dont like scratchy pants, but Gabe (baby brother) wears them, so i can too!" Bless his heart! He's been doing so much better in school too! So i thought I would make this project for him to let him know how very very special he is!

By the way, he did just turn 4 in february and has been learning to write his name and is a weeeeee bit obsessed with the letter J! He also loves to write on things, so inside this box will be some sheets of paper and a pencil all of his very own (also so he'll quit stealing mine!)


This is the boxes lunch template. Isnt it darling! It would also make FANTASTIC teacher gifts (which you will be seeing from me!), a PERFECT gift for a daddy who carries a briefcase (which you would not be seeing from me haha!) or as a little pick me up, award, etc for a kiddo. Again, endless ideas!!!!!!

I used my Sure Cuts A Lot program and my cricut to cut out this template (using couture cardstock, LOVE this stuff!)

I cut the "lid" out of Whale Watching cardstock and the base out of Oat. I like the luxtaposition of the light and dark colors together on this template! I wrapped some polka dot grosgrain ribbon (SU) around just the lid of the template and adorned the base with some extra stars I had cut using the SCAL program and sponged the edges.

But thats not all there is! There is also a cut file called love note that makes a perfect little addition to the boxed lunch. AND there are not 1 but 2 perfect stamp sets!


The note card has a slit in the top to easily grab the card closed.

I used the Lunch Box Love Notes stamp set which has different "pictures" for the front of the lunch box. MAN, this set is cute!

Then there is another set called Lunch Box Love Note Additions! Thats where the Just a Note to Say came from as well as the stars with "Super" written inside that decorated the front of the box.

Now there is MORE TO SEE!!!!

Lauren has a project AND a giveaway! You really have to check it out!
and Lesa also has a project for you to see today!
Dawn and Geny had ADORABLE cards for you to check out!!!!

Have a wonderful day everyone!!!


Read more...

Quick Post of a simple card for a Sweet girl!

>> Monday, April 26, 2010


So i'm in a stop the world i want to get off moment! Man, just when you get the to do list whittled down to something manageable, things pile back up!

This past weekend i had 4 girls for prom and 2 weddings to makeup, and then a birthday party on saturday for a super sweet 2 year old! Needless to say, i guess THATS how the to do list piled up on me again! But the girls for prom were so excited, the weddings went fabulously and the birthday party was a nice little break.

My card to share today is one i quickly put together for the birthday girl!


I used Shelby Fairy for the front of the card and stamped a sentiment from Birthday Cheer for the inside.

Copics were used to color Shelby.... R81, R83, R85 and a smidgen R89 for the pinks.
Dress is custom color "E23", E25, E27
Hair is E31, E34, E55
Skin is E00, E000, E21

And now i gotta jet and get some more of that to do list taken care of while Jackers is in school!

Have a wonderful day!

Read more...

PMS Makeup for the Weekend challenge, M4TW25, WT267

>> Friday, April 23, 2010

Everybody's workin for the weekend! Ok, that'll be me this weekend! 2 weddings! A new release to prep for. Stuff to make for MTME. It will be one busy weekend! But, if there is one thing that can get me thru anything, it's beautiful weather! And i particularly like beautiful weather that comes out of bad weather! Ever since i was a little girl i've been fascinated with rainbows, that something so fun and amazing can come some something so blah!

Well, this week's Paper Makeup Challenge (that's right, i'm actually participating, so sad that i dont often, i know!) is to use the colors of the rainbow! Amber challenged us to this! It's so fitting since her blog title is So Many Colors, So Little Time! That girl loves her colors!

Here is my card - probably taking the challenge a smidgen too literally!


This was a way fun card to make. Definitely a little different from my norm. First i just colored the image (with copics) with reckless abandon! I just wanted her bright and colorful and rainbow-ie! Then i suddenly thought, hmm... i wonder if i'll even have any paper to go with this! WOOPS! Then i remember that i had read the Splitcoast Ways to Use it Challenge (WT267) was to use lots of different patterns on a card. So i started thinking about how to use up all those random scrap pieces of paper i can never seem to get rid of! And i knew this would be perfect!

Now here's another fun thing... after i made my new diagonal stripped paper (tip, just glue your pieces together on a thin sheet of paper, THEN cut your rectangle or whatever shape you are making!) I decided, that instead of adhering my image to the top, lets do something a little different! So i took a circle nestabilties die (by spellbinders) and cut out a circle to create a window. Now window cards are not new to the cardmaking world, but i'm not sure i've ever made one, so this was a fun new thing for me!

Here's the inside of my card...


Well since i had already colored my image (remember, with reckless abandon!) I couldnt just have it in the inside of the card because I had already stamped it on a square piece. Drat the cat! SO, i cut the image out with a larger circle nestabilities so that it would still be larger than the window. Yes i repeated the sentiment, only this time i split it up (just by only inking up part of it at a time). I couldnt decide where i liked it better, so i used it both places!
Plus, i LOVE that quote! That Dolly sure does have some good ones! Right up there with Dr Suess in my book!

Ok... i'm beat, it's after midnight (as i type) and i have a full day ahead of me tomorrow! So i'm out like a light! Be sure to check out the Makeup for the Weekend challenge! And check out these Paper Makeup Artists for their awesome and very colorful takes on the challenge!


Have a wonderful weekend! I probably wont have another post up til sunday or monday! :D

Read more...

Happy Earth Day!

>> Wednesday, April 21, 2010

April 22nd (which is probably today as you read this) is Earth Day!

So Happy Earth Day everyone! Before i ramble on (and on) in my normal babble fashion, let me tell you that Paper Makeup Stamps is having a sale on most all of the "green themed" stamps!
The sale is 25% off the normal price! check out the PMS blog to see a list of whats on sale...

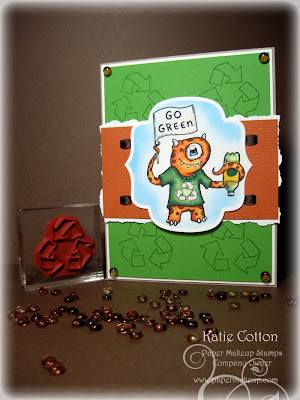
Here is my card...

This is George, he is the epitomy of the Earth Day monster! He is all about recycling, and cleaning up the planet!

Here is a close up image...
I colored him first (with copics) and then cut him out with the Labels 9 nestabilies die by spellbinders. After that i airbrushed him with the copic airbrush. Now i did get a little more of the blue sky in the flag that i wanted, but the nice thing about the airbrush is it's such a list coat of color on the top, i just used the colorless blender and cleaned that right up!

Notice seeing his arm thru the bottle? I used the same technique a bit back with some balloon images (see that card here). it's SUPER easy to do, you just layer the opposite colors on top of each other. And dont be afraid of doing it! Here's my recommendation though, let each "layer" dry a bit so that you dont end up having colors migrate to places you dont want them. :D Always finish off with the color that is supposed to be in front. So in this case, i colored in his arm before i colored the bottle on top. I did go ahead and use a darker green toward the outer edges of the bottle and a super pale green (g20) on the inside.

Ok, so i think thats all the babble i have in me... oh no wait, funny story (Jack, my recently turned 4 year old has been saying the funniest things lately! Always random, and very serious! Today just he and I did the grocery run. I told him, "buddy, i'm so tired i could fall asleep right now" and his eyes got big and he said "well dont fall asleep pushing the cart!" I think he was more concerned because he was IN the cart! but that was 5 hours ago, and i'm STILL awake. So now i'm REALLLLLLLLY ready for bed. Night world! Have a very happy earth day!

Read more...

New things for sale!

>> Tuesday, April 20, 2010

Hey everyone... nothing crafty to post (just yet... still hoping to remedy that today!)
BUT i have updated my Feeding the Habit blog with a whole lot more to sell!

You know whats sad.... is that i still love the stamps i'm selling! hahaha! I just dont have the time to use them all and i want them to go to good homes! That and i have my eyes on purchasing a few big items so the funds will go towards those purchases.

Check it out!

Read more...

Thanks for you support... with PMS and some MOJO134

>> Friday, April 16, 2010

I dont have a whole lot of chatter today (SHOCKING, i know!)
Yesterday was some fun times crafting with friends at a friends SU club. Loads of fun!
Always hard to decide what to get! So after a night of crafty last night, i wasnt sure i'd get inky today but to my sheer joy, everyone feel asleep early (kids, hubby, animals, everyone!)

So i played a bit more with the Oo La La set from Paper Makeup Stamps that was released this month. :D

Here is my card...


I used this week's mojo challenge sketch (mojo134) only i decided to flip it sideways. I rarely flip sketches (it doesnt usually occur to me to flip them!) but i really wanted to play with one of the corset images and for that i needed a more verticle piece so flipidity do i did.

here's a close up of the corset...

Now there are 3 corsets in this set. Remember i used a more frilly version on a card last week.
Last time i used really intense colors, so this time i kept it soft and simple. See, corsets dont have to just be sexy and for hubby's! :D
My image was stamped in memento ink on neenah solar white cardstock. I then colored it in with copics (RV000, RV00, RV11 and a leeeeeettle RV34) and used a clear spica over the straps which you cant see in the photo.
The image was then cut with the labels 4 nestabilities die by spellbinders and embossed just with a stylus and a mousepad. Then sponged with Pink Pirouette ink by Stampin Up.

I paired it with the sentiment "Thanks for your Support"

I just inked the sentiment in white daisy ink from CTMH and stamped right onto my cardstock.

The rest is pretty self explanatory and i'm about to fall over from sleep deprevation so i'm going to go to bed! Night everyone!


Stamps
Oo La La by Paper Makeup Stamps

Inspiration

Paper:
Pink cardstock - Blushing by Couture Cardstock
Brown cardstock - Walnut by Bazzill Basics
Burgandy cardstock - Bravo Burgandy by Stampin Up
White - Solar White classic crest by Neenah
Patterned Paper by Daisy Bucket

Accessories
Flower by making Memories (was white but colored to match using copics)
Ribbons all from Stampin Up
Border Punch by Stampin Up
Brad by Bazzill basics
Liquid Pearls in White Opal

Read more...

A peek into my world... and a friends new blog!

>> Wednesday, April 14, 2010

Hey peeps! Nothing crafty to share with you today, BUT a friend of mine from WAAAAAAY back (i'm talking we went to school together from kindergarten thru 8th grade, and we still keep in touch!) started a new blog called CovetLiving. Its all about Coveting the Life you Live.

LOVE IT! The blog is just starting up but i love the design of it and both Steph (my friend) and Karrie (who i know, but not well) are both such fun and amazing women with fantastic energy, this blog is bound to be a good read! So if you are interested in such blogs.... check out

Now one of the first entries is titled Goodwill Hunting... all about being a recessionista in these crazy times. Love that word! If you scroll down a bit in the post you'll read about finding mismatched frames. I love that picture of the frames behind the bed! I might have to do that too! Karrie did this as well in her recessionista version painting all of the frames black. I love the clean feeling it gives. Here's the thing for our house... it doesnt match our more rugged aesthetic. BUT i do have a slightly different version, leaving a lot of the frames mismatched. But i did do some modifcation to many of them... check out the wall we found boring recently in our living room...

My wall isnt very extreme with pictures... but thats because it's just begun!
My pictures are also mostly in color with a few black and whites. However my friend Jess in LA has her place completely done over in black and white and I love that look too!
There are truly 101 possibilities!

For the most part, our frames are all black. Either because thats the way we got them, or because I made them that way. Dont get a can of black spray paint near me, i go nuts!
There are just a few exceptions to add some color

Yes i know this picture is blurry, but my 4 year old has since "stolen" my camera from when i just took these pictures and is taking pictures of random things all over the house.

This picture is one of my favorites on the wall. It's from when i was pregnant with Gabe and Jack and I were hanging out on the bed during a belly photo session with Jen Rogers Photography. This frame was also a wedding gift and was sadly not in use, so put to use it went!


Here's another favorite. Now i do love that picture of the hubs and I but i LOVE this frame too!
This was a cheap pick up by my hubby from Big Lots.

Then there are the "modified" frames.

This was just one of those super cheapies from Ikea. Plain wood... nothing special. I just painted crackle paint on it and let that set for about 15 minutes (needs less time when you don't paint the first coat) and then painted black acrylic paint over it. Easy peasy! I actually did this to about 3 frames on the wall. You can also use a different color underneath before you paint the crackle if you want a different color popping thru.

And now to show some of the super fun frames! The more personality/meaning the better!

This frame i've had since no joke... the 8th grade! My BF since the womb (the one in the photos with me) put it together for me. And i've kept it. Now since not only it shows some pretty hilarious pictures and is a fun green color, it's actually meant to be a table top frame for it sticks out slightly from the wall. but i think it's fun that way!


This frame back did in school. Hence the not quite perfect paint job. The picture was taken in school as well and then it was wrapped and given to me as a present from jack. So cute huh!
It's definitely a one of a kind frame on the wall!


Last but notleast... is the artwork in the middle. It's a print by Brian Andreas. I LOVE this artist! I have given many of his prints as gifts. If you havent heard of him, check out www.storypeople.com.
He is an artist, writer and well you just have to check it out!

So thats a peek into my world. :D Have a wonderful day!

Read more...

This is how i roll...

>> Tuesday, April 13, 2010

Hello everyone!

Well, my taxes are done! At least MY end of taxes for the family. However i would like to beat the customer service help girl from paypal over the head with a rolling pin!

Here's a little FYI for anyone who uses paypal for business purposes. 1, never count on the help desk. 2, always ask friends before you take the information from the help desk.
I needed to add up all my incoming moolah for taxes right? And i couldnt just do it off of my website because I do have other sales and such off the website. I also needed to know the total in fees that i had paid over the year. So i looked and looked for the way to get these to add up for me on the site. No luck. Well thats just silly I thought, there HAS to be a way to do that. This is PAYPAL, and for businesses! So i called them, asked very nicely that I was sure it was there, i just couldnt find it. The gal on the phone says she's sorry, the only way is to add them up. I was like, are you kidding?! I actually said that to her. And i said, even as a business account, there is no report or anything like that? She said no, but that it was already mentioned to her today so she was going to tell someone. So i proceeded to spend the next 6 hours of my life adding. Til 1:30 in the morning i might add. The next morning (that would be yesterday) i made a post on facebook about how annoyed i was and had not 1 but 2 people tell me exactly where to go on paypals website to see this report and NOT have to add up a darn thing. Seriously? What good is a help center that gives the wrong information!

I was fuming. SO, needless to say, i didnt have my post i planned on up yesterday. But i'll get my Oo La La corset card done later and show ya.

but today! Today is a foodie review from Paper Makeup Stamps. Some of the PMS gals are reviewing sets and stamps that were released on April 7th. Since I showed you Tina's Kitchen in this post , i thought today i'd show you Guilty Pleasures, a super fun food and sentiment set.
Both of these sets are available for just 7 bucks bare rubber! (9 if you want them on ez mount) and the sentiments are SUPER versatile! You can use them again and again, with the set, without the set. Way fun!

Ok, here is my card...


This is my favorite image and sentiment combo from this set. It cracks me up!
I colored the rolling pin with copic markers (E30, E33, E35, E37) on One Sheet Wonder cardstock by Couture Cardstock and then cut it out. The sentiment i stamped on a 3.5 x 3.5 piece of Solar White Neenah cardstock (65 lb, i use lighter weights unless i'm coloring, helps to not weigh down the card AND it's cheaper... still the same bright smooth white). The cut out rolling pin was then popped up on dimensionals so thats not a shadow i colored, thats the real shadow. The edges were sponged with Old Paper distress ink.


The corners were pierced using the Stampin Up mat stack.

I still thought the card could use a little something else at the bottom, so i took Daisy Bucket paper ribbon (love this stuff, you can tear it, curl it, stamp on it, etc and you get like 15 yards for 5 bucks!).

I added scor tap all along the back. Then as i laid it on my card, i just folded it a bit wonky to leave the pattern. The scor tape holds so well that it just sticks.

So thats it! Be sure to check out the PMS blog for some other fun creations using these sets!
Have a great day!


Stamps: Guilty Pleasures from Paper Makeup Stamps


Read more...

Life is short...eat dessert first!

>> Sunday, April 11, 2010

This is my motto in life! I take it very literally! hahaha! Last night my hubby gave me a hard time because i didnt really eat dinner since i knew we were going out for ice cream and then i was still hungry when we only went to mcdonalds for ice cream. (by the way, family of 4 eating ice cream at mc'ds cost 4.73 as opposed to the 15 bucks we probably would have spent at baskin robbins or one of those types of places. Now i loooooove me some baskin robbins, but at 4.73 you can do that 2 or 3 times a week for summer treats!

Anyhoo - this week Paper makeup Stamps is having a week of review with the stamps that were just released. It's a new thing, and we've love to hear your feedback on it!

Today the review is on the recently released as rubber, Moody for Rock and on the new monsters, Duncan, Milo and Eye Pod. Today i'm showing you ca card using Duncan...


Doesnt he just look so fuzzy and cute? I just wanna smoooosh him! And eat all his cookies!
His name is Duncan and you can purchase him HERE.
He was colored with Copics (B32, B34, B37; E40, E42; E37, E33) on One Sheet Wonder cardstock by Couture Cardstock. The edges were sponged with Antique Linen distress ink. It's subtle, and not very noticeable in the photos, but it's there. :D

The sentiment is from another newly released set called Guilty Pleasures. Some fun foodie sentiments along with food pictures.

My card with made with all scraps! Go me! I used the sizzix version of the swiss dots folder for some texture. :)

So thats my card! Have a wonderful day!!!

Read more...
Related Posts with Thumbnails

Listen to makeupartistkaties playlist


Get a playlist! Standalone player Get Ringtones

  © Blogger template Webnolia by Ourblogtemplates.com 2009

Back to TOP