Hello New Friends!

>> Wednesday, June 30, 2010

This is a fun post to help welcome my new friends with Paper Makeup Stamps!

The design team call is down and today is the day that we announce our newest team members!

Read more...

Holy Cow I'm Back!

>> Tuesday, June 29, 2010

Are you ready for this... I am back in action!
Thank you SO much to everyone for my birthday and computer well wishes!
We got my computer back up and running buy purchasing a new harddrive and thank goodness i back things up all the time so i actually didnt lose anything other than some computer programs that i'll have to gather the discs back up (some of them were um, technically my dads and others are around here somewhere!) but we're on the up and up! And my room is ALMOST finished!
And it's sneak peak time! So WOOHOO! I've been ACHING to get crafty! And now i finally get to!

Today is the first day of sneak peeks from My Time Made Easy!
This release is *truly* my favorite release so far! There are lots of elements of this release that i really can see myself using over and over and over again, even with the addition of new stamps. The template i get to show you today, called The Flapper, is no exception!
This is one of those perfect gift box templates. It's more than "just a box". But it's more general in theme so it can be used for ANYTHING! But it's anything but basic! It's various angles make it much cooler than just a box and i love the way it opens to peek at the giftie inside! You'll have to keep reading to see!

Here's what i've done...

I just think its such a fun template! But the template isnt the only reason i'm stoked about this release, i'm also loving the paper and stamps being released. Here i've used some of the pretty printables digi paper from the Bangin' Burlap collection and this color is Burlap Sprinkles. The photo turned out a little more bright than it appears printed.

Then... the stamps! OMG, lovin' these stamps! I actually used 4 different stamp sets on this project! First i printed the burlap paper and then used it when cutting the decorative layers for the template. I took the cattails stamp from the Killer Curves stamp set (set of 8 images for $20). This set i'm just GAGA for! I inked up the stamp in Old Paper Distress ink and also sponged the edges in the same ink.

For the front...
I inked up the solid image from the Lovely Labels stamp set and actually sniped off the top "bubble" in order to get it to fit where i wanted it to on the box. Quick FYI - you may remember the Lovely Labels cut file that was released a bit back that fit perfectly on the front of another one of Lauren's templates... well that perfectly fits all these images too! WOOT WOOT! My sentiment on the inside of my label is from the awesome Tending the Garden stamp set. You'll get to see this set in full form tomorrow from Stephanie, Lesa, Pam, Geny and Dawn! Oh yeah, and ME on the 2nd! So stay tuned!

Ok, got off track... so why in the world is this template called The Flapper? Well, it's because of it's nifty little flap closure! Here's the open view... and my giftie inside...

How cute is that little fold over. I decided to just use a simple string (DMC floss for cross stitch, soooooooo many colors to choose from, sooooooo cheap!) to tie is closed.
And the inside is more spacious than you might think! You could fit so much in there! I opted for more of a presentation type of set up, filling the bottom with extra scraps of kraft paper (the real kraft paper, the kind you see brown bags made of! it crinkles better!) and then placing 2 wallflower refills inside. By the way, i am TOTALLY addicted to wallflowers from Bath and Body Words! They go on mega sale all the time and I picked these up this weekend for a mere 2 bucks a piece (they retail for 6.50) making it cheaper than glad and yummier smelling!
My sister is also addicted to wallflowers! Which is why i made the gift! The other bonus about these, is they come in so many different scents and colors, it's really easy to match the color and or theme of your project!

And one last photo for you!

This is one more peek at the Killer Curves Fancy Frames set was introduced, well those images fit perfectly inside this stamp set which also means this stamp works fabulously with the Killer Curves cut file that was released last month! You gotta love it when things you buy coordinate with other things!

Ok, back to the project, i knew that when you opened the box, i wanted more than to just see the gift inside. I treated the lid of the box sort of like a card itself in that you get to read the note when you open the card. I did this mostly because i couldnt figure out where to stick the card or tag for the project other than to just make a coordinating one. Which of course is great to have a coordinating card, but whats the liklihood that i sis will stick it on the table next to her little box? I wanted her to remember my thoughts right when she opened the box each and everytime! Well my sis, she's pretty amazing. In fact, she's Scent-Sational! haha! I used that sentiment from the Take Time set. The other images here are all from the Killer Curves set.

Whew! I had forgotten how wordy i could be! How could you forget! HAHAHAH! Well, i guess i have a lot of babbling to do to get caught up from my silence!

Have a wonderful day!

Dont forget to check out
Dawn and

for more fabulouso creations!


Read more...

Happy birthday to me and an update try 2

>> Saturday, June 26, 2010

Phew well this has been a crazy month. I'm so sorry for the lack of posting and whatnot. After being gone the first half of the month I scrambled trying to get caught up setting aside all things crafty until orders and such were up to date. Then began the redo of my craft room which was actually half done while I was gone so the pms catch up was being done out of boxes (ugh). So I finally get caught up and even have a few things to share but I can't find my camera anywhere!  And then some programs start acting wonky on my computer and yesterday the whole thing DIED!  as it is now, I am updating via email being sent from my iPod!  Oy, technology. I have the worst computer luck in the world (remember my external harddrive pooped out on me last october). My husband told me he was going to just get me awriting tablet and carrier pidgeon but thought PETA might come after me if I killed the pidgeon.  So it will be a few more days yet before I get to update you again.  Sneak peeks are coming up for my time made easy and then paper makeup stamps so I will find a way to make those posts!  Bear with me!

And with all my luck guess what today is... My birthday! At least my hubby called already to wish me happy birthday. Last year he forgot!
You know who didn't forget?  My AMAZING design team! They organized a special surprise birthday hop just for me!  Made me feel so special and thank goodness for my iPod so I could see there amazing creations!  Go to the paper makeup stamps blog to see everything they did!!!!

I'll try to update again soon!

Sent from my iPod

Read more...

Copic Creations Challenge No. 30

>> Tuesday, June 15, 2010


It's the 15th which means it's time another another Copic Creations Challenge!

This is challenge number 30 for Copic Creations and challenge number 3 for me on the team.
I'm still just tickled pink that i get to be acquainted with these ladies!
Phenom talent they have, i tell ya!

Challenge No. 30 is to color on paper that is NOT white!
This is another great way to really change the feel of an image, or to get the most for your money when you buy a stamp! When you stamp and color on another paper, you can truly get a different look!

The sponsor for this challenge is Stampavie. Since i have, ahem, more than 1 Stampavie stamp that hasnt seen love, this was a great opportunity for me to pull one out!

Here is my card...

I chose one of the cutie patootie bear images drawn by Penny Johnson.
This one in particular is called Butterfly Bear.

I stamped him out on Neenah Kraft cardstock in 80lb weight. The blendability of the kraft cardstock versus the neenah white is about the same. The biggest difference is as kraft cardstock gets "wet" with the alcohol ink it gets noticeably darker. This would be the case with pretty much any colored paper. Just like when a blue shirt gets more noticeably darker when it's wet than say a white shirt does. So what works best for me is to color with a marker. And then take moment for the alcohol to evaporate out of the paper so that you can see what your final result color is going to be. It's also good to have a scratch piece of the same paper you are coloring on to scribble out colors on. Remember with kraft, to use brighter colors as the kraft cardstock will mute down the color quite a bit.


Here's a close up view of the image and a list of the copic colors i used....
Browns: E29, E27, E25, custom color E23, E21
Butterfly: Y02, Y04, Y08, YR04, YR07
Background: G03 for grass, B00, B000 for sky

First i paid a lot of attention to the tufts of hair around the bear and added some darker colors there and blended the other browns out from there. I did add a bridge to the bears nose by using the E25 there where the rest of the bears face is E21. E21 is a VERY almost non existent color on the kraft paper but in my opinion worked great.

I decided to not use a white gel pen anywhere as i knew that the bright white would be very eye catching, and i was going with a more subtle image (BUT OMG, i've already seen some of the other ladies samples, one with Copic opaque white and another with gel pen, and when it's done right MAN does it look good, and these ladies know how to do it right!) But i did still want a highlight. What to do, what to do. So i pulled out a white colored pencil for a much more toned down highlight. :D

I used some blues to trace around the bear and to flick out away from the bear. I didn't need to create the whole blue sky but I wanted to make the image stand out a little bit.

My papers are all from the Fly a Kite collection from October Afternoon.
Accents: Kaisercraft Pearls, cheap ribbon (haha, i cant remember the brand, but it's the 25¢ type), button by creative cafe.

Thanks for stopping by today! Dont forget to check out the rest of the Copic Creations team and the challenge today!

Read more...

There's a free digi for you....

>> Sunday, June 13, 2010


I so wanted to have something crafty to post! But i'm still in catch up mode from being out of town and redoing my craft room! I have a friend coming over this afternoon to help me put furniture pieces back, so maybe, just maybe i'll have pictures of my newly done craft room for you soon!

BUT, i did want to let you all in on a freebie from Paper Makeup Stamps!
Check out THIS POST to get the freebie!

But here are some phtoos i promised of my little man in his tux!


(He looks buff! Thats because they didnt have a vest his size and we had to make the part around his waist cinched as tight as it would go to fit him, so the top made him look like "a super hero" (according to HIM!)


(notice he is not wearing any socks, it was the only way i could make a deal with him to wear his shoes!)

So yep, pictures as promised! Now go get that freebie digi! And have a great day!

Read more...

MTME Group Post - Time for a Spot of Tea!

>> Tuesday, June 8, 2010

It's the 8th so it's the last day of scheduled reveals from My Time Made Easy!

For my project today, I used the Tea Tabbed Box.
Now what's fabulous about this template is you can very easily create it without the slot in the front to create a very cute little box for lots and lots of treats. And in fact, I will have another box made for you sometime next week so you can see just that!

But today, today i actually WANTED to create this in the way it was originally intended.
Maybe it's because my out of the box thinker hasnt been turned on this month, or MAYBE it's because Lauren's templates this month are so cute and such fun ideas for gifts, i just HAVE to use them the way she envisioned them first! :D


Here is my tea tabbed box...


I actually created this from the PDF version. I know, *GASP* hand cutting, no cricut! But that was just not one thing i wanted to bring with me on my trip, and i wasnt ahead of the game enough to have this done before i left. Oh no no no, i whipped up this badboy yesterday lickity split might i add! This is definitely an easy template if you are looking to see how fast and fun these templates can be!

Since i was using the PDF version, I had the ability to lay the template out perfectly on my patterned cardstock (which is from the crafty DCWV paper packed that i picked up today at JoAnn's!) I really wanted the flowers climbing up the front of my box, and since the box folds under to create the base, i couldnt just have it start at the base of my paper. But this was so easy to line up and i used the extra pieces for other elements on my project so no wasted paper!

Here's a forward view of my box!

Now the front piece has a curved dip. It's what made me think to put a circle label on the front, but then the blossom nestie kinda covered it up. I like the way the front looks, but i regret not taking a picture beforehand so you could see the curve.

The sentiment is from the A Spot of Tea set which is sold both as an acrylic stamp set and a digi set. here i actually used the digi because the stamps are either buried in my suitcase, or sitting oh so sad and lonely on my craft table at home asking why i forgot them!

The top of my box i simply decorated with some large flowers (that were also picked up today from Jo Ann's! I was going to use the to DIE FOR tea cup image for the top, but i saw another genius had already used that idea. haha. Plus i REALLY wanted to use these flowers and fun brad center! HAHAHAH!


Now since today is a group share day, that means the whole team has treats to share!
Check them all out!


Photobucket

Lauren Meader


Catherine Doucette


Dawn Easton


Geny Cassidy


Lesa Rapp


Pam Imholz


Stephanie Kraft


Tracey Cuccia


Silke Ledlow


Have a wonderful day!

Read more...

It's time for a PMS blog hop!

>> Monday, June 7, 2010


Holy CRAP! When did it get to be the 7th?! I guess since i didnt participate in each day of the sneak peeks (just not enough hours in a day!) it crept up on me fast!!! We made an 11 hour drive yesterday back from nebraska to my parents house in Indiana. Jack made an adorable ring bearer and i'll have pics and such of that for you very soon! But first, I have some business to attend to! It's the PMS blog hop for the June Release! If you've hopped here from Lisa McKinney's blog, then you are in the right spot! if not... well geez, i'm the last stop and you've missed some AWESOME stuff! GO back to the PMS blog to catch up!


Okily dokily...Here is my card...


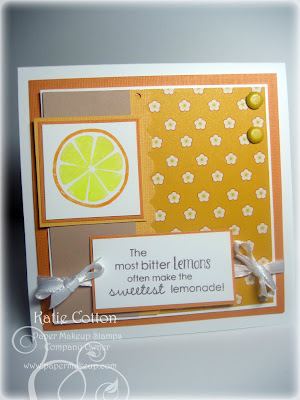
I used the new Freckled Lemonade set for this card! This set is FULL of some fun lemonade images including a very large pitcher that is large enough to use on a scrapbook layout! I went with the solid lemon image and the sweet wordart.


Now first i would like to say, i did some "ghetto" crafting for this card and i would like to say i think it turned out pretty darn cute! I had a pad of Cosmo Cricket's Garden Variety paper with me (thanks to my pal Amy from Caffinated Cropper who sent it to me just before i left town so i just tucked it into my bag with me). I had a mat stack from DCWV with me and luckily a few sheets matched great. And then when i went to stamp i went, oh shoot. I have nothing to stick this stamp to! So i took soem plain scotch tape and wound it around itself to stick it onto a block! Then i thought, oh shoot, i dont have any colored ink with me. No worries... would you know that my 4 year olds crayola pip squeak markers worked FANTASTIC! WOOHOO!


I used last weeks Mojo Monday sketch. Of course now i cant add it because the linky is closed, but it was still a cute sketch! :D


So thats my card for you! I still have a letter for you too! Don't forget, collect each letter from the blogs in the hop today and you get a 15% discount code for the new release! My letter is E!


There, now wasnt that fun? :D I hope to see you tonight at the release party in our forum!! 8pm CST, be there or be square!


Read more...

Paper Makeup Stamps June Sneak Peeks, day 1

>> Friday, June 4, 2010

Hello everyone! Thanks so much for all the well wishes while i've been on vacation! I havent gotten to fully relax yet, but those who know me know that i never fully stop running anyway!

I made this card in my hotel room! For the fact of having next to nothing craft wise with me, i think it turned out pretty well. :D


This image will be the newest addition to the Moody Girls line. She is Moody for Dreams (yes those are dream catchers around her. I think she is just precious! I'm not sure what exactly came over me to color her hair purple. it just seemed fitting. And i dont even know what markers i used! Or at least in what order! It was a bit of a hodge podge... RV99, RV69, RV95, RV93 and RV91 but then it seemed too grey so i went over it all with RV17 and RV00. Really, it was a strange combo and my brain was a bit all over the place!

But still, even though the card is simple, i think cynthia just did a brilliant job of making a striking image that the card didnt need to much other fuss. The patterned paper is by Glitz (Sparrow Collection). The ribbon is from Ribbon/fx.

Be sure to check out the PMS blog today! There are bunches of other wonderful cards from Paper Makeup Artists!

Have a wonderful day!!!

Read more...

My Time Made Easy Tea for You!

>> Wednesday, June 2, 2010

Who knew you could make something like this out of paper?! Well, Lauren did obviously! This makes the perfect gift for the tea drinker in your life! Just think of the goodies you can put inside, but also what an adorable little decoration it would make for any table! I knew exactly who i had in mind when making this sweet little teapot! A friend of mine collects tea pots AND is a scrapbooker. I just know she will be knocked off her socks to see a teapot made out of paper!

So here it is... my tea pot for you using the new release template, Tea for You, from My Time Made Easy.


I just think this Tea Pot is so much fun! And while you think it would be super hard to put together, it's really not. It does take a smidgen of patience or more so, no squirmy wormies on your lap. I had to take a break and wait til the kiddos were busy in the other room. haha.
But once i have 2 hands to work with again, it really was pretty easy! The tabs lauren has made in the template design make the curves for you. I found it the most helpful to make sure i have adhesive running down the side the tabs stick to. The extra glue dots on the tabs gives you a super strong seal as well.

Here is a overhead shot of the tea pot, just to get a better view.
My cardstock is from Couture Cardstock (and i am SO sorry, but I'm typing up my post from VAAACAAAAAY and i dont have my swatch ring so i'm not sure exactly which color it is! Um, whale watching maybe?) My patterned paper is from a collection from Close to My Heart.

I took some ribbon (the color is close to Summer Sun but it's really just a strand from my ribbon bin, so i have no idea where it came from, wow, i'm a lot of help today on product info, huh!?) And i tied it around the lip of the lid. The lid comes off entirely, so you could fill the tea pot with all kinds of goodies. Treats to eat while sipping tea, additions to your tea, napkins or other tabletop items, etc. I also took the same ribbon and laid it down the handle for just a little extra decoration. Be sure to form your handle first. I then put scor tap on my ribbon and just laid it down on the already formed handle.


Now this tea pot template isnt the only tea thinking goodie available from My Time Made Easy.
You know that Lauren never makes just 1 thing with out stamps and other templates and cut files to go with it (which, also helps to make the perfect gifts of course!)

On this project, i also used the new stamp set called A Spot of Tea.

There are all kinds of cute images in this tea stamp set include a build your own tea cup that is OH so adorable! You'll have to check back in later this week to see my project made with that!


Be sure to check back in with Lauren to see what goodie she has for you today as well and to go browse the new releases from My Time Made Easy!

Read more...

Copic Creations Challenge with Hambo Stamps

>> Tuesday, June 1, 2010

This is my third post for today! Holy cow - i dont know that i've ever had 3 posts in one day! Be sure to scroll down to see my Quixotic Paperie Blog Hop post and my Card Share post for My Time Made Easy!

They like me.... they reeeeeeally like me! I've been asked to join the Copic Creations Design Team while super duper talented design team member Jami Bova is on leave (she's in Afganistan for 4 months!) Maybe i can make them reeeeeally like me enough to keep me on after Jami returns! hahaha! I am beyond floored to join this amazing group of copic divas to challenge myself to try new and different things using this favorite medium!

Today's challenge is to color animals! So yes, it's easy enough, but what is super fun about animals is there is so much fun an texture in animals! They can be a delight to color whether it's because of their shape, the texture, fur or scales, etc. The team has done a fabulous job showing you some of these neato techniques and I just hope that mine is up to snuff!

Our sponsor for this challenge is Hambo Stamps.
I chose to use the Floating Pig digi that you can find with some other fun animal digis HERE.
Hambo Stamps has much more than just digi stamps, however! You can check out more HERE.

Here's my card...


Now why do i chose this piggie? Well for one, i think the whole "when pigs fly" idea is funny and even more funny that this pig has a balloon tied to him to make him fly!
Ok, so why is he fun to color with copics? Well pigs are ROUND! Big fat pigs! Thats what i wanted to be sure to get the idea of when i colored him. I made sure to shade around the string tied around his belly because that string would pinch in on the fat little piggie. I also knew i wanted to keep the center fairly light to help the whole "round" idea.

Balloons are also a fun round thing to color! I did add a white gel pen to my image to help emphasize the highlights. I've been on a bit of a white gel pen kick lately!

Now while i'm on vacation, my hubby is supposed to be working on my craft room! So i had to pack everything up before i left. Let me tell you, crafting out of a packed up craft room is tricky! And to boot, i had already colored this image! I found this square piece of patterned paper in a scrap box (though i remember it's from american crafts) I was tickled pink that it matched so well! I used one of my new martha stewart punches (called optic something or other) and the ric rac is from a pack of bazzill decorative strips. It was also in the scrap box!
The sentiment is from a retired set from The Greeting Farm.

Here is a close up view of the colored image...

Before i get into the copic colors used, one of the colors for my pig i call "R80".
which is a custom color, an equal blend of colorless blender and R81 various ink refill ink in an empty copic... view my tutorial on how i make my own colors HERE. The first part of the video is on reinking, but you'd still want to see how to do that if you make your own custom colors the way that I do.

Copics Used:
Pig: "R80", R81, R83, R85
Balloon: YR12, YR04, YR04, YR07, YR09
Sky: B000, B000, B00, colorless blender
Flowers: V12, V15, V17; Y32, Y35, Y38; B21, B24, B26; R24, R27; YG11, YG17


Thanks for stopping by! Keep scrolling down for more copic fun! I did some major coloring on all 3 of my posts for today! :D

Read more...

Quixotic Paperie Blog Hop!

This is my 2nd of 3 posts for the day! Scroll down to see my Card Share post with My Time Made Easy and check back in after a bit to see my Copic Creations post!

What day is today?!

Photobucket


Today is the 1st Anniversary of the Quixotic Paperie online store, and they are having a celebratory blog hop! If you're already following the hop, you should have hopped over here from Rachel Jakes - http://www.papercraftsbyrach.com/. If not, then hop back to the beginning at the Quixotic Paperie Store Blog. You won't want to miss a stop, as in addition to lots of fantastic inspiration, there are some prizes on offer (full details on the Quixotic Paperie Blog).

First of all, let me tell you how honored I am to be invited in on this hop! Quizotic Paperie was one of the first stores to carry Paper Makeup Stamps and is the only online store in the UK carrying my stamp line. Working with her has been a lot of fun, and when she invited me to join in the birthday hop, I of course said YES! And then i got the hop line up, well good LORD there are some phenom people in this hop! And the blog you were at before mine, Rachel Jakes has been someone who's work i have admired and longed to be like, and now she's linking to MY blog! SO i am definitely honored! And now, a little info on Quixotic Paperie if you havent read about it yet!
Quixotic Paperie was started on June 1st 2009 by Elaine Hughes. Having been an avid crafter (and craft shopper!) for a number of years, Elaine wanted to share her passion and see where it might take her - so, Quixotic Paperie was born! Since then, the store has grown, and now stocks a fabulous range of rubber stamps from around the world: The Greeting Farm, Kraftin' Kimmie Stamps, SCACD Stamps, Paper Makeup Stamps, Belles 'n Whistles, the Mo Manning for Stamping Bella range, Stempelglede and more! In addition, the store carries a large range of charms and embellishments, and a host of gorgeous papers for all your crafty projects! If Elaine loves it, you will probably find it at Quixotic Paperie!
In November 2009 the Quixotic Challenges blog was started, where you can find weekly inspiration from the wonderful Quixotic Paperie Design Team, and join in for the chance to win a monthly prize.
It has been a fabulous and wonderfully crafty year and here's to another one and hopefully many more to follow!
And now onto my card! I was told I could use anything that the QP shop carried. So i am shamelessly using some Paper Makeup Stamps! :D This is Shaela Fairy and I think she's fabulous for any celebratory occasion!
I paired her with a sentiment from the Birthday Cheer sentiment set.
She was colored with Copic Markers (see list below if interested).
But here is a close up shot...


Thank you for joining us on the hop! Your next stop is the forever talented,


Stamps: Paper Makeup Stamps
Shaela Fairy
Birthday Cheer Sentiment Set

Colored With Copics:
Hair: "E23", E25, E27
Skin: E00, E21, E000
Dress: YG11, YG13, YG17
Wings: YR000, YR01, spica pen
Shoes: E43
Sparkler: Y35, Y32, spica pen, white gel pen

Papers & Embellies from the Celestial Possibilities Makeup Kit
(Company, Kaisercraft & Bazzill)


Read more...

My Time Made Easy Group Card Share!

This is my first post of 3 today! Check back later today for a post for Quixotic Paper Birthday Blog Hop and for the Copic Creations Challenge Blog!

It's the first of the month! That means all the new products are LIVE for My Time Made Easy!
Every 1st of the month, the MTME design team shows off cards! You've seen some templates the days before and after, so on the 1st, we all go in together to show off some super fun things you can make for cards with MTME products.

Well, i decided to go DIGI for this month! Did you know that Lauren offers many many of the MTME acrylic stamp sets also in a digi format?! Some people think of digi stamps as just the lineart images, etc. Well, I wanted to show you why digi stamps can be so cool! Especially in the case of these images, when changing the sizes can make a big difference and make the set extremely versatile!

Now don't get me wrong, i love actual stamps! And the stamps Lauren has are perfect for their intended uses... BUT since the images are smaller for use of tags and labels on templates and given the fact that i'm a teensy obsessed with coloring, sometimes i like to take a digi image and make it MUCH bigger! And these digi sets are perfect for this!

I used the Well Preserved Digi set for all 3 of my cards to show you today!
(you may remember my post from the other day using the stamp version of this set!)

First, the "boobewy" (as my 20 month old says!) card!

This card is a 5.25 x 5.25 card! So those blueberries are a pretty darn good size! Since these digi stamps are of a high resolution, making them larger (i just used photoshop) was a breeze!
And then coloring them.... oh now that was fun!
I used Copic Markers (now aren't you shocked!) B32, B34, B37, B39.

I also enlarged the sentiment from the same digi set and i used some of the fabulous paper from the Preserve It © Blueberries and Grapes Pretty Impressions Printables paper collection.

For my second card, i used the cherries from the Well Preserved Digi set.

Again, super fun to color! Now if i had just enlarged and printed, my leaves would have been black. This would have looked just fine, but i decided that since i was using some paper from the Preserve It © Cherries and Peaches paper collection and that paper have colored leaves, that I would match my leaves accordingly. Again, super easy. I used photoshop, selected the color i wanted and then used the paint bucket to "fill" the leaves, but any paint program would work the same. For my cherries i used copics again, R24, R27, R29, R59.

The sentiment is a modified sentiment fromt he digi set. Again, digis are so easy to do what you need to! If i was stamping, i would have had to mask out the word berry and then fill in with the word cherry (which is a single stamp, so it wouldnt have been too tricky) but for this, i just erased the word berry, and then dragged the word Cherry in it's place!

Ok, one last card for you!


Again, i enlarged the apple image, but then i decided that i also loved that inside the apple part. If i was stamping, i would have just stamped it inside and it would have been super easy. But this time, i just enlarged it as well and dragged it in to the center of the apple. Also super easy!
Again, i colored in the leaf of the apple, but i wouldnt have to. I tried it both ways, and they both looked fine. :D

I colored the image with copics, and still used the same reds as the cherry but since i was using papers that were deeper reds (papers are from the Preserve It © Apples and Pears collection) I used R59 much more predominately than on the cherries and worked my way in just barely used R24, where on the cherries, R24 was my main color. :D The inside of the apple was colored with E43, E42 and E40.

The sentiment use is also an enlarged sentiment from the Well Preserved Digi set.

Now can you imagine how much fun you could have enlarging all those fruits! If you love to color like i do, thats a lot of fun coloring space! OR, you could enlarge them, but print them over patterned paper like a paper piecing! Or use some of the fabuloous coordinating digi papers available this month. You could make nice large fruit labels for your jars! You could really theme a teapot for a friend who also decorates her kitchen with apples. You could even make your own digi paper! Digi stamps can be oh so much fun!

Ok, so enough about digi stamps. You want to see some more fun stuff you can do with the June Release from MTME? Check out THESE fabulous ladies!

Photobucket

Lauren Meader

Catherine Doucette

Dawn Easton

Geny Cassidy

Katie Cotton - that's me

Lesa Rapp

Pam Imholz

Stephanie Kraft

Tracey Cuccia

Mona Pendleton

Silke Ledlow


Stamps: Well Preserved Digi set from My Time Made Easy

Papers: Pretty Impressions Printable Paper from My Time Made Easy


Tools and Accessories: Spellbinders, Distress Ink (antique linen, aged mahagony), rhinestones from Darice, ribbon from Dots & Dashes and Stampin' Up, Copic Markers, White Gelly Roll pen

Read more...
Related Posts with Thumbnails

Top Blog Sites

Blog Archive

Listen to makeupartistkaties playlist


Get a playlist! Standalone player Get Ringtones

  © Blogger template Webnolia by Ourblogtemplates.com 2009

Back to TOP