It's time for a PMS blog hop!

>> Monday, June 7, 2010


Holy CRAP! When did it get to be the 7th?! I guess since i didnt participate in each day of the sneak peeks (just not enough hours in a day!) it crept up on me fast!!! We made an 11 hour drive yesterday back from nebraska to my parents house in Indiana. Jack made an adorable ring bearer and i'll have pics and such of that for you very soon! But first, I have some business to attend to! It's the PMS blog hop for the June Release! If you've hopped here from Lisa McKinney's blog, then you are in the right spot! if not... well geez, i'm the last stop and you've missed some AWESOME stuff! GO back to the PMS blog to catch up!


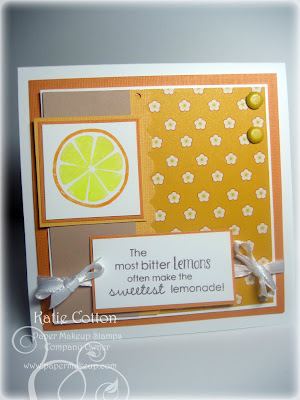
Okily dokily...Here is my card...


I used the new Freckled Lemonade set for this card! This set is FULL of some fun lemonade images including a very large pitcher that is large enough to use on a scrapbook layout! I went with the solid lemon image and the sweet wordart.


Now first i would like to say, i did some "ghetto" crafting for this card and i would like to say i think it turned out pretty darn cute! I had a pad of Cosmo Cricket's Garden Variety paper with me (thanks to my pal Amy from Caffinated Cropper who sent it to me just before i left town so i just tucked it into my bag with me). I had a mat stack from DCWV with me and luckily a few sheets matched great. And then when i went to stamp i went, oh shoot. I have nothing to stick this stamp to! So i took soem plain scotch tape and wound it around itself to stick it onto a block! Then i thought, oh shoot, i dont have any colored ink with me. No worries... would you know that my 4 year olds crayola pip squeak markers worked FANTASTIC! WOOHOO!


I used last weeks Mojo Monday sketch. Of course now i cant add it because the linky is closed, but it was still a cute sketch! :D


So thats my card for you! I still have a letter for you too! Don't forget, collect each letter from the blogs in the hop today and you get a 15% discount code for the new release! My letter is E!


There, now wasnt that fun? :D I hope to see you tonight at the release party in our forum!! 8pm CST, be there or be square!


Read more...

Paper Makeup Stamps June Sneak Peeks, day 1

>> Friday, June 4, 2010

Hello everyone! Thanks so much for all the well wishes while i've been on vacation! I havent gotten to fully relax yet, but those who know me know that i never fully stop running anyway!

I made this card in my hotel room! For the fact of having next to nothing craft wise with me, i think it turned out pretty well. :D


This image will be the newest addition to the Moody Girls line. She is Moody for Dreams (yes those are dream catchers around her. I think she is just precious! I'm not sure what exactly came over me to color her hair purple. it just seemed fitting. And i dont even know what markers i used! Or at least in what order! It was a bit of a hodge podge... RV99, RV69, RV95, RV93 and RV91 but then it seemed too grey so i went over it all with RV17 and RV00. Really, it was a strange combo and my brain was a bit all over the place!

But still, even though the card is simple, i think cynthia just did a brilliant job of making a striking image that the card didnt need to much other fuss. The patterned paper is by Glitz (Sparrow Collection). The ribbon is from Ribbon/fx.

Be sure to check out the PMS blog today! There are bunches of other wonderful cards from Paper Makeup Artists!

Have a wonderful day!!!

Read more...

My Time Made Easy Tea for You!

>> Wednesday, June 2, 2010

Who knew you could make something like this out of paper?! Well, Lauren did obviously! This makes the perfect gift for the tea drinker in your life! Just think of the goodies you can put inside, but also what an adorable little decoration it would make for any table! I knew exactly who i had in mind when making this sweet little teapot! A friend of mine collects tea pots AND is a scrapbooker. I just know she will be knocked off her socks to see a teapot made out of paper!

So here it is... my tea pot for you using the new release template, Tea for You, from My Time Made Easy.


I just think this Tea Pot is so much fun! And while you think it would be super hard to put together, it's really not. It does take a smidgen of patience or more so, no squirmy wormies on your lap. I had to take a break and wait til the kiddos were busy in the other room. haha.
But once i have 2 hands to work with again, it really was pretty easy! The tabs lauren has made in the template design make the curves for you. I found it the most helpful to make sure i have adhesive running down the side the tabs stick to. The extra glue dots on the tabs gives you a super strong seal as well.

Here is a overhead shot of the tea pot, just to get a better view.
My cardstock is from Couture Cardstock (and i am SO sorry, but I'm typing up my post from VAAACAAAAAY and i dont have my swatch ring so i'm not sure exactly which color it is! Um, whale watching maybe?) My patterned paper is from a collection from Close to My Heart.

I took some ribbon (the color is close to Summer Sun but it's really just a strand from my ribbon bin, so i have no idea where it came from, wow, i'm a lot of help today on product info, huh!?) And i tied it around the lip of the lid. The lid comes off entirely, so you could fill the tea pot with all kinds of goodies. Treats to eat while sipping tea, additions to your tea, napkins or other tabletop items, etc. I also took the same ribbon and laid it down the handle for just a little extra decoration. Be sure to form your handle first. I then put scor tap on my ribbon and just laid it down on the already formed handle.


Now this tea pot template isnt the only tea thinking goodie available from My Time Made Easy.
You know that Lauren never makes just 1 thing with out stamps and other templates and cut files to go with it (which, also helps to make the perfect gifts of course!)

On this project, i also used the new stamp set called A Spot of Tea.

There are all kinds of cute images in this tea stamp set include a build your own tea cup that is OH so adorable! You'll have to check back in later this week to see my project made with that!


Be sure to check back in with Lauren to see what goodie she has for you today as well and to go browse the new releases from My Time Made Easy!

Read more...

Copic Creations Challenge with Hambo Stamps

>> Tuesday, June 1, 2010

This is my third post for today! Holy cow - i dont know that i've ever had 3 posts in one day! Be sure to scroll down to see my Quixotic Paperie Blog Hop post and my Card Share post for My Time Made Easy!

They like me.... they reeeeeeally like me! I've been asked to join the Copic Creations Design Team while super duper talented design team member Jami Bova is on leave (she's in Afganistan for 4 months!) Maybe i can make them reeeeeally like me enough to keep me on after Jami returns! hahaha! I am beyond floored to join this amazing group of copic divas to challenge myself to try new and different things using this favorite medium!

Today's challenge is to color animals! So yes, it's easy enough, but what is super fun about animals is there is so much fun an texture in animals! They can be a delight to color whether it's because of their shape, the texture, fur or scales, etc. The team has done a fabulous job showing you some of these neato techniques and I just hope that mine is up to snuff!

Our sponsor for this challenge is Hambo Stamps.
I chose to use the Floating Pig digi that you can find with some other fun animal digis HERE.
Hambo Stamps has much more than just digi stamps, however! You can check out more HERE.

Here's my card...


Now why do i chose this piggie? Well for one, i think the whole "when pigs fly" idea is funny and even more funny that this pig has a balloon tied to him to make him fly!
Ok, so why is he fun to color with copics? Well pigs are ROUND! Big fat pigs! Thats what i wanted to be sure to get the idea of when i colored him. I made sure to shade around the string tied around his belly because that string would pinch in on the fat little piggie. I also knew i wanted to keep the center fairly light to help the whole "round" idea.

Balloons are also a fun round thing to color! I did add a white gel pen to my image to help emphasize the highlights. I've been on a bit of a white gel pen kick lately!

Now while i'm on vacation, my hubby is supposed to be working on my craft room! So i had to pack everything up before i left. Let me tell you, crafting out of a packed up craft room is tricky! And to boot, i had already colored this image! I found this square piece of patterned paper in a scrap box (though i remember it's from american crafts) I was tickled pink that it matched so well! I used one of my new martha stewart punches (called optic something or other) and the ric rac is from a pack of bazzill decorative strips. It was also in the scrap box!
The sentiment is from a retired set from The Greeting Farm.

Here is a close up view of the colored image...

Before i get into the copic colors used, one of the colors for my pig i call "R80".
which is a custom color, an equal blend of colorless blender and R81 various ink refill ink in an empty copic... view my tutorial on how i make my own colors HERE. The first part of the video is on reinking, but you'd still want to see how to do that if you make your own custom colors the way that I do.

Copics Used:
Pig: "R80", R81, R83, R85
Balloon: YR12, YR04, YR04, YR07, YR09
Sky: B000, B000, B00, colorless blender
Flowers: V12, V15, V17; Y32, Y35, Y38; B21, B24, B26; R24, R27; YG11, YG17


Thanks for stopping by! Keep scrolling down for more copic fun! I did some major coloring on all 3 of my posts for today! :D

Read more...

Quixotic Paperie Blog Hop!

This is my 2nd of 3 posts for the day! Scroll down to see my Card Share post with My Time Made Easy and check back in after a bit to see my Copic Creations post!

What day is today?!

Photobucket


Today is the 1st Anniversary of the Quixotic Paperie online store, and they are having a celebratory blog hop! If you're already following the hop, you should have hopped over here from Rachel Jakes - http://www.papercraftsbyrach.com/. If not, then hop back to the beginning at the Quixotic Paperie Store Blog. You won't want to miss a stop, as in addition to lots of fantastic inspiration, there are some prizes on offer (full details on the Quixotic Paperie Blog).

First of all, let me tell you how honored I am to be invited in on this hop! Quizotic Paperie was one of the first stores to carry Paper Makeup Stamps and is the only online store in the UK carrying my stamp line. Working with her has been a lot of fun, and when she invited me to join in the birthday hop, I of course said YES! And then i got the hop line up, well good LORD there are some phenom people in this hop! And the blog you were at before mine, Rachel Jakes has been someone who's work i have admired and longed to be like, and now she's linking to MY blog! SO i am definitely honored! And now, a little info on Quixotic Paperie if you havent read about it yet!
Quixotic Paperie was started on June 1st 2009 by Elaine Hughes. Having been an avid crafter (and craft shopper!) for a number of years, Elaine wanted to share her passion and see where it might take her - so, Quixotic Paperie was born! Since then, the store has grown, and now stocks a fabulous range of rubber stamps from around the world: The Greeting Farm, Kraftin' Kimmie Stamps, SCACD Stamps, Paper Makeup Stamps, Belles 'n Whistles, the Mo Manning for Stamping Bella range, Stempelglede and more! In addition, the store carries a large range of charms and embellishments, and a host of gorgeous papers for all your crafty projects! If Elaine loves it, you will probably find it at Quixotic Paperie!
In November 2009 the Quixotic Challenges blog was started, where you can find weekly inspiration from the wonderful Quixotic Paperie Design Team, and join in for the chance to win a monthly prize.
It has been a fabulous and wonderfully crafty year and here's to another one and hopefully many more to follow!
And now onto my card! I was told I could use anything that the QP shop carried. So i am shamelessly using some Paper Makeup Stamps! :D This is Shaela Fairy and I think she's fabulous for any celebratory occasion!
I paired her with a sentiment from the Birthday Cheer sentiment set.
She was colored with Copic Markers (see list below if interested).
But here is a close up shot...


Thank you for joining us on the hop! Your next stop is the forever talented,


Stamps: Paper Makeup Stamps
Shaela Fairy
Birthday Cheer Sentiment Set

Colored With Copics:
Hair: "E23", E25, E27
Skin: E00, E21, E000
Dress: YG11, YG13, YG17
Wings: YR000, YR01, spica pen
Shoes: E43
Sparkler: Y35, Y32, spica pen, white gel pen

Papers & Embellies from the Celestial Possibilities Makeup Kit
(Company, Kaisercraft & Bazzill)


Read more...

My Time Made Easy Group Card Share!

This is my first post of 3 today! Check back later today for a post for Quixotic Paper Birthday Blog Hop and for the Copic Creations Challenge Blog!

It's the first of the month! That means all the new products are LIVE for My Time Made Easy!
Every 1st of the month, the MTME design team shows off cards! You've seen some templates the days before and after, so on the 1st, we all go in together to show off some super fun things you can make for cards with MTME products.

Well, i decided to go DIGI for this month! Did you know that Lauren offers many many of the MTME acrylic stamp sets also in a digi format?! Some people think of digi stamps as just the lineart images, etc. Well, I wanted to show you why digi stamps can be so cool! Especially in the case of these images, when changing the sizes can make a big difference and make the set extremely versatile!

Now don't get me wrong, i love actual stamps! And the stamps Lauren has are perfect for their intended uses... BUT since the images are smaller for use of tags and labels on templates and given the fact that i'm a teensy obsessed with coloring, sometimes i like to take a digi image and make it MUCH bigger! And these digi sets are perfect for this!

I used the Well Preserved Digi set for all 3 of my cards to show you today!
(you may remember my post from the other day using the stamp version of this set!)

First, the "boobewy" (as my 20 month old says!) card!

This card is a 5.25 x 5.25 card! So those blueberries are a pretty darn good size! Since these digi stamps are of a high resolution, making them larger (i just used photoshop) was a breeze!
And then coloring them.... oh now that was fun!
I used Copic Markers (now aren't you shocked!) B32, B34, B37, B39.

I also enlarged the sentiment from the same digi set and i used some of the fabulous paper from the Preserve It © Blueberries and Grapes Pretty Impressions Printables paper collection.

For my second card, i used the cherries from the Well Preserved Digi set.

Again, super fun to color! Now if i had just enlarged and printed, my leaves would have been black. This would have looked just fine, but i decided that since i was using some paper from the Preserve It © Cherries and Peaches paper collection and that paper have colored leaves, that I would match my leaves accordingly. Again, super easy. I used photoshop, selected the color i wanted and then used the paint bucket to "fill" the leaves, but any paint program would work the same. For my cherries i used copics again, R24, R27, R29, R59.

The sentiment is a modified sentiment fromt he digi set. Again, digis are so easy to do what you need to! If i was stamping, i would have had to mask out the word berry and then fill in with the word cherry (which is a single stamp, so it wouldnt have been too tricky) but for this, i just erased the word berry, and then dragged the word Cherry in it's place!

Ok, one last card for you!


Again, i enlarged the apple image, but then i decided that i also loved that inside the apple part. If i was stamping, i would have just stamped it inside and it would have been super easy. But this time, i just enlarged it as well and dragged it in to the center of the apple. Also super easy!
Again, i colored in the leaf of the apple, but i wouldnt have to. I tried it both ways, and they both looked fine. :D

I colored the image with copics, and still used the same reds as the cherry but since i was using papers that were deeper reds (papers are from the Preserve It © Apples and Pears collection) I used R59 much more predominately than on the cherries and worked my way in just barely used R24, where on the cherries, R24 was my main color. :D The inside of the apple was colored with E43, E42 and E40.

The sentiment use is also an enlarged sentiment from the Well Preserved Digi set.

Now can you imagine how much fun you could have enlarging all those fruits! If you love to color like i do, thats a lot of fun coloring space! OR, you could enlarge them, but print them over patterned paper like a paper piecing! Or use some of the fabuloous coordinating digi papers available this month. You could make nice large fruit labels for your jars! You could really theme a teapot for a friend who also decorates her kitchen with apples. You could even make your own digi paper! Digi stamps can be oh so much fun!

Ok, so enough about digi stamps. You want to see some more fun stuff you can do with the June Release from MTME? Check out THESE fabulous ladies!

Photobucket

Lauren Meader

Catherine Doucette

Dawn Easton

Geny Cassidy

Katie Cotton - that's me

Lesa Rapp

Pam Imholz

Stephanie Kraft

Tracey Cuccia

Mona Pendleton

Silke Ledlow


Stamps: Well Preserved Digi set from My Time Made Easy

Papers: Pretty Impressions Printable Paper from My Time Made Easy


Tools and Accessories: Spellbinders, Distress Ink (antique linen, aged mahagony), rhinestones from Darice, ribbon from Dots & Dashes and Stampin' Up, Copic Markers, White Gelly Roll pen

Read more...
My Time Made Easy Sneak Peeks day 1

>> Saturday, May 29, 2010

Ok, so i know i havent posted in a week! So sorry about that!
I will be leaving town in just 1 more day! YEAH FOR VACAY!
However, it's the absolute worst time for me to be on vacation! During sneak peeks and reviews for both MTME and PMS! YIPES! So i've been hard at work getting ahead, so i'll still have lots of yummy goodies to show you for the next week and a half!

Today, it starts!

Sneak peeks for My Time Made Easy and OMG, am i in love with this release!!!!!!
It's awesome and has just come at the perfect time!

Check out these gifties i made for Jack's preschool teachers...


I used the Pretty Packaging template called Jam Packed. Adorable name, no?
And what else to fill these little cuties? JAM! haha! Not that i didnt give that away on the front! Are you ready for some pictures?


I will spare you close ups of each and every box as I'm sure you get the idea! Since each box has a different jam inside, i decorated the outside of the box differently for each one (just using the coordinating colors for the jam inside).

My paper is from the Pretty Printables paper collection called Vintage Plaid and there is just about every wonderful color combo you can think of! I was very easily able to make special colored boxes to match the jam flavors and i STILL had to make choices!

I also used the Well Preserved stamp set that, i'm telling you, if you like to give gifts and custom homemade treats, you HAVE to have this set! have to have to have to!
here's a close up of that oh so cute jam jar...

There are actually 2 jars available in this set. I chose the more rounded jar. I stamped it again over a scrap of the Vintage Plaid paper and paper pieced it onto my jar (using distress ink on the edges to really make it matchy matchy). Then i used the word jam (a separate stamp) across the front. The jar was colored with copic markers to match the jam that would be inside. OH, and my plaid top! Thats another stamp! So you can cordinate your top, or you can stamp the plain on and paper piece, or color it in, or... :D

Ok, more pictures!


Here they are opened. I love the little cut out (perfectly made for you in the template)
so that it snugly fits your jars and gives a nice display. Still, you could easily cut that part out and have an adorable box for just about anything really!


Last one, i promise! :D

Here are the jars sans boxes. You notice how i wrapped the same vintage plaid paper around the jars? Well, besides making them very coordinated to the boxes, and very cute, i'm hiding the fact that i dont have a clue in the world how to make jam! Those are just smuckers jams that i covered up! BWAHAHAHAHAHAH!

Ok, the toppers! Also part of the Well Preserved set! I stamped my fruit image (there is pretty much every fruit you can think of) and then stamped the correct flavor on top. Again, they are all there! Well, just about! There wasnt a Black Raspberry, but there was a Raspberry and a Blackberry! So i just inked up the "black" part of blackberry and stamped it with the raspberry and i was good to go!

So fun huh?! I know i'll use this trip over and over. Ok, maybe i'll even learn how to make my own! I d have a strawberry and blueberry plant afterall! :D

Now there is more goodness to see! Check out
and

And have a wonderful day!!!!


Read more...

A card and a SALE from My Time Made Easy!

>> Saturday, May 22, 2010


My Time Made Easy Is having a sale!

Puckered Up Patterns and Paper Pattern Pieces are 2 fantastic background builder sets.
And while they usually retail for only $12 each, they are on sale right now thru May 24th!
Taken from Lauren's Blog...

My Time Made Easy ™ LLC is having a SUPER SALE!

DON’T WAIT! LIMITED TIME ONLY!Enter the coupon code –> PATRN2420 to get $4 OFF your purchase for BOTH the Puckered Up Patterns and Paper Pattern Pieces © .Details:

Coupon is good from NOW until MIDNIGHT (Eastern Time) May 24th .

Supplies are limited. No rain checks. Limit: one use per customer.

Coupon not valid on previous purchases, and/or the purchase of any other Pretty Impressions stamp sets. Offer does not include shipping charges.

Lauren has done a fantastic job displaying some different pattern possibilities on her blog.

She has 2 posts showing possibilities so be sure to scroll down on her blog.

Ok, onto my card! When i heard that Lauren was doing a special sale on these sets, I definitely wanted to try to make a card with them. Why? Well because i'm a little terrified of build a background sets. Or rather, i was! Until i made THIS CARD.

That card was my first true "build a background" type of card. Sure i had stamped backgrounds before. But i had never attempted to layer stamps to create a more one of a kind background. I had so much fun experimenting on that card and it was rather theraputic rather than monotonous. SO, i just had to make another card to show you how easy it is! And the fact that i have a big wedding today and very little time just goes to show that it really is easy!


The background was stamped entirely from the Puckered Up Patterns set. I stamped the largest stamp in Stormy Sky distress ink on One Sheet Wonder cardstock by Couture Cardstock.

Then i took the single "diamond" shape and stamped where all the circles meet in Victorian Rose Distress ink. Those arent as easy to see, but it adds depth to the design. Then using the same ink, i took the single plus sign and stamped it in all the negative spaces. Now you'd think this would take forever! It took me maybe 5 minutes. :D

My sentiment is from Sensational Sentiments. Another must have sentiment set in my opinion.


I colored in the flower with copics (RV69, RV34, RV32; B97, B93 with G24, G21 for the stem and leaf)

I diecut the sentiment using the circle nesties and then matted it on a scrap of dark pink cardstock and again on a scrap of white that i punched the scallop border on just 1 end using the SU scallop border punch. Some kaisercraft pearls finish it off.

So thats my card! Be sure to check out the sale and have a wonderful weekend!


Read more...

New card kit available at Paper Makeup Stamps!

>> Thursday, May 20, 2010

Paper Makeup Stamps has a card kit available and it's on sale now!
The kit is called Celestial Possibilities and oh so many possibilities it has!
Here is my card for you today using the kit!


Oh how i love what's in this kit, and I havent even gotten to use it all yet!
My favorite (aside from the stamps!) is that oh so yummy velvet ric rac ribbon!
Isn't it just to die for! Next up is the paper. It's just thick enough! Not too flimsy, double sided and just beautiful! But it's also not so thick that you just feel like your card is going to fall over if you put more than 1 layer on it! And then third, those epoxy brads. I dont often buy epoxy brads because they tend to be pricy. But i just couldnt help but include them in this kit!
They are from the same collection as the paper so of course they match it perfectly.
And they are just stunning on a card!

Here's a closeup image of Celest...

I colored Celest with Copic Markers (Skin: E000, E00, E21; Hair: E27, E25, "E23"; Dress: G40, G82, BG34; Wings BG0000, Colorless Blender; Moon "BG100", BG10, BG72)
what are all those colors in quotes? Those are ones i've made using reinkers and empty markers. See the video i made on that, HERE, watch the end, the beginning is on refilling)
ETA: i let the image hang out of my nestie a bit when i cut it out and i just saw that Gina K has a fantastic tutorial on how to do this! Check it out HERE!

And of the wordart you get in the kit...

I cut the image out with nesties and then used the copic airbrush and BG10 marker.

Ok, so ya wanna see what all you get in this kit?
1 Image Stamp: Celest the Fairy
1 WordArt Stamp: Dwell in Possibilty
8 Sheets of 6x6 double sided patterned paper (by Kaisercraft)
8 full sheets of 8.5x11 Cardstock (by Bazzill)
1 pack epoxy brads (matches paper, by Kaisercraft)
1 pack Paper Flowers (dont be fooled, flowers are stack on top of themselves, theres a lot)
4 yards of delicious ribbon (may arts)
20 star shaped brads (by Creative Impressions)
4 Star Spiral Clips (by Creative Impressions)

Kit Cost while valued at $25 (or more if you include EZ Mount) is being offered for $20 (add $2 if you want the stamps mounted on EZ mount for you)
BUT also included in the kit is a $5 voucher towards a future purchase of $20 or more.
And because i know people will ask... these stamps are not being sold separately from the kit.
We may consider adding them to the PMS line at a later date, but they will not be sold separately so long as we have this kit in stock.
BUT, there is a limited quantity of this kit made up! Once we are out, we wont be restocking.
So get it while you can!


Are you ready to purchase this kit yet?
If so, check it out HERE!


WAIT, 1 more thing to share...
if you are a fan of kits where everything is matched and ready for you
to create with wreckless abandon then check out the Caffinated Cropper Kits!
Amy has put together some wonderful kits and there is still more of the Birds of a Feather kit is STILL AVAILABLE! This kit features 2 paper makeup stamps, and one of those is one you havent even seen before! PLUS you get a $10 voucher towards a $25 purchase (hmmm... what do you know that costs about $25? Oh yeah, the celestial possibilities kit! Buy the Caffinated Cropper kit and you get that kit for only $10?! WHAT?! Thats right. Do we make money? No, but do you benefit... oh yes! hehehehe! So be sure to check her out too! She has other kits available on her sidebar!

Read more...

I love CRACKLE!

>> Wednesday, May 19, 2010


Hello everyone! This is a little project i did with the youth group at our church.

The youth group leader wanted to focus on CREATIVITY for the month and asked if I would be interested in sharing with the youth. Um, YEAH! I love sharing what talents God gave me, especially with those younger than I am. That is my gift back to Him!

So i wanted to keep the project fun, purposeful, easily to do both feminine and masculine
but at the same time not too terribly difficult.

Here is our project!


This is one of those little paper mache boxes you can pick up at a craft store (in this case, i got mine at Hobby Lobby, but they all carry them!) And while it retails for .99cents, this is one of those items that goes on sale ALL the time. I picked them up for .50 each.

To keep in line with the "use your own creativity" idea, i brought ALL of my acrylic paints so that they could chose colors that inspired them. There were clemson boxes, girlie boxes, black and rustic boxes. And they were all fascinated at watching the paint CRACKLE!
I do loooooove crackle!

I also brought ALL of the Paper Makeup Stamps wordart (wow, didnt realize we had so many)
in order for them to each choose a quote that spoke to them.
And i brought embellishments in every bits and sizes so that they could doctor up their creation.

All in all, i think it was a success! They had a blast and i got a few thank you calls from parents.

Now to share with you details on what I chose to do!

First i painted the entire box with brown acrylic paint and let that dry. Then i painted the crackle medium over the box and let it dry slightly (the longer you wait, the more fine cracks, the less time, you get be fat thick cracks. I like mine somewhere in the middle).

Here is an overview of the top of the box...

This quote is from the Believe Scripture set from Paper Makeup Stamps.
I stamped it, then cut it out with the small long rectangle nesties and matted it with brown cardstock cut with scallop long rectangles nesties. Before adhering, i distressed the edges with Antique Linen Distress Ink.

To adorn the top of the box, i took a SUPER cute button that is in the shape of a flower (Creative Cafe) and threaded some DMC floss thru so it would look sewn onto the box.
Using a martha stewart branches punch, i punched the same brown cardstock and glued to either side of the flower button.

More distressing...


To get this dirty and weathered look on the box, i use an antiquing glaze which you can find in the same area of the craft store as the paint and crackle medium. The natural textures of the paper mache box (uneven edges, etc) are PERFECT for this since the glaze doesnt go on quite a smooth.

So thats it! if there is enough interest, i'd be happy o do a step by step or even video tutorial on this process. :D Just leave a comment if you'd really like to see it!

I have a really big announcement from paper makeup stamps tomorrow so be sure to check back in!

Read more...
Related Posts with Thumbnails

Listen to makeupartistkaties playlist


Get a playlist! Standalone player Get Ringtones

  © Blogger template Webnolia by Ourblogtemplates.com 2009

Back to TOP