3 minute card and DT call announcement!

>> Tuesday, May 18, 2010


I have a quick post for you! Ok, so nothing is ever too quick with me, but this one has to be! :D

First of all I want to make sure everyone knows about the Design Team Call for Paper Makeup Stamps! The team and I are so excited to put out this call to add to our family!
We are looking for a some Full Time Paper Makeup Artists as well as some guest designer spots.
Check out THIS POST to read all about the call!

Next I want to show you a very easy to make 3 minute card!
This was created for a Make N Take at Funkie Munkie Scraps and i hadnt had a chance to show
it here on my blog yet.
For Make n Take night, the ladies paid $5 and got to do 5 crafts. We we didnt want to time or product on any 1 project. This idea is also great to keep in mind when you are mass producing cards!

Here is my 3 minute card...


I keep everything simple and to get the most out of the 12x12 sheet of patterned paper, i
cut the 12x12 paper into 4x12 inch strips. Then i cut down the strips to create 4 x 5.25 rectangles. This gave me 6 card fronts from 1 sheet of 12x12 paper.

Next came the sentiment. I let each cropper stamp the sentiment on some white neenah cardstock and then we punched it out using one of the Marvy Giga punches. Um...i think i need those at home. Man they were so fast to use! The bonus of using a punch is that you dont have to worry about stamping the sentiment straight. :D

The stamp used one of the sentiments from the new Faith, Hope, Love set
from Paper Makeup Stamps.

Now i do like a lot of layers on a card, but in the case of less is more, i like to still to do something to help the layers I do have stand out. So i sponged all the edges with a matching ink color (in this case, rose red from Stampin Up) :)

To add a little embellishment to the card we used some stripped grosgrain ribbon and a few pearls from Kaisercraft.

And that's my 3 minute card!

Have a wonderful day everyone!


Read more...

Guest Designer for Copic Creations Challenge blog

>> Saturday, May 15, 2010

Holy crap, it's Saturday?! Where did my week go!?
Sadly, it has definitely been one of THOSE weeks! Teething toddlers, puppies entering the "chewing" phase, a normal 4 year old (which translates into crazy), copic class, Local scrapbook store announcing they will be closing (very very sad about that) not to mention follow up from the Paper Makeup Stamps May release that went live last friday!
Needless to say.... I.... am.... POOPED!

Ok, enough of that mumbo jumbo... I have a fun announcement!
I'm joining the design team over at Copic Creations for their next challenge!
When asked if I would be a guest I was very very honored! Of course i wasnt going to not sponsor as well as Mary always has a stellar sponsor lined up for each challenge.
So I will be giving away a $35 voucher towards stamps at Paper Makeup Stamps!
It's one of the bigger prizes i've given away, but i REALLY want people to try out this technique using their copics! What technique is it, you ask?

Well, really? Do you have to ask?

MONOCHROMATICS!

It's no subtle thing that I love to color in a monochromatic or monotone theme.
I think that coloring in such a fashion can truly evoke a feeling. Color theory plays such an important role in how we perceive things!
I have made 2 videos on youtube using different sets of the grey copics. You can view these tutorials as well as some other copics (and makeup, haha) tutorials HERE.

Now black and white DOES look stunning! I use this technique quite often.
Here are some samples of previous posts of all black and whites.


However, just because your coloring in a monotone, doesnt mean there can't be any color!
As mentioned before, colors plays a strong role in our emotions and how we feel about something we see. It's why many fast food restaurants use the color scheme red and yellow.
For some odd reason, it triggers our brain to feel hunger.
Well on the simpler side... here are the basics....
Cool Colors such as blues give a sense of peace and tranquility.
They also move away from focus and recede in a picture. So be sure that if you are not using monochromatics, that you dont color something you want to be the main focus point in a cool color, and something you'd want to recede to the background a warm color!
Warm colors such as red or orange have an energy about them. They provoke excitement.
Warm colors also move forward in our vision. Something colored with a warm color will definitely grab your attention!

So, without much further ado, here are my product samples!


I love how Moody for Dragonflies turned out in a more red color scheme!
I used copic colors R30, R32, R35, R37 and R39 with E000 for her skin.
I thought that E00 was too peach and took away from the pink tones. I used R30 to shade on her skin. However, R000 would probably have worked very well as well and then i wouldnt have been cheating!!! hahahaha!
I think with all the warm pinks and reds that there is something passionate about the card!
And you might notice how the image grabs you a bit... which is because of the intensity of warm colors.
The sentiment used is also by PMS and can be found, HERE.

Now let's go to the other end of the spectrum with some very cool colors.

Now clearly lily's are not blue and the most definitely do not have blue stems!
This is where using monochromatics to step outside of what you might normally do not only helps you to possibly use a stamp in a new way, but also get a new FEEL out of the stamp.
Blue is very subdued and peaceful, so this card should evoke a feeling of tranquility.
Here i used copic colors B91, B93, B95, B97 and B99 and also the colorless blender to flick back into the flower to help create the white at the tips.
The stamp image is by Stampendous, but the sentiment is from the Everyday Thanks set by PMS.

Ok, you've hung with me this long... I have one more for you!
This card isnt necessarily warm or cool (more warm than cool, but thats not the point).
This one uses browns to create a fun old photo sepia look!

I thought this image of Wayne was PERFECT for this sepia toned look. maybe that's because he was named after my grandpa and my grandpa always had a ton of OLD stuff around (he was an antique collector on top of being well... my grandpa!)
I used copics E30, E31 (though it is s little grey looking in this color family, so use caution), E33, E35, E37 and E000 (skin). I airbrushed inside a nestie with E41 and E42.
When working with browns in particular and with an image with more details, i think it's more beneficial for you to work from dark to light. Just an fyi. it's very easy to lose your "lines the artist gave you" so i feel like for a monochromatic brown look, it will help you to work with your dark colors first.


And finally... here are a few more tips on coloring in monochromatics!
* Dont be afraid to try it! I think you'll be very pleased with your results!
* Remember the feeling you are trying to evoke before chosing your monochromatic color.
* When chosing your hue, pick one that you have many colors within that "family".
Follow the first number (which determines the intensity of the marker color).
B21 would not pair well with the B93, B95, B97 combo because the B21 color would be too bright in comparison.
Make sure that you have a good range of color. Most importanly you must have a very light and a dark. In order for all the different colors you would see in an image to not get muddled together, you'll need to be sure to color them each a different value (degree of light to dark).
Example, in the sepia toned image, i wanted to be sure that his overalls were darker than the bale of straw so that they wouldnt get lost in each other.
It is vital to have a range of values in order to get the contrast you need for a popping image.


Phew, that was a lot of information. And i was tired before! hahaha!
If you are local, and are interested in taking a class on these techniques, this class will be my last class at Funkie Munkie Scraps as they are closing their doors on June 12th :(
Our wednesday night meeting is May 26th from 6:30-8:30. The cost of the class is a mere $5 buckaroos some come and chat and color with us!

But wait.... there is MORE! The Copic Creations design team has made some absolutely STELLAR samples! You really have to check them out HERE!


Card Details (links to stamps provided under cards)
Card 1
Stamps: Moody for Dragonflies, Birthday Wishes from Paper Makeup
Markers: E000, R30, R32, R35, R37, R39
Paper: My Mind's Eye (For the Home collection), Stampin Up and Paper Studio for cardstock
Accessories & Tools: Circle Nesties, red pearls from kaisercraft, sheer ribbon from ribbonFX

Card 2
Stamps: Flower by Stampendous, Sentiment from Everyday Thanks from Paper Makeup Stamps
Markers: B91, B93, B95, B97, B99, Colorless Blender
Paper: Scrapbook Etc patterened paper, bazzill for cardstock
Accessories & Tools: organza ribbon from stash, Faded Jeans Distress Ink, Curved Rectangles Nesties

Card 3
Stamps: Wayne Fairy, to plant a garden sentiment from Paper Makeup Stamps
Markers: E000, E30, E31, E33, E35, E37 (E41 and E42 for airbrushing)
Paper: Daisy Bucket patterned paper, Creative Memories cardstock
Accesories & Tools: Paper ribbon by Daisy Bucket, baubles by stamping bella, classic and long rectangles nesties

Read more...
PMS release week review!

>> Monday, May 10, 2010

Howdy everyone! I hope that everyone had a fabulous mother's day yesterday - whether you celebrated with your mom, you are a mom, or you'd like to be a mom! I hope it was full of fun and relaxation!!!

Also - a quick shout out to my girl Christi! Today is her birthday! Go give her some love!

Paper Makeup Stamps had a release on May 7th - lots of fun at the party!
This week we're reviewing the stamps that were released.

I'm showing off Andi & Aaron, one of the new Beautiful Day Fairy images.
I love these cute kids in the wagon. I named them after my BFF since the womb and her little brother because thats exactly what they looked like as kiddos! I remember her little brother tagging along with us as wel played and our constantly friendly teasing... "what are you staring at?"... "Oh nothing i'm just gazing in your direction" oh he hated that! hahahaha!

Here is my card...

I also used the sketch challenge which you can read about HERE.


I did have to tweak the sketch just a smidgen to fit the image (i just moved the light pink rectangle down a bit)

Here's a close up view of the fairy image...


Also released was a bunch of children's inspired word art!
Here's a closeup below..


Thats all I have for you today!
Be sure to check out the PMS blog for more review cards!


Stamps: from Paper Makeup Stamps
Andi & Aaron
Children Hold Our Hands

Coloring With Copics
Markers Used: E00, E21, E33, E35. E37, E40, R30, R35, R37, R39, BG10, BG72, G40, G82

Paper:
Cosmo Cricket, Early Bird Collection

Accessories:
Bellas Baubles
Distress Inks in Old Paper and Fired Brick
Sponge Daubers

Read more...

Group share for My TIme Made Easy

>> Saturday, May 8, 2010


Today is the final day of reviews for My Time Made Easy.
If you havent checked out the May release yet, you really should! There is some fun and fantabulous things in there and OMG perfect for teacher gifts!!!!

Today the entire design team for My Time Made Easy is sharing projects!
You can see links to everyone in my sidebar or go directly to Lauren's blog for all the details!

As for me... i'm keeping my post short! It's been a LONG week and I am just totally beat!
I'm looking forward to a relaxing mother's day weekend without TOO terribly much to do!

Here is my project for you using the Pucker Up template.
This template was super easy to put together. It easily makes a cute gift package when you're working on little time (like me this week!) I plan on stuffing it with chocolates and giving it to the principle at Jack's school!


The paper used for my project is from the digi paper pack Basic Blooms. I love these colors together and the flowers match the Sensational Stems stamp set perfectly!
Here's a quick view of the back where i've used some stamps from the sensational stems set!


I left enough "white space" that I could hand write a little note to the principle as she's been very helpful lately with Jack and his "issues".

Both of my sentiments used in this project come from the Sensational Sentiments and the little butterfly comes from the every so versatile, Just for You set.

Dont forget to check out the rest of the MTME team and their fabulous projects and cards today!!!

Read more...

Paper Makeup Stamps Blog Hop!

>> Friday, May 7, 2010

Welcome to the Paper Makeup Stamps May Release blog hop! If you've arrived from Dawn Knight's blog, you're right on track! If not, you can start at the beginning (and get all the good info on the release tonight, some challenges, and get the start of your special release code!)

It's here! it's finally here!
I have been ACHING to color up this image ever since Cynthia first sent her to me.
This is Moody for Dragonflies and i adore her! Even though i was coloring her past midnight when my poor tired eyes would have rather been sleeping... she was so much fun to color.
I LOVE TO COLOR!

Ok, I've gotten ahead of myself! Here is my card!

I was actually very pleased with how my card came out... especially since I was creating while i was turning as orange as a YR15 copic marker (i.e turning into a pumpkin!)
But i truly truly adore coloring! Everything about it from picking out colors to just the time it takes. It's so relaxing. The card came together ok, with some special help from my new paper from the Fly a Kite collection by October Afternoon. I also used one of the PMS release challenges! I chose the 2nd challenge (to use a button and a bow on my card!)
Read more about the challenges on the PMS blog!

Here's a closeup shot of the image...

I used a LOT of different copic markers. And it's amazing how much easier it is to pick which colors you want to use when you already have your paper picked out. Too often i color with wreckless abandon and dont pick my paper first. Then i struggle finding the papers to match my image. So my helpful tip is to pick your color palette and papers first! :D

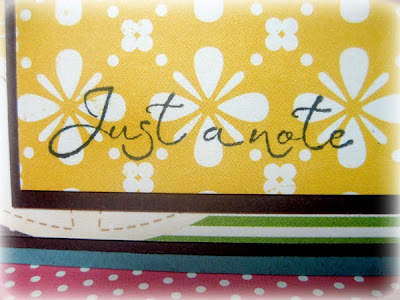
Just a Note for you (teeheehee)... for anyone that has ordered the past few months you may have noticed a freebie stamp in with your order. Of course they are only while quantities last, but i've been including a special small sentiment stamp, just as a thank you for everyone's support (you guys all mean the world to me!). This month's freebie is the sentiment i used on my card... "just a note". See a closeup view below...


So thats my card for you! But before i forget... you need your letter!
Remember to collect the letters along the hop to get your special release code for 15% off the new releases. My letter for you is the letter M! As in.... Maria! Who is the next gal on the hop list! You are gonna flip when you see her monster card!

Hope to see ya tonight at the PAAAAARTAAAAAY!


Stamps from Paper Makeup Stamps
Moody for Dragonflies (to be released tonight at 8pm CST!!!!)
Just a Note, may freebie stamps with your order

Coloring with Copics
Hair: "E23", E25, E27, E29
Skin: E000, E00, E21, "R200"
Eyes and Bubbles: BG10, BG72
Dragonflies: W5, W7, YG11, YG63
Flowers: E40, E41, E43, Y21
Kimono: R32, R35, R37, R39; YR000, YR61, YR65

Tools and Accessories
Spellbinders Labels 9 nestabilities die
Button (hollyhock) from Close to my heart
Satin Ribbon (oceanmist) from PaperTreyInk
Button Thread (dark brown) Dual Duty Plus
Distress Ink (tea dye)
Jumbo Sponge Dauber


Have a wonderful day!!!

Read more...
Once you choose hope...CAS card

>> Thursday, May 6, 2010

I am so very excited and tickled pink for what I get to share with you today!
Paper Makeup Stamps is getting a new illustrator!
Well, kinda.... haha! Lindsay Spencer did some "guest illustrations" a bit back right when I first started Paper Makeup Stamps. She couldnt come on as a full time illustrator because of some other commitments, but NOW she has had some things free up and she CAN illustrate for PMS!

YIPPPPIEEEEE! For those who know Lindsay, you know that she also has a digi stamp company called Whimsy Have. She is continuing to design for herself, her digi shop and vinyl for EAD designs, so dont you worry! However i am THRILLED that she is willing to share her talent with PMS and design things things that we can turn to rubber! Lindsay has such an awesome talent, I'm so glad that she's found so many ways to share it with the world!

Her first set is called Faith Hope Love. It truly is a set that was missing from the PMS inventory! it fits perfectly with the style, but yet it's different. Love it!
This set includes 5 different solid flower images that are like silouettes, but can be used SO many different ways. You can check out the PMS blog to see what the other Paper Makeup artists have come up with today using this set. Also included in this set are 3 awesome wordart quotes. They are a really good size, but not toooooo big. So they can be used both in scrapbookng and cardmaking.

Anyhoo enough chatting, i'm supposed to be condensing my blog posts, arent i!?

Here's my card...


Ironically after all that talk about flowers... i didnt use any of the flowers! But i did use the grass! I love that grass and can see it used for so so much!
I created by sky by using the copic airbrush. I had an extra piece of cardstock that i punched a hole out of to create the sun.

The rest of my card i kept CAS (for those that don't know what that means, it's Clean and Simple). Now looking at it, i wonder if i shouldnt have done a smidgen something else?
But again, i can never just leave well enough alone and I'm trying to perfect my CAS style.

So thats what i have for ya today! Be sure to pop back in tomorrow for the PMS blog hop!
And the challenges... and the party tomorrow night. Oh it's going to be fun!!!!

Read more...

While we teach our children... Easel Card

>> Wednesday, May 5, 2010


First off before i forget! - The Paper Makeup Artists are showing off some wonderful new images by Diem Pascarella today on the PMS blog. Very exciting news is that not only will Diem be drawing the Beautiful Day Fairies for PMS but she is also going to be illustrating a line called "Retro Cuties", adorable little critters inspired from 1950's cartoons and patterns!
This month a little mouse named Lucy is being released as well as 2 fun fairy images.

Each month, Senior Paper Makeup Artist, Lisa Kind works out the lineup for teams sneak peeks.
It's a hard job that takes a lot of time to make sure everything works out evenly.
Usually i get a peek "assignment" for every day but this time, i did not.
I thought, well silly Lisa, i'll do one anyway. Well let me tell you, these little placecards for the Teacher's Appreciation Luncheon (needed today!) kinda kicked my butt!
I'm so glad i had the day off or i would have been up til 3 am! hahahahaha!

Ok, now onto my post!

Last year, Jack's preschool did a Teacher's Appreciation Luncheon. The parents all thought it was wonderful and that the event should continue each year. Last year i made little placecards for each teacher to set where their seats were. I was asked to do it again this year.

Here's what i came up with, each teacher's looks alike but there are are few different color schemes.


I decided to do easel cards because they seemed to be a neat way to do a placecard, while still looking a little bit different. Also, since many of the teachers are not papercrafters, it would be a new idea to theme (even though they'd taken the papercrafting world by storm!)

I used THIS tutorial by beate johnson on SCS. She is fabulous and i LOVE her tutorials!
I did adjust the size to make the front 4x4 square. This was really more because i was using 12x12 double sided patterned cardstock for the cards and I wanted to get more out of the 12x12 paper. You can get 3 of these out of 1 sheet of 12x12 paper. Cut the 12x12 into 4in long strips (so you'll have 3) and then cut 4 inch off each one so that you'll have a 4x8 piece and a 4x4 piece. You'll need both of these to create 1 card. Score the 4x8 piece at 4 and 6 inches.

The stamp used on the front of the easel cards is one of the upcoming releases from Paper Makeup Stamps (it was peeked yesterday if you'd like to see christi's card, look here)

I wanted to do a little more to the inside, especially since this wasnt a card that i needed the extra space inside to write a note. Though i did want something a little more to add a note of thank you to the teachers (afterall, it IS a teacher's appreciation luncheon!
Here is the inside... I've just edged the front flap all the way up so you can see.


Each card has the teacher's name on the bottom which i just printed out from the computer.
Afterall, these are meant to serve as placecards! :D

It's been awhile since i did a more formal listing of "the deets" and there are a few tools and things i used, so I'm going to let ya in on that info this way, instead of rambling on and on for another 20 minutes! My blog posts have taken me entirely too long to type lately! hahaha!


Stamps
Front - While we try to teach wordart - from Paper Makeup Stamps (release date May 7th, 8pm)
Inside - Everyday Thanks sentiment set from Paper Makeup Stamps

Paper:
Martha Stewart Crafts baby boy paper pack (i got mine at walmart for 8 bucks!)

Tools and Accessories
Dragonfly Punch by Martha Stewart Crafts
White doublefaced satin ribbon by May Arts
Loop border punch by Martha Stewart Crafts (wow, i'm lovin' me some martha today!)
Distress Ink in Antique Linen

Read more...

PMS sneak peeks begin!

>> Tuesday, May 4, 2010


OMG! I'm very excited for this release from Paper Makeup Stamps!
It's a big one for sure! And some of these stamps i've have around just waaaaaiting for this release so i'm super d duper excited to finally get to share them all!

Today some of the Paper Makeup Artists are showing off some of the new wordart!

I'm showing off a card made with a wordart I put together myself (shocking, i know!)
I have a *slight* obsession with stars that I've had ever since i was a little girl.
Stars on my ceiling, stars doodled over notebooks, star key chains, stars on my clothes.
Yep, i love stars.

So it's no wonder that this is one of my favorite quotes...There are a few versions of it floating around (the most notable being a slightly varied version quoted by Marilyn Monroe) but this is the one that i have adopted into my motto. :D


Thats also one of my new fav fonts. :D You'll be seeing it alot! So i hope you like it too!


The color scheme of this card is a little out of my norm. But i had this random piece of glitter patterned cardstock (i think it came in a stack) and it twinkled and had stars on it! So i decided to give it a go! The rest of my card is pieces from the scrap bin (though i believe both american crafts). Funny, i was just chatting with a friend about another seeming to become and obsession with polka dots as i'm always drawn to paper with them, and then 2 polka dot patterns appear on my card!

I added some red spica pen to the top of the word twinkle... you can kinda see it below...


Well, since i'm typing this post waaaaaaaay past my bedtime, off to bed i go before i turn into a pumpkin! Be sure to stop by the PMS blog to see more fabulous word art creations!!!

Read more...

My Time Made Easy Trendy Tool Tote and A Special Birthday Hop!

>> Sunday, May 2, 2010

Oh there is so much to share todaaaaaaay!

Today is my special day to share a My Time Made Easy treat with you!
But not only do i have a project for you, but the MTME design team has put together a special little Birthday Blog Hop! Tomorrow is Lauren's birthday and then Stephanie's birthday is the 5th
so we're doing this little hopparoo for them!

So be sure to scroll alllllll the way down!

First, i'll share my Trendy Tool Tote project!

A lot of times I'm making gifts for my super crafty friends, but it's always tricky at what to make or give them that they might actually need! Making a card maker a set of cards is sometimes a little silly when they make them already! So i decided to turn the trendy tool tote into a super cute
ribbon caddy! I mean, all crafters need a fun and snazzy way to hold their ribbons, right?


And filling this up with some new fun ribbons felt like a super fun and useful gift!
Now i will say - if you think this is a fun gift idea and you'd like to make it for a friend, the American Craft ribbon spools fit PERFECTLY! Other ribbons spools fit well too, but are a little more snug. I have a wide variety of ribbon brands in my picture, but the AC fit the best. :D

Ok, now for how i made it! First of all... i did not get to use my beloved Sure Cuts a Lot! Thats because i'm a dummy and left my cord to plug my cricut in at the scrapbook store from when i was helping with a make n take night. DOH! So i made this project PDF old school style!
While it did take me a smidgen longer, it was still SUPER easy to put together!

Ok, so first i took the Trendy Tool Tote template and cut it out using Squash Couture Cardstock as my base and then BowBells (also CC) for my handle.

I printed out the Trendy Tulips pattern digi paper from the Sugar and Spice Pretty Impressions Printables paper collection. Then i cut out the decorative layers and also a mat layer (and since i didnt have my SCAL to do the mat layer for me, it's just eyeballed by adhering the decorative layer on cardstock and then just cutting out a smidgen around it, see totally easy!)

Next i used the Sensational Stems stamp set and stamped out my stem in Old Olive SU ink.
I stamped the largest tulip top in So Saffron SU ink on a separate piece of cardstock (one sheet wonder from couture cardstock, i just love how smooth solid images stamp out on this stuff!), cut it out and adhered it on top of a pop dot for some extra dimension.

Onto, the other side...

I stamped my sentiment from the Sensational Sentiments stamp set onto OSW using razzleberry SU ink. I used the Curved Rectangles spellbinders die to cut out a scrap of Nomad couture cardstock and embossed it using an embossing stylus. I added some copper pearls from Kaisercraft.

OH, i also added the kaisercraft pearls in the largest size to the ends of the handles. You can kinda see it in the first picture. And I wrapped some sheer polka dot ribbon around the whole thing. That about does it for this project, but thats not all!

I have 2 birthday cards to share with you!


I used roughly the same CAS layout for both my cards. Only a slight differen placement of ribbon and sentiment, but i'm sure your eyes are working correctly and you can see that yourself! hahahaha!

First, my card for Lauren...
Lauren's favorite color is purple and she loves tulips so I thought this would be a perfect bday card for her! Now if only I had my butt in gear earlier in the week and wasnt so sick i'd have already mailed it, but alas, sorry lauren, you'll get it a few days late!

Again i used the Sensational Stemps stamp set but this time to create my tulip head, i used the ladybugs wings and the butt of the ladybugs body (just dont ink up the head part, it makes the flower look a little funny). I used Amethyst and Hydrangea ink from CTMH for the tulip head and the Kiwi Kiss from SU for the stem. The sentiment is from the So Sentimental stamp set. My cardstock used on this card is all Couture Cardstock (Fortune Teller, Guinivere and One Sheet Wonder)

Next is Stephanie's birthday card! Her's might actually make it in time!


Now, I have to admit, I dont know Stephanie the way that i know Lauren! We've just "met" but i know i think she's just so sweet and super talented! When trying to think of what Stephanie's favorite colors were, this color combo came to mind. I think i've just seen her use it a few times, but hey, we're gonna run with it! :D

I used the same stamp sets, but this time, i used the ladybug as, *gasp* a ladybug! Since i was stamping on Kraft cardstock, ok, so it isnt kraft cardstock, it's brown paper packaging by couture cardstock, but it's more fun to call it Kraft in this situation! I used a white gel pen to fill in the dots on the wings. I added a little swirlie do from the Fanciful Flourishes stamp set.

So thats what i have for you today! Whew, now i need a nap. It took me longer to type all that than it did to actually make it all!

Now hop on over to Dawn Easton to see her fun birthday creation!
And be sure to go wish Lauren and Stephanie a very happy birthday (even if it's a smidgen early!)


Birthday Hopping Gals...

Read more...

My Time Made Easy - Day of Cards!

>> Saturday, May 1, 2010

Well today the My Time Made Easy May release is live on the site and ready for your orders!

Last month on the first the design team had a card day. Lauren said she had a great response to it so we're doing it again!

Ok, so many of you know that My Time Made Easy has awesome templates to make gift giving SO easy, stylist and NOT expensive! But MTME also has awesome and i mean AWESOME clear stamps! Superb quality! And they match the very cute templates!

But this month.... not only are there cute stamps to match the templates, but there are some awesome sentiments AND background stamps! WOOHOO!
Possibilties are now truly endless with these products!

Here's my card for you today...


I made all my own patterns on the paper! :D it was fun!
I used the Paper Patterned pieces stamp set that only costs 12 bucks!
This stamp set also has a bunch of cute frames (including the one you see on my card).
I stamped the set of 6 circles repeatedly in sorbet (CTMH) ink. I then stamped the small flower inside the circles in creme brule and juniper breeze inks (CTMH). In the center of all the juniper breeze flowers, i added various small sizes pearls by Kaisercraft.

For the red piece, i used the stamp set Puckered Up Patterns that also is only 12 buckaroos.
I actually had fun making some background using this set as i instantly fell in love with the largest stamp in this set, but then ended up liking my other paper more! haha! I didnt even end up using it because i didnt want to cover the other pattern up! So maybe you'll see it on another card soon! :D

Here are some detail shots of the card...


And here's a closeup of the sentiement...

This sentiment is part of a sensationally wonderful new sentiment set released TODAY
called... what else... Sensational Sentiments! And again... this set is 12 bucks!
What a steal!

I did try the card one more way... i'm not sure which way i like better... what do you think?

Not much is changed, i just added some fun ribbon. I just cant leave well enough alone sometimes. hahahahah!

Ok, now be sure to check out the rest of the design team as everyone has some fun cards to share today as well as our NEW TEAM MEMBERS! So check them out!


Photobucket

Lauren Meader - Owner, designer


Dawn Easton


Geny Cassidy


Katie Cotton - that's me


Lesa Rapp


Pam Imholz


Stephanie Kraft


Tracey Cuccia


Mona Pendleton


Read more...
Related Posts with Thumbnails

Listen to makeupartistkaties playlist


Get a playlist! Standalone player Get Ringtones

  © Blogger template Webnolia by Ourblogtemplates.com 2009

Back to TOP